Showing posts with label Capers. Show all posts

Friday, January 2, 2015

A Summer Lunch with a Friend

Today we invited our friend Kim over for a New Year catch up over lunch. It's great to be on holidays and to have the luxury of a leisurely lunch during the week, along with a few glasses of wine and some good conversation. The weather is really warm right now, so I wanted a menu that kept me out of a hot kitchen, and that also took advantage of the beautiful Summer produce around at the moment. I managed to come up with a menu that delivered all that, as well as ensuring I didn't have to turn the stove on inside at all. Win!

I thought I'd set the tone with some lovely bright flowers in my favorite vintage vase to pretty up the dining table a bit. Red and green is also kind of festive, don't you think?

Pretty, Pretty.

On New Year's Day I really felt like cooking a French style terrine (as you do!) so that made up our first course. I love a good terrine, and this one is my version, based on lots that I tasted when I was travelling in France. Every little cafe and restaurant seemed to have their own version (Terrine de Maison) and over the years I've developed my own. It is a mixture of pork and chicken, along with bacon, capers, pistachios, juniper berries and a touch of allspice. It is really delicious and better eaten the day after you make it. I've had a couple of requests for recipe, so I will share it with you at the end of this post. Here is what it looked like on the day I made it.


My Terrine de Maison


I served the terrine today with some crisp lettuce hearts, cornichons and some beautiful Bruny Island plum jelly that I brought back from my last trip to Tasmania. We also enjoyed it with slices of crusty French bread and lashings of fabulous Pepe Saya cultured butter. 


Plated Terrine 
with accompaniments

For the main course, I visited the fishmonger this morning and decided to see what they had that looked good, and I would base a dish around that. I found some super fresh, large local prawns and some really good looking line caught Blue Marlin steaks. I cooked them outside on the BBQ, along with some fresh asparagus and some zucchini flowers. I made a simple sauce with olive oil, lemon juice, cherry balsamic, chilli, capers, parsley, garlic chives and fresh oregano from my garden. I just drizzled the dressing over just before serving. I added some grilled lime on the side and some baby chervil herbs for a bit of freshness.


The Fish Course

The dessert was super simple. I bought 3 perfect white peaches that are now in season and really beautiful and fragrant, I always like creating dishes out of what is in season, and these are great right now. I blanched them in boiling water to remove the skins, chilled them and then served them drizzled with a sweet syrup made from palm sugar - and some fresh coconut cream and lemony tasting baby sorrel leaves. Easy - and a fresh and delicious end to a summer lunch. This is great dessert for people who can't eat dairy products. The coconut cream gives a velvety richness without any dairy at all. I notice that supermarkets are stocking it now, in the chiller section next to the sour cream and other dairy based creams. Have a look for it - it has a lighter, fresher taste than the tinned coconut cream you buy to make curries with.


White Peach
With palm sugar, coconut cream and baby sorrel


We had a lovely few hours eating and chatting and drinking wine and everyone enjoyed the menu I had put together. Apart from the terrine, which was made the day before, it was a very low stress menu for a hot Summer day.

As requested, below is the recipe for my terrine. You can cook it in a traditional ceramic terrine (the rectangular dish that gives the dish its name) or a metal loaf tin, if you don't have a terrine. You will also need something to place on top of the terrine while it is cooking, to compress it. I use a small rectangular ceramic dish that works fine.


Gourmet Goddess Terrine de Maison

500g Pork Mince
500g Chicken Mince
250g Finely Chopped Bacon
15-20 Slices Prosciutto
1 Large Finely Chopped White Onion
2 Cloves Garlic
1/2 Teaspoon Allspice
6 Crushed Juniper Berries
1 Teaspoon Finely Chopped Rosemary (Don't use dried Rosemary for this recipe)
1 Tablespoon Wholegrain Mustard
1 Tablespoon Small Capers 
2 Teaspoons Salt
1 Teaspoon Ground Black Pepper
1 Egg
1 1/2 Cups Breadcrumbs
3 Pinches Cayenne Pepper
1 Tablespoon Butter
1 Tablespoon Olive Oil
Olive Oil Spray

Method:

Preheat the oven to 170C. Cut a piece of baking paper to line the bottom of your terrine dish or tin. Spray the tin with olive oil. 

Carefully line the bottom and side of the tin with a layer of prosciutto. Set aside.

In a pan, heat the tablespoon of butter and olive olive oil. Add the onions and garlic and cook until transparent. Don't have the heat too high - you don't want the onions or garlic to brown. 

In a large mixing bowl, add the cooked onion and all of the other ingredients. Using clean hands, thoroughly mix the ingredients until very, very well combined.

Fill the terrine with the mixture, taking care that it is packed in evenly. When you have finished, add a weight to the top of the terrine. I use a small rectangular ceramic dish to do this. You want the terrine to be compressed during cooking, which results in a nice, even terrine when you go to cut it later. Cover the whole dish with foil.

Cook in the over for 1 hour 20 minutes. When you remove it from the oven, take off the foil and carefully drain any excess cooking juices that you may find at the bottom of the terrine.

Allow the terrine to cool in the dish for about 30 minutes, before turning it out on a plate and putting it in the fridge to chill. You can eat it once it's cold, but I recommend waiting 24 hours, as the flavours develop really nicely given a little bit of time.

Serve with crusty bread, any kind of pickle of fruit jelly and some crisp lettuce leaves. It's also great in crusty rolls for a picnic.

Serves 8 People


*******

Saturday, May 10, 2014

Bookish Delights - Smoked Ocean Trout & Horseradish Tart

I am a member of a Bookclub made up of a group of literary minded mates who decided we would use our love of books and enjoyment of each other's company as an excuse to discover new things to read. It is also a great way to guarantee that we get together every couple of months. We also happen to be avid food lovers and good cooks, so Bookclub has also become a place to share great food. Even if the book turns out to be a dud, you know that the catering is going to be impeccable!

We found that often we were inspired by the books we were reading, cooking food related to the themes or settings. Sometimes, it is easy to come up with something relevant to the subject - other times, it is more of a challenge. Our latest book falls into the latter category. Our current Bookclub book is the magnificent Burial Rites, by Hannah Kent, telling the story of an accused murderess awaiting execution, set in harsh rural Iceland in 1830. The book actually talks quite a lot about the food that they ate back then - preserved whale blubber anyone?

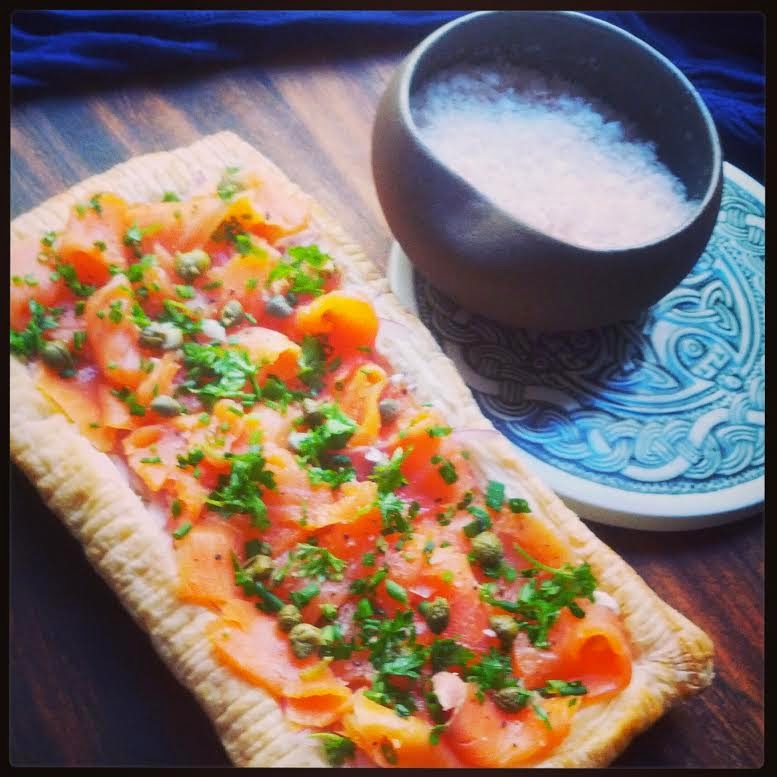
There were also references to eating dried and preserved fish, which gave me the idea of what I would cook for today's Bookclub. Smoking fish is a very old preservation technique, and also happens to be delicious, so I made that the centrepiece of my dish. Even better was the fact that I happened to have some smoked ocean trout in the fridge (which I love having with poached eggs for a special weekend breakfast treat). I created this very simple to put together tart, with fresh herbs fro the garden, a silky cream cheese filling and the gorgeous bite of horseradish. You could use smoked salmon in place of the trout if you preferred.

I'm sure that folks in rural Iceland probably wouldn't be eating something so pretty and delicate looking - but the cheese, fish and herbs take some of the elements of what they would have eaten and make them fresh and modern. Enjoy!


Smoked Ocean Trout & Horseradish Tart


You will need: 1 sheet pre-rolled puff pastry, 100g smoked ocean trout cut into strips, 1 cup cream cheese, 1 tablespoon horseradish cream, 1 tablespoon chopped parsley, 1 tablespoon chopped chives, 2 teaspoons washed and drained capers, 1/2 small red onion sliced very thinly, salt & pepper.

Method: Preheat the oven to 200C.

Cut the pastry sheet in half. Lay one half on a baking tray lined with baking paper. With the other half, cut a border about 2cm thick the whole way around. When you remove the pastry in the middle and you will be left with a rectangular frame shape. Lay the frame on top of the pastry on the tray, press down gently. Use a fork to prick the middle of the pastry only, not the "frame". I gently score the frame with a knife on the edges for presentation - you can do this if you like.

Bake the pastry in the oven for 10-15 minutes or until lightly golden. As it cooks, you will see the middle puff up - don't panic - you will press it down later when you add the topping of the tart. Once the tart is cooked, allow to cool completely before adding the filling.

Mix together the cream cheese, horseradish, half of the parsley, half of the chives and half of the capers. Season generously with salt and pepper.

Gently push down the pastry that has puffed up in the centre of the tart. If it is particularly puffy, you can also gently lift it out completely - it will still leave a layer of crispy pastry on the base.

Spread the cream cheese mixture over the tart base. Layer the finely sliced red onion and then arrange the strips of ocean trout on the top. Sprinkle over the remaining parsley, chives and capers. Add some cracked pepper and a little salt and serve.

Eat this tart cold or at room temperature.

******


Sunday, November 17, 2013

Sunday Night Capers

It's been raining like crazy all day today, so it has been spent cosying up indoors, listening to the rain on the roof and enjoying a luxurious lazy Sunday afternoon. As dinnertime approached, I wanted something tasty robust tasting and comforting - but that didn't require slow cooking or lots of fuss. This dish of pan fried pork cutlet with a zingy and delicious lemon caper sauce fit the bill perfectly, especially when served with some creamy mash and beautiful seasonal asparagus. It was quick to put together, but didn't scrimp on flavour or the comfort food factor.

Andrew reminded me this week that the very first meal I ever cooked him at home was pork cutlets with caper sauce and how much he enjoyed it. I haven't really made it since, which is surprising, as this classic sauce is so simple to do and it tastes delicious. It adds a special element to an otherwise quite simple meal - and you can even make up the butter and freeze it so you have it on hand whenever you feel like it - really worth doing.

This butter based sauce works beautifully with rich meat such as pork, or if you like seafood, salmon steaks or any robust, firm fleshed fish. The acidity and saltiness of the capers, lemon and a touch of anchovy cuts through the richness of the meat, giving a lovely vibrancy to the dish. This is so easy, it barely warrants being called a recipe! Give it a try.


Pan fried pork cutlet
with lemon & caper sauce


You will need:
1-2 pork cutlets per person, 3 tablespoons butter,1 clove finely chopped or crushed garlic, 2 teaspoons finely chopped parsley, 2 teaspoons finely chopped capers (I use the baby ones), 2 anchovies chopped and mashed, 1 teaspoon finely grated lemon rind, 1 teaspoon lemon juice, pinch of cayenne pepper, salt and pepper.

Method:
Combine all ingredients except the pork in a small saucepan. Set aside.

Season the pork. Pan fry or BBQ the pork until cooked as desired. I like it to retain a touch of pinkness in the middle, so it stays succulent. Let the pork rest for 5 minutes.

While the pork is resting, heat the butter in a small saucepan until it melts. Add any of the meat juices from the rested cutlets. Drizzle the butter over the pork just prior to serving (or serve in a small bowl so people can dish up their own sauce)

This dish is delicious with a creamy potato mash and a fresh green vegetable such as asparagus, green beans or broccoli.

*******

Sunday, March 24, 2013

Calamari Mediterranean Style

Sunday night dinner tonight was something so rustic, simple and super tasty that I'm not even going to worry about writing down the proper recipe! Our cooler Autumn weather has receded a little here in Sydney and it was actually quite hot today, so I felt like something that would suit the weather - and the fact that my stove is out of action at the moment. To me, warm weather says seafood and BBQ, so we headed to the fishmonger this afternoon and picked up some lovely whole local calamari.

I cleaned the calamari, removing and reserving the tentacles (my favourite bit!) and keeping them whole. I then scored the calamari down the side - cutting almost to the edge so that they looked like tiger stripes. This creates rings, however not cutting them right through keeps the calamari in one piece, making them easier to handle on the BBQ. I drizzled them with some good quality extra virgin olive oil, plenty of sea salt and pepper and then cooked them on a super hot (smoking actually) BBQ. They took only a couple of minutes to become golden and charred, just the way I like them.


Grilled Calamari Mediterranean Style


I accompanied the calamari with some gorgeous organic cherry tomatoes, capers, finely chopped cucumber and onion, olives, chilli, red capsicum, fresh basil and continental parsley from the garden, a splash of olive oil, a drizzle of balsamic and a little salt and pepper - all of this was tossed together to make a rustic salsa.

Then, it was just a case of piling the salad onto the plate, laying the calamari on the top, drizzling over a little touch of extra olive oil and presto! Sunday night dinner. All of this was done in the time it would take to microwave a TV dinner. I know which option I'd prefer!!

As I mentioned, my oven is not working at present, so I predict lots of BBQ action this week until it is fixed/replaced. I had vague notions of attempting some Easter themed baking -  however this is going to depend on the fate of the oven. I even bought some groovy, rather kitsch Easter cupcake patty-pans to use in my baking dammit! Still, we may be up and cooking up a storm again in a day or two. In the meantime, have a great week everyone. Hope you get to eat something delicious!


*******


Tuesday, January 29, 2013

Simple Summer Seafood

In Summer, I really lean towards dishes that are light, healthy and full of the gorgeous Summer produce - but also ones that don't keep you trapped in a hot kitchen too long. If a dish can be cooked outside on the BBQ, then all the better! Today's dish ticks all those boxes. I put this together after seeing some beautiful Blue Eye Cod at the fishmonger, and wanting to do something lighter and healthier than fried fish and chips.

Blue Eye Cod (also called Blue Eye Trevally) is one of my favorite fish to eat. The firm white flesh has a lovely mild flavour and a beautiful meaty texture that means it won't be likely to fall apart when you are cooking it. Although it can handle marinades and more robust sauces, I like to cook it very simply, so that the fish is not overwhelmed and you don't miss out on that delicious taste.

In today's dish, I teamed some simply cooked Blue Eye Cod with a selection of seasonal grilled vegetables and a light and fresh lemon and caper dressing. The result is a delicious, healthy and good looking dish that you could happily serve at a dinner party or as a delicious mid week dinner. Because it requires very little preparation, it is a perfect choice if you are in a hurry or want something to serve that won't keep you from your guests too long.

You could easily adapt this dish for vegans or vegetarians - leave out the fish, do extra veges (maybe some grilled tofu?) and serve with the lovely lemon and caper dressing. For those who don't like seafood, some free range chicken thighs, seasoned and grilled would work well too.


Grilled Blue Eye Cod
with grilled vegetables and lemon caper dressing

You will need:
1 or 2 pieces fish per person, olive oil for grilling, 2 medium zucchini, 1 medium eggplant, 1 bunch asparagus, about 300g peeled pumpkin, salt.

For the sauce: 1 tablespoon extra virgin olive oil, Juice of 1 lemon, tablespoon chopped continental parsley, 2 teaspoons very finely minced or chopped garlic, 1 tablespoon honey, 1/2 tablespoon baby capers, salt and pepper, 1/4 teaspoon cayenne pepper.

Method:
First, make the sauce by whisking together all of the sauce ingredients well, until they emulsify and thicken slightly.

Slice the zucchini, pumpkin and eggplant into thin 1cm slices. Cut the woody ends off the asparagus. Check the fish for bones - if there are any, pin bone the pieces by using tweezers to carefully remove each one.

Heat a grill pan or BBQ until very hot and cook the vegetables until tender, brushing with a small amount of olive oil and seasoning with a little salt. Once all the veges are cooked, put them aside.

Brush the fish with olive oil and season with salt and pepper. Cook the fish for 2-4 minutes each side, or until cooked (timing on this will depend on the thickness of your fish fillets)

Assemble the vegetables on your serving plate/plates. Add the fish to the top of the vegetables and drizzle with the caper dressing. Serve right away.

******


Thursday, March 8, 2012

Catalan Fish Stew

A note about today's recipe: You will notice that today's entry is not accompanied by the usual photo of the finished dish. I did, in fact take a number of suitably arty shots that were destined for my Gourmet Goddess readers' eyes. However, due to a rather unfortunate incident involving me getting a bit thumb happy with the delete function during the upload process, Andrew and I are the only ones who will ever know how pretty the dish actually looked. And it was so pretty, I promise! Next time I will pay a bit more attention. So, apologies everyone - you will just have to enjoy a groovy poster advertisement for Spanish olive oil that I found instead. I will be more careful next time!

Now, to the dish itself. The inspiration for today's dish comes from Spain - or more specifically, Catalonia. Catalan food is extremely diverse and dishes in different parts of the region will depend entirely on what grows well there. Away from the coastal areas, the focus is more meat such as pork - both fresh and cured meat, wild mushrooms, local vegetables and olive oil. Along the Mediterranean coast, particularly around Barcelona, they celebrate the abundance of fresh seafood. Being a big seafood lover, I thought I would share my version of a delicious Catalan Fish Stew  or "suquet de peix".

The stew has a rich tomato base, enhanced with aromatics such as fennel seed, peppercorns, fresh garlic and thyme - and heaps of succulent seafood. The sauce has extra depth with the addition of saffron and a little almond meal that is stirred in towards the end of the cooking process. Ground almonds or hazelnuts are commonly used in Catalan recipes to thicken sauces and to add another flavour dimension.

This dish is very robust and rustic and would be great served communal style -  in a generous serving bowl, with plenty of fresh crusty bread to mop up the sauce. Feel free to use whatever seafood you prefer - I think clams and scallops would be a nice addition. Using a couple of different varieties of fish would also provide extra flavour and possibly some texture contrast.


Mmmmm.....
Pure Spanish Olive Oil


You will need: (For the Sauce) 1 large red onion diced finely, 4 cloves garlic chopped, 1 cup finely diced celery, 1 cup finely diced red capsicum, 1 fennel bulb (the white part) diced finely, 1/2 cup finely diced carrot, 1 tablespoon olive oil (I used a Spanish one - seemed appropriate), 3 cups tomato passata (or tomato puree), 4 anchovies, 1 bay leaf, 1/2 tablespoon fresh thyme, 1 teaspoon fennel seeds, 1 teaspoon black peppercorns, 1 tablespoon sweet paprika, 2 teaspoons brown sugar, 1 tablespoon almond meal, 1/2 teaspoon saffron threads, 2 teaspoons sherry vinegar, 3 cups fish stock (you could also use vegetable stock if you wanted to), pinch of cayenne pepper,salt and pepper to taste.

(For the seafood) 1 large fish fillet (it should be at least 2cm thick and about 30cm long), 10 black mussels, 10 large prawns in the shell, 1 large squid.

Method: In a mortar and pestle, crush the peppercorns and fennel seeds. Set aside. Put the saffron threads in a small cup of boiling water and allow to infuse while you continue the preparation.

In a deep pan, heat the olive oil and add the ground up fennel and peppercorn mixture. Add the onion, celery, capsicum, fennel,and carrot. Cook for about 10 minutes until the mixture begins to go soft.

Roughly chop the anchovies, and add to the mixture along with the garlic and the bay leaf. Cook for another 5 minutes. Add the passata, paprika, brown sugar, sherry vinegar and cayenne pepper and combine well. Bring the mixture to a gentle simmer.

Add the soaked saffron (including the water) and the fish stock. Allow to simmer gently for around 45 minutes. Season with salt and pepper and adjust if necessary. Stir through the almond meal.

Now prepare your seafood. Remove any bones from the fish with tweezers and cut into chunks. Clean and de-beard the mussels, clean and skin the squid and cut into rings.

Heat a heavy based frypan with a drizzle of olive oil. Cook the fish, prawns and squid in small batches and set aside. Make sure you do not overcook your seafood - each batch will only take a minute or two.

Add the prawns and the mussels to the simmering sauce. Put the lid on and cook for a couple of minutes until the mussels open. Disgard any that don't. Gently stir through the fish and squid. Remove the bay leaf before serving.

Serve in pasta or soup bowls with crusty bread and a sprinkling of fresh continental parsley.

Serves 4 as a main meal or 6 as an entree.

******


Sunday, October 16, 2011

Beautiful Beef

Last weekend we visited the fabulous Feather and Bone Providores to check out their butcher shop, located in a warehouse in the back streets of Rozelle. They specialise in sustainably grown meat with the focus on guaranteeing provenance - that is, knowing exactly where and how the meat is produced. All products are sourced locally, and because they have such close relationships with the producers, they can not only tell you where the meat was raised, what it was fed, the sustainabilty practices of the farm that it came from, but even which paddock it lived in!

Because they deal with small producers, supply often fluctuates, sometimes they will only get small amounts of a product, so they issue a newsletter to customers every week telling them what is in stock for the next 7 days - you can't get more seasonal than that! They supply meat and game, poultry, eggs and a range artisan products such as handmade sausages, pates and terrines. Most of their business is based online and they deliver all over Sydney, but you can also arrange to pick up your order from their butchery in Rozelle. To find out more go to  http://www.featherandbone.com.au/

We came away with some pork and fennel sausages, lovely Wagyu rump steaks, a free range chicken and a large piece of Dexter Beef rump from the mid north coast of New South Wales.

The Dexter breed originates from Ireland and is one of the smallest European breeds of cattle. They produce beautiful quality milk and beef. Once quite rare, some cattle farmers in Australia have started breeding them very sucessfully, especially in New South Wales and Tasmania. I was curious to see what the meat tasted like, as I had heard about how great it was, but had never seen it for sale anywhere until now.

I chose to cook the beef in one piece, over the coals on the BBQ. I just don't think you can beat cooking over coals for flavour. I seasoned the meat well with Murray River pink salt and plently of pepper, and made sure the beef was at room temerature before cooking it. Never cook meat straight from the fridge - the muscle fibres in the meat contract quickly when they hit the heat and the result is tough meat. Second rule of course is to always rest your meat before carving it. I rested the roast for about 20 minutes.


Roasted Dexter Beef


I decided against a traditional roast beef dinner and instead went for something with a bit of a French influence, choosing to serve the Dexter beef roast with a luscious potato galette (my recipe below is based on Julia Child's) and a fresh parsley and caper sauce.


Potato Galette

The beef had a fantastic flavour - quite lean but with a delicious crust on the outside, created by rubbing the thin layer of fat with the salt, and the effect of cooking over the coals.The accompaniments were a perfect addition to an outstanding piece of beef - and a perfect seasonal Spring menu. I will definitely be buying Dexter beef again, for it's wonderful flavour.


Roasted Dexter Beef
With potato galette and parsley and caper Sauce

Cooking the meat was very basic, so I haven't included cooking instructions - however I have included the recipes for both of today's side dishes - they would be lovely with any kind of meat, including poultry or even fish. As Julia would say - Bon Appetit!


Parsley and Caper Sauce

You will need: 1 large bunch continental parsley chopped, 1 clove crushed garlic, 1 tablespoon capers, 2 spring onions sliced finely, 1/4 teaspoon cayenne pepper, 4 anchovies chopped finely, 1 tablespoon white balsamic vinegar, 2 tablespoons warm water, 1 teaspoon sugar, 1/3 cup extra virgin olive oil, salt and pepper to season.

Method: Combine all of the ingredients in a food processor until well blended. Taste for seasoning and add more salt and pepper as needed. Cover with gladwrap until ready to serve. This can be made a few hours ahead and stored in the fridge.

Potato Galette

You will need: About 1 kg washed, peeled whole potatoes, 2 teaspoons fresh rosemary chopped finely, 2 cloves crushed garlic, 1 tablespoon salted butter, 2 tablespoons olive oil, salt and pepper.

Method: Melt the butter and combine in a small bowl with the olive oil, rosemary and garlic. Set aside.

Preheat the oven to 200C.

Slice the potatoes very thinly (a mandolin or slicing attachment of the food processor is great for this)

Place the potatoes in a layer in a springform cake tin, or a round pie tin. Brush with the butter mixture and season with salt and pepper. Continue building up layers until you have used all of the potato.

Cover the dish with foil and bake for 1 hour. Remove the foil and continue to bake for a further 30 minutes, until the top is crispy and golden.

Allow the dish to rest for about 10 minutes before cutting into wedge shaped slices and serving.

******

Friday, March 11, 2011

A Salmon Tale....

I love salmon. The lovely pinkish flesh, the delicious buttery taste and that luxurious texture. One of the best bits of the salmon is the tail - often overlooked in favour of the chunkier parts of the fish, it has a delicate marbling of fat through it that makes it moist and super tasty. It rarely has any bones (occasionaly if you buy a super large sized piece you may find one or two, but this isn't common) and it is easy to cook. Salmon tail is also a great way to enjoy this beautiful fish if you are on a budget - salmon steaks can be quite pricey, but with the tail you are not getting bones and it is not as chunky as the rest of the fish. Win!

Apart from tasting amazing, salmon is also incredibly good for you, crammed with Omega 3 oils, high amounts of protein and chock full of vitimin D. Great for your skin, your hair and the rest of you!

Regular Gourmet Goddess readers will remember the fish cooking technique I learned in Paris last year - placing the fish on a bed of herbs or aromatics, to cook the fish gently and infuse it with heaps of flavour. Well, today's recipe uses that same technique, this time with fennel as the star flavour. I know many people are hesitant to use fennel - but it really works beautifully in this dish, imparting a delicate herbaceous character to the salmon that is just gorgeous.


The salmon before it went into the oven -
nestled cosily on a bed of fennel,onions,red onion,parsley and garlic.


I decided to team the salmon with a salad of watercress and pink grapefruit. The peppery nature of the watercress and the sweet tang of the grapefruit is a lovely contrast to the rich, buttery taste of the salmon. I added a very simple poppyseed vinigarette for the dressing.

With the salmon itself, I made a very simple, throw together with one hand behind your back, caper butter. You could easily add garlic or other herbs to this if you wanted to, but it was a weeknight, I was hungry and it was "cooking night" on SBS, so I wanted something fast and easy so I could get my weekly dose of Adriano Zumbo and Anthony Bourdain!

This whole dish took about half an hour to create, so it makes a great midweek meal or stress free dinner party dish. And here it is, in it's pinky, salmon-ish glory.....


And after....succulent salmon and infused with all those great flavours,
served with caper butter, a watercress and pink grapefruit salad and poppyseed dressing.


You will need:
For the salmon - 1 salmon tail, 1 tablespoon chopped continental parsley, 2 cloves sliced garlic, half a red onion cut into thin slices, the green part of 1 fennel bulb cut into slices, salt and pepper, a splash of olive oil.

For the sauce - 1 heaped tablespoon salted butter, 2 teaspoons roughly chopped capers, salt and pepper.

For the salad - 1 bulb fennel sliced finely (white part only - you will use the green part for the roasting of the fish), 1 pink grapfruit cut into segments with the white pith removed, half a red onion sliced finely, a couple of handfulls of watercress (trim the larger tough stalks off so that you are mostly left with the delicate leaves)

For the salad dressing - 2 tablespoons white balsamic vinegar, 2 tablespoons good quality olive oil, 2 teaspoons poppyseeds, 1 teaspoon sugar, pinch of salt, pinch of cayenne pepper, a little black pepper to taste.


Method:
First, preheat the oven to 220C. Then, line a baking tray with baking paper.
Combine the parsley, garlic, onion and green part of the fennel and place it on the baking tray in a thick layer the size of the salmon tail.

Check that the salmon does not have any bones by feeling the surface of the flesh - it is unlikely that you will come across any in the tail, but if your fishmonger has given you a large peice, you may occasionally find one or two. Use tweezers to remove any that you find.

Rub the salmon all over with olive oil and season with salt and pepper. Lay the fish on top of the fennel mixture. Set aside.

Now make the salad dressing - simply whisk together all of the dressing ingredients until it starts to emulsify (you will know this is happening when it has thickened slightly) Taste for seasoning and adjust if necessary. Set aside.

Place the salmon in the oven and bake for 10-15 minutes, depending on the size of the salmon. Watch how it is going so that you do not overcook it - the flesh should yield slightly when you press on it.

While the salmon is cooking, toss together your salad ingredients and arrange on your serving plate, without the dressing.

Now make the caper butter - just combine all of the ingredients in a warm pan until the butter is melted. Set aside.

When the salmon is cooked, take it out of the oven and allow it to rest for 5 minutes. Lift the salmon off the bed of fennel and place on your serving dish. Spoon the caper butter over the salmon.

Dress the salad and serve with the fish. Delicious.

Serves 2 for a main course or 4 for an entree.


******

Sunday, January 9, 2011

A Summer BBQ. And what I'm planning......

Welcome to the very first Gourmet Goddess recipe of 2011. It was a rather steamy summer Saturday in Sydney yesterday, so I decided that a BBQ dinner was absolutely mandatory. I also wanted something quite light, as well as something a bit different. Summer says seafood for me , so I headed to the fishmonger to check out what looked good. I couldn't go past the baby calamari that he had on display, so that was the inspiration for today's dish. I love the versatility of calamari - and also the fact that it is very inexpensive at this time of the year - so it is good for your health,your tastebuds and your wallet! I decided to go with a slightly Italian vibe with this recipe, serving the calamari with a zingy Summer stuffing flavoured with garlic, lemon, parmesan, capers and plenty of fresh herbs from the garden - mint, basil and continental parsley.

If you are really squeamish about cleaning the calamari, then get the fishmonger to do it for you. But please, please don't be tempted to buy those big pre-cleaned (inevitably frozen) squid tubes from the supermarket. They taste like rubber and are truly awful. Wait until you can get your hand on the real McCoy - tentacles and all!

I served the calamari with a salad of baby spinach, spanish onion, black olives, cucumber and fennel, which I grilled first on the BBQ. I have never done fennel that way, but it was fantastic. Just cut the bulb into slices, brush them with some olive oil, season well and cook for a few minutes each side. Really delicious. For the salad dressing I just added a drizzle of good olive oil and a few drops of pomegranate balsamic.

This week I will be in preparation for a paid catering gig on Saturday - a private 6 course degustation dinner for a 70th birthday. I do the odd paid job from time to time - I really enjoy it and it keeps both my cooking and organisational skills well and truly honed.The menu has been locked in and I'm in the process of putting down my working plan. This is basically a timetable of when everything needs to be done -  from the cooking to the final serving and an inventory of what you will need to do it. When you are juggling multiple tasks, it is an absolute must to have a clear plan, or it can go pear shaped pretty quickly! Even a simple written list can mean the difference between getting all the food on the table at it's best and in the right order - or kitchen chaos.

I find it is always a challenge cooking in someone else's kitchen. Happily the dinner is being held just down the street from me, so quite a bit of the preparation can be done in my own kitchen. This makes things so much easier. I am really looking forward to creating this degustation menu. One of the items is a fruit tart that I haven't made since Paris, and I have been meaning to do it since May last year! A good chance to revisit what I learned at cooking school. I will of course be putting up photos and a full account of the dinner next weekend.

In the meantime, I hope you enjoy this lovely summery calamari dish from the Gourmet Goddess kitchen....


Char-grilled Baby Calamari
with lemon, caper and green herb stuffing


You will need:
For the calamari: 6-8 smallish/medium sized calamari, a splash of olive oil, toothpicks (for securing the ends of the calamari), lemon wedges to serve.
For the suffing: 4 cups fresh breadcrumbs, 1 large finely chopped onion, splash of olive oil, 3 cloves very finely chopped garlic, finely grated rind of 1 lemon, 1 tablespoon baby capers, 2 tablespoons grated parmesan cheese, 1 tablespoon chopped continental parsley, 1/2 tablespoon chopped basil leaves, 1/2 tablespoon chopped mint leaves, 1 tablespoon melted butter, 1 egg, salt and pepper(to taste).

Method:
Heat a splash of olive oil in a pan and cook the onion and the garlic on a medium heat until it softens and starts to look transparent. Set aside.

Combine all of the remaining stuffing ingredients in a bowl. Add the onion and mix well. Your hands are best for this, to ensure that all of the ingredients are well combined. Season generously and set the stuffing aside.

Clean the calamari - you will need to remove the head, outer skin, "wings" and tentacles and ensure that the remaining calamari tubes are super clean and clear of any ink etc.

Cut off the tips if the calamari tubes (about 1/2 cm). This will prevent the calamari from swelling too much during cooking and popping open. It basically gives them an inbuilt air vent!

Using your fingers, stuff the calamari with the filling, pushing it right to the ends. Secure with a toothpick. Wipe the calamari with a damp paper towel to remove any stray stuffing from the outside.

Heat your BBQ/Grill. Brush the calamari with a little olive oil and cook for about 5 minutes each side. Cooking time will vary depending on the size of the calamari. If you happen to have a BBQ with a hood/lid, pop the lid on for the last few minutes of the cooking process.

Let the calamari rest for 5 minutes after cooking.
Slice and serve with salad, crusty bread and an extra squeeze of lemon.

******

Wednesday, May 19, 2010

Comfort food - Italiano!

Is there a person alive who doesn't love a good schnitzel? I think it rates as one of the ultimate comfort foods and the other night I really felt like some comfort, so I decided to do a simple chicken schnitzel. As it turned out, I also had some eggplant in the fridge so what started as a basic schnitzel turned into something else entirely, with a distinctive Italian flavour. I simply prepared the chicken schnitzels as you normally would - well seasoned flour, then some beaten egg and breadcrumbs and in the fridge to firm up for 10 minutes or so before shallow frying the chicken.

While the chicken was chilling, I sliced the eggplant thinly and then cooked the slices in a very lightly oiled pan until it started to colour. I also made a simple tomato based sauce at the same time. Once I had cooked the chicken, I spread on a thin layer of the tomato sauce, topped the chicken with the eggplant, then some more sauce. I then added a mixture of mozzerella and parmesan cheese and baked the chicken in a moderate oven for about 10 minutes or so. Easy.


Chicken Melanzane
with asparagus, baby carrots and white anchovy and caper butter
I had been to the organic market the day before and had bought some lovely baby carrots and asparagus as well as some white anchovies and these formed the basis for a side dish to serve with the chicken. The butter that I used as a dressing for the vegetables would also work really well as a simple sauce for filled pasta, such as tortellini or ravioli. You can also make a batch of the butter and freeze it.

To make the butter, I just finely chopped a handful of capers and 5 or 6 white anchovies. Add this to a couple of tablespoons unsalted butter, along with a pinch of cayenne pepper and a generous amount of black pepper. Mix well and then just toss through the hot vegetables. Delicious.

*****

Friday, March 12, 2010

Something delicious from the sea....

I had a bit of a seafood craving earlier in the week and wanted something hearty, easy to make and full of gorgeous delights from the sea. This dish fits the bill perfectly. It is very rustic and simple and only requires about as much time as it takes to cook some spaghetti. I threw in a few handfulls of fresh rocket at the end, which is delicious when it wilts and absorbs all the flavours of the seafood and the garlicky, lemony goodness. Yum! Use whatever seafood takes your fancy - I went for salmon, mussels, prawns and scallops this time. I have also made versions which included clams, calamari and balmain bug tails. Just visit your fishmonger and see what's good.

This pasta makes a great shared dinner party dish - just do a large bowl of it, add a big mixed leaf salad, some good crusty bread and a few bottles of red and your guests will love you forever. Bear in mind that it is not a dish you can make ahead - it needs to go straight from the stove to the table - but then, it is so fast and easy to do, you will only be away from your guests for a few minutes to throw it all together. Enjoy!

Seafood Pasta with lemon, capers and wilted rocket

You will need: 1 cup raw seafood per person (I used a mixture of prawns, scallops, salmon), 2-4 mussels per person, 1 large chopped red onion, -2 red chillis, finely chopped,1 tablespoon capers (I use the salted baby ones, soaked in water for a few minutes and drained. If you are using the big ones, chop them roughly for use), 1 or 2 cloves finely chopped garlic, a few handfuls of rocket  leaves, grated rind of a lemon, 2 tablespoons lemon juice, a splash of olive oil, a tablespoon salted butter, pepper to taste, 70-80g dry spaghetti or fetucchini per person.

Method: Put your water on to boil for your pasta, making sure you salt the water well.

Now, to the sauce. Heat a splash of olive oil in a pan and sautee the onion, chilli and garlic for about 5 mins. Add the seafood, except for the scallops and mussels. Cook for about 5 minutes. By now your pasta water will be boiling, so add your pasta to cook while you finish the sauce. Give it a stir so that it doesn't stick together.

Add the capers, mussels and scallops to the seafood mixture in the pan. Cover with a lid and allow to cook until the mussels open. Discard any that don't.

When the pasta is cooked, drain and add to the seafood, along with the lemon rind, lemon juice, butter. Taste for seasoning and add salt and pepper if you need to. Serve right away.

*****

Saturday, January 16, 2010

Dinner with friends

Last night I hosted my first dinner at home for 2010 and I decided that I wanted something with big flavours that would be good for sharing around my living room table. Although I do have a small dining room (a converted second bedroom that I figured would get more use as a place to dine) I often serve dinner around my oversized coffee table. It makes for a much more chilled out atmosphere and we can all just lounge around without the formality of a dining room. The menu I put together for my guests was heavily influenced by spanish cuisine, starting with a whole selection of tapas style dishes that were served with warm crusty bread and plenty of wine. I followed this with a big bowl of fresh local mussels, a grilled vegetable salad and the chicken dish I cooked earlier in the week (I told you that it freezes well!) For dessert, I took advantage of the beautiful white peaches that are in season right now, and poached them in a vanilla and orange blossom water syrup. I served them with some double cream and topped them with some Pomona glace oranges.

I tried something new last night - I have seen various kinds of stuffed chillies served as part of a tapas selection and also in mexican and asian menus and I always like the idea of them. I made up my own recipe, which comprised of chorizo, breadcrumbs, garlic,and a touch of passata to moisten the mixture. I whizzed this all in the food processor and then split and de-seeded the chillies and filled them with the mixture. They were then put in a hot oven drizzled with olive oil for about half an hour. They were spectacularly good - smoky and melty and sexy. I swear I could eat a huge plate of them without stopping, they were so moreish. Perfect as a snack with beer but also great as a tapas/antipasto option. My only regret was not making a lot of them! I will be featuring these in many a menu in the future I think.

Here are some pretty pictures of what was on offer at Casa Gourmet Goddess last night.....


Warm mixed marinated olives, Green Sicilian olives, Chorizo stuffed chillies


From left: Grilled haloumi with lemon, Mixed chorizo (chicken and pork),
cheese stuffed peppers, red figs with proscuitto


Paprika crusted squid with aioli


Grilled vegetable salad with pomegranate balsamic dressing


Chicken with capers and olives


Steamed mussels with rich tomato and garlic butter sauce


Poached white peaches with orange blossom water and vanilla syrup


PS: Before I sign off, I have to thank Justin and Marek for treating us to a couple of bottles of my favourite fizz, Veuve Clicquot to kick off the evening in fine style. Thanks boys XX

*****


Saturday, January 9, 2010

By special request....

Here at Gourmet Goddess we are all about satisfying the culinary cravings of those we care about, so this week when my friend and fellow food lover - the lovely Emily - asked me if I had a recpe for a mediterranean style chicken casserole dish, I promised her that I would whip one up on the weekend and post the recipe. This chicken dish I have chosen is very rustic and the flavours are bold, with the addition of fennel, olives and capers. The sauce also contains anchovies. Now, if you hate anchovies, don't go all skittish on me (you are already screwing up your nose, aren't you??) Anchovies add a beautiful piquant quality to the sauce and I promise you that it won't taste even remotely fishy. They really do add something special to the dish, so don't be tempted to leave them out. I really love capers in a whole range of dishes and they really work well with mediterranean flavours. Generally I prefer to use the salted capers - you just need to rinse the salt off them before use. If you can only get the ones in vinegar, that's fine - just drain them well. The smaller capers are much nicer than the really large ones too, so look out for the smaller "baby" capers.

This dish can be made ahead and is actually even more delicious the next day. Perfect for entertaining if you want a "set and forget" meal that will not keep you away from your guests. It is also ideal for freezing, which is what I am doing with the batch I've made tonight. It is gorgeous as a pie filling too. Put the mixture in a dish or in individual ramekins and whack some puff pastry on the top. Cook until the pastry is puffed and golden and presto! Mediterranean chicken pie. This casserole is lovely with polenta, green vegetables such as broad beans or zucchini or with crusty, garlic grilled bread.

So, here you are Em - hope you enjoy this one....


Mediterranean chicken with olives and capers


You will need: 1kg boneless chicken thighs, 2 tablespoons plain flour, 2 tablespoons mild paprika, 1/4 teaspoon cayenne pepper, 2 large onions, 1 small fennel bulb, 4 cloves garlic, 1/2 cup roughly chopped pitted olives (I used a mixture of red and green), 1 tablespoon capers, 1 bay leaf, 4 anchovies finely chopped, olive oil, 1 litre chicken stock, 1 tin crushed tomatoes, 1 tablespoon balsamic vinegar, salt and pepper.

Method: Trim the excess fat from the chicken thighs and if the chicken thighs are all in one large piece when you buy them, cut them in two. Combine the plain flour, cayenne, a generous amount of black pepper and 1 tablespoon of the paprika - coat the chicken well in that mixture. Heat some olive oil in a casserole dish on the stovetop and brown the chicken till golden, a few pieces at a time. Don't overcrowd the pan - you want to brown the chicken at this stage, not stew it. Put the chicken aside.

Slice the onion and fennel (only use the white part of the fennel bulb). Heat a splash of olive oil in the pan and cook the fennel and onion until it starts to soften. Add the bay leaf, garlic, anchovies, olives and capers and combine well. Add the chicken, stock, tomatoes, balsamic and 1 tablespoon paprika. Bring to a simmer and then cover the pan and transfer it to a moderate oven.

Cook for 1 hour with the lid on, stirring a few times during the cooking. After the 1 hour mark, taste for seasoning and add salt and pepper if required. Turn the oven up high and cook the chicken for another 20 minutes so that the sauce reduces furter before serving. Serves 4-6 people.

****


Sunday, August 9, 2009

The Mother of Invention

They say that neccessity is the mother of invention and it is often the case when it comes to creating new dishes. Today's dish came about when friends dropped by one day. I invited them to stay for lunch, only remembering a short time later that I had not done any food shopping for a few days (unusual for me) and that the fridge and pantry were not exactly groaning with a cornucopia of ingredients. In fact it was looking pretty dismal - I had even run out of garlic!

I tried not to panic, took stock of the bits and pieces I did have ( a tin of tuna, tomatoes, olives, parsley and a few other things) and ended up accidentally creating a pasta dish that is now one of my favourites. My guests loved it and my hostess reputation was saved! The beauty of this dish is it's simplicity of preparation and its gorgeous fresh flavour. To top it off, it is healthy and you don't even cook the sauce. Yep, just chop the ingredients and add it to the hot cooked pasta and presto! Lunch. If you are a vegetarian you don't have to miss out - you can omit the tuna and you will still end up with a great dish, just increase the amounts of olives, parsley and tomatoes.

You can use any kind of pasta you like for this dish. The day I accidentally invented this recipe I had spaghetti in the cupboard, so that was what I used. Today I used what is probably my favourite type of pasta - Orecchiette. The literal Italian translation means "little ears", due to thier shape. I love them because whatever sauce you make gets trapped in the "little ears" and you don't end up with most of the sauce on the bottom of the plate - it stays on the pasta where it belongs. I also think they're pretty :)

So here it is, "mother of invention" pasta (serves 4)

Tuna and Olive Orecchiette


You will need: Enough pasta to serve 4 people, 2- 3 ripe tomatoes diced finely, 1/2 red onion diced finely, 1/2 cup chopped continental parsley, 1 finely chopped red chilli, 1 tablespoon chopped black olives, 2 teaspoons chopped capers, 1 tablespoon roughly chopped semi-dried tomatoes, 1 tin chunk style tuna in oil (my preferred brand is Sirena - it has a great flavour and the flesh is dense, which is ideal for a dish like this), 2 teaspoons butter, splash of extra virgin olive oil, salt and pepper, dash of tabasco.

Method: Bring a large pot of well salted water to the boil and add the pasta. Keep an eye on it and give it the odd stir while you make the sauce. You want the pasta to be al dente, not overcooked.

Combine the fresh and semi-dried tomatoes, onion, chilli, parsley, tuna, tabasco, olives and capers.

When the pasta is cooked, drain it and then return it to the pan. Add the butter and toss it through the pasta. Add the tuna mixture, a splash of olive oil, a few pinches of salt and plenty of pepper to season.

Serve with fresh grated parmesan.

*

Sunday, July 26, 2009

Ispirazione Italiana!

My inspiration for the flavours of this rack of lamb is the famous Italian pasta dish, Spaghetti Puttanesca (Whore's spaghetti) which traditionally uses capers, chilli and anchovies. I have used these ingredients as part of a marinade for the lamb, resulting in a salty, slightly spicy taste that goes beautifully with the meat. If you are (god forbid!!) an anchovy hater, don't be put off. The anchovies add a beautiful piquant element to the dish that isn't remotely fishy. It may even convert you to the merits of anchovies in cooking. I personally think that no pasta sauce is complete without a few of those salty lil' fishies, but that's for another day and another recipe :)

To go with the lamb I have chosen Risoni - small, rice shaped pasta flavoured with mushrooms and pumpkin. You will find Risoni in the dry pasta section of most supermarkets. If you have trouble finding it, continental delis or food stores will stock it. It may also be called Risi, or if you happen to be buying it from a Greek food store like I did, it will be called Orzo. Regardless of the name, you will recognise it by its rice shape. It may come in a few different sizes too - choose whatever takes your fancy. Obviously the smaller they are, the quicker they will cook.

Over to you - inizi a cucinare! (that's Italian for start cooking!)
Rack of Lamb
with Pumpkin and Mushroom Risoni


For the lamb......
You will need: 2 x trimmed racks of lamb (4 cutlets on each rack), 1/4 cup olive oil, 1 tablespoon balsamic vinegar, 3 cloves crushed garlic, 3 teaspoons finely chopped capers, 1 teaspoon very finely chopped red chilli (less if you aren't a chilli fan), 3 minced or very finely chopped anchovies, 1 teaspoon fresh thyme, 1/4 teaspoon ground black pepper,a couple of pinches of salt.

For the risoni......
You will need: 300g risoni (orso), 1 large diced brown onion, 2 cloves garlic, 1 tablespoon olive oil, 2 cups cooked pumpkin cut into small cubes (it should be slightly firm and not overcooked), 2 cups thinly sliced button mushrooms, 2 tablespoons dried porcini mushrooms, 1 cup chicken or vegetable stock, 2 tablespoons chopped continental parsley, 1 tablespoon salted butter, 1 tablespoon grated parmesan, salt and pepper to taste.

Method (lamb): Combine all of the ingredients to form a marinade. Place in a bowl with the lamb, mix well, cover and refrigerate for at least an hour. Overnight is even better.

Preheat the oven to 200C. Put the lamb in a baking dish and cook to your liking (20 minutes for rare, 30 minutes for medium) Loosely cover the lamb in foil and allow it to rest for 10mins before carving.

Method (risoni): Soak the porcini in warm water until soft. Reserve 1 tablespoon of the liquid. Drain porcini and set aside. Heat the olive oil in a pan and add the onion and garlic. Cook until the onion starts to turn transparent. Add the button mushrooms and the porcini and sautee for 1 minute. Add the pumpkin, stock and porcini liquid and allow to simmer until the liquid reduces by about half. Set aside.

Cook the risoni in salted boiling water until tender (around 8-10 mins) Drain thoroughly and add to the vegetable mixture along with the butter, parmesan and parsley. Combine well and taste for seasoning. Adjust seasoning as required. Serve with the carved rack of lamb.

Serves 4
*