Showing posts with label Almond. Show all posts

Sunday, March 17, 2013

Berry Nut Tart

I always love entertaining and catching up with friends and this weekend I got to hang out with my good friend Yvette who has been living and working in Cambodia for the last 2 years. As well as being excited to see her after so long, I was also very excited to meet her lovely Cambodian husband Vanda for the first time. It was Yvette and Vanda's first anniversary and they chose to celebrate it by sharing their vows in our back garden, with Andrew and I as witnesses and my celebrant mother in law Kate and father in law Peter in attendance. Celebratory champagne and lunch followed of course!

I decided on a quite simple family style lunch. Yvette had previously commented on the fact that in Cambodia, there isn't the option to indulge her craving for roasted lamb, so I thought this was the obvious choice for lunch. I deboned and butterflied out a leg of Cooma lamb and allowed it to marinate overnight with plenty of garlic, paprika, olive oil, lemon and orange rind, a squeeze of orange juice, rosemary from the garden, sea salt, cayenne pepper and a few crushed up anchovies. I then char grilled the lamb on the BBQ, and served it with crispy golden potatoes, plenty of seasonal vegetables, gravy and a native Pepperberry and Pinot Noir jelly that I brought back from our trip to Tasmania. The Pinot and Pepperberry was a really tasty accompaniment to the grilled lamb as an alternative to mint jelly.

For dessert, I wanted something that I could do ahead. When having lunch or dinner guests, I try to include at least one course that can be made - or at least mostly prepared - the day before. It makes things so much easier. There is nothing worse than feeling rushed and stressed when your guests arrive. I mean, entertaining is supposed to be fun right? My second criteria for the dessert dish was that it also had to be pretty much dairy free. I chose a French style homemade almond tart that showed off the delicious berries that are in season right now. I had a handful of macadamia nuts in the cupboard too, so I used those as part of the topping, for a buttery tasting, golden crunch. Normally I would serve a tart like this with creme anglaise or ice cream, but I chose a dairy free sorbet instead from Cow and Moon, a local artisan gelato shop that make delicious, award winning frozen treats. I chose a blackberry and blueberry sorbet that was lovely and tangy against the sweetness of the tart.


Berry Nut Tart


This tart could easily be adapted for all kinds of other seasonal fruit. I think that peach or nectarine would be lovely in place of the berries - or you could go really classic and use apples or pears. This recipe would also work well as smaller, individual tarts.


Tart served with Blackberry & Blueberry Sorbet
from Cow & Moon artisan gelato @ Enmore


You will need: 150g soft butter (I used salted butter), 120g caster sugar, 2 teaspoon vanilla extract, 1 tablespoon cornflour, 200g almond meal, 3 eggs, 1/2 cup roughly chopped macadamias, 1 punnet fresh blueberries, 1 punnet fresh raspberries, 1 to 1 1/2 sheets sweet shortcrust pastry (the amount will depend on the size of you tart tin)

Method: Preheat the oven to 180C. Grease and line a tart tin with baking paper. I use a metal tart tin with a removable base - I think they give a good result and it is much easier to get the tart out of the tin.

Line the tart tin with the pastry and then place another sheet of baking paper on the top. Fill with baking beads (or if you don't have them, use dry beans or lentils) Blind bake the pastry in the oven for 15 minutes. Remove and allow to cool.

To make the filling, beat together the softened butter, sugar and vanilla until light and fluffy. Add the cornflour and half of the almond meal and beat together thoroughly. Add the eggs one at a time, beating as you go. Finally, add the last of the almond meal and beat until all combined.

Spread about half of the raspberries and blueberries across the empty tart shell. Pour the filling mixture into the tart and spread out evenly. Press the remaining berries into the mixture.

Sprinkle the macadamias over the tart and bake at 180C for around 30-40 minutes, or until lightly golden. Allow to cool for 20 minutes uncovered before slicing and serving. Can be served either warm or cold.

 
******


Saturday, October 20, 2012

Fruity Inspiration

You guys are all aware by now that baking isn't really my bag. I will happily spend 3 days making a master stock, or painstakingly put together a 9 course degustation menu, but setting aside half an hour to make a cake just doesn't do it for me. Well, the Goddess of baking and sweet things must have aligned all the planets of something, because this week I had an idea for a cake recipe buzzing around in my head that just wouldn't go away. I took this as a sign from the universe that I should head to the kitchen and give this cake experiement a bit of a whirl.

I don't eat cake really - but when I do, my sweet thing of choice is lemon syrup polenta cake. I love the texture that the polenta has, and the tang of the lemon. Yum. My recipe idea is a bit of a variation on that type of cake, using fresh lime and lashings of passionfruit. I decided to add some almond meal to the equation, as well as using olive oil instead of butter. The result is a beautifully textured but very moist crumb and a sticky, tangy, fresh tasting syrup.

These cakes are lovely by themselves with a hot cuppa, but I think they would work really well as a do-ahead dessert. I'd serve them slightly warm with some clotted cream, creme anglaise or maybe some marscapone with some fresh lime rind folded into the mixture. You could also use those very small muffin tins and serve them as tiny sweet petit fours after dinner.


Sticky Passionfruit and Lime Polenta Cakes


As this was an experiment, it was all a bit free form. I used the quantities that I hoped would work, based roughly on the proportions I use when making normal muffins - and on the amount of almond meal and polenta I had in the pantry. Once I had that in mind as a starting point, I added some other ingredients and let my instincts take over. I was really happy with the result - the proportions worked a treat and I ended up with the texture I was hoping for. Dealing with the egg whites seperately really helped with this I think. I wasn't going to bother with the egg white thing, but it only took an extra two minutes and was worth it.

These cakes were fast to make and only take about 20 minutes to cook, so they aren't too much of a stretch for someone like me who doesn't usually have the patience or inclination for cake baking. Hell, I whipped up these on a Saturday morning while I stacked the dishwasher and sipped my morning coffee! Very do-able indeed.

You will need:
For the cake - 4 free range eggs, 1/2 cup caster sugar, 1/2 cup almond meal, 1/2 cup fine polenta, 1/2 cup plain flour, 1 teaspoon baking powder, 2 tablespoons olive oil, Juice and rind of 1 fresh lime, Pulp from about 3 passionfruit.

For the syrup - 1 cup caster sugar, Juice and rind of 1 fresh lime, Pulp of 2 passionfruit, 2 tablespoons water.

Method:  First, make the cake. Preheat the oven to 180C. Grease your muffin tins if you are not using silicone tins like I did.

Separate the eggs and put the yolks in one mixing bowl and the whites in another. With an electric beater, whip the egg whites until they form soft peaks. Set aside. (Hint - it is always better to beat egg whites in a metal bowl, or a ceramic one as a second choice. Plastic bowls tend to retain grease and oil, which is the enemy of fluffy egg whites!)

Combine the half cup of caster sugar with the yolks and beat until the mixture is lighter in colour and increases slightly in volume.

To the egg yolk mixture, add the almond meal, polenta, plain flour, baking powder, olive oil, lime juice and rind. With a spatula, combine all of the ingredients.

Now gently fold a third of the egg white into the cake mixture. Put in the rest and fold in until combined. Don't be too heavy handed with the mixture.

Spoon the mixture into the muffin tins, remembering that these cakes do not rise a whole lot, so you can fill them almost to the top.

Bake at 1080C for 15-20 minutes. The cakes are cooked when they are slightly brown and the mixture springs bak a little when you touch the top of them.

While the cakes are cooking, put together the syrup - just combine all of the syrup ingredients in a small saucepan and simmer gently for a few minutes until the sugar is dissolved completely and the syrup thickens slightly.

When you remove the cakes from the oven, spoon over about half of the syrup while they are still warm. When you are finished, run a knife around the edges so that they don't stick to the pan. Spoon over the remaining syrup and allow the cakes to soak up the mixture.

Serve warm or cold with cream, marscapone or icecream. Or scoff them without the extras.

Makes 10-12 small cakes

******


Thursday, June 14, 2012

Baking Bliss

This week has been rather exciting in the Gourmet Goddess kitchen, as we took delivery of a new fan forced oven to replace the evil, contankerous old beast that I have been cooking with since we moved into our house almost two years ago. I have to admit I was pretty happy to see the demise of the old one, which had a penchant for cremating the bottom of whatever you put in it, whilst leaving the top of everything unpalatably raw. I don't really bake much at the best of times, but the crappy oven really didn't make me want to change that situation!

Well, I am very happy to report that the new oven is a whole other world - one where things cook as they are meant to and your pastry ends up golden and puffed (and cooked evenly!) just like it should. Hell, I may even be tempted to bake a cake - or Goddess forbid - a meringue! Watch this space.

So, my first oven baking experiment was a couple of simple apple, almond and nashi pear tarts. The golden tarts are given a lovely sweetness and glossy finish by an easy maple syrup glaze.

You could actually use any kind of fruit for these - apricots, peaches or nectarines when in season would be gorgeous - cherries, berries or quinces would work a treat too. I used apples and nashi pears because they happened to be in the fruit bowl at the time. Whatever fruit you decide to use,  the result is a delicious, easy to make tart that looks lovely too. This style of tart reminded me a lot of the apple galettes that you would always see in the patisseries around Paris. I confess I enjoyed a slice of mine with a nice big milky Cafe au Lait, and a generous serve of nostaligia -  imagining I was back, sitting in a cafe in St Germain on my honeymoon watching the world go by. Food is always so evocative of past memories and this one really did that for me.

Maple Glazed Apple and Nashi Pear Tarts


You will need: 2 sheets ready rolled puff pastry, 2-3 apples or nashi pears (I used some of both), 1 1/2 cups almond meal, 1 teaspoon vanilla extract, 2 tablespoons brown sugar, 2 tablespoons warm water, 30g melted salted butter, 1/3 cup maple syrup, 1 beaten egg.

Method: Preheat the oven to 200C.

Peel and core the apples/nashi pears, cut them in half and slice them thinly. In a bowl, combine the almond meal, vanilla, brown sugar, melted butter and warm water. Mix well to make an easily spreadable paste. Add a little more warm water if the mixture is a little too firm.

Take the two sheets of pastry and cut them in half, lengthways. You should now have four lengths of pastry of equal size. Take two of the pastry sheets and cut a border into them, about 2 cm wide, removing the pastry in the middle. You will be left with two "frames"made of pastry.

Brush the other two peices of whole pastry with a little of the egg. Carefully lay one of the "frames" onto each of the pastry peices. Press the edges down gently. Now evenly spread half of the almond mixture onto each of the tarts, smoothing it up to the edge of the border you have created.

Take the sliced apple/nashi pears and carefully arrange the slices, so that they slightly overlap, until you have covered the tarts. Brush the edges of the pastry with a little bit of the egg wash.

Bake the tarts for 15-20 minutes until they are lightly golden. Remove them from the oven and using half of the mixture, brush the top of the tarts with the maple syrup. Return to the oven for another 5-10 minutes until they turn a deeper golden colour.

Remove the tarts from the oven, and while they are still warm, brush the remaining maple syrup over them.
Serve warm or cold. Makes two medium sized tarts.

******

Sunday, June 10, 2012

Winter Sunshine

As most of you would be aware, each week the Gourmet Goddess kitchen receives a delivery of local, organic and chemical free produce from the fabulous folks at Food Connect in Sydney. One of the great things about this, apart from the first rate, ethical produce - is that they often include seasonal vegetables or fruit that are not terribly common on most dinner tables. This was one of those weeks. Amongst the cornucopia of seasonal produce was a stash of freshly dug Jerusalem artichokes - dirt still attached. At first glance I thought they were ginger roots, but I was thrilled when I realised that they were in fact the first Jerusalem artichoke crop of the winter.

Native to the eastern part of North America, also called sunroot or earth apple, the Jerusalem artichoke is in fact not an artichoke at all. It is actually a tuber vegetable related to the sunflower and does not resemble the well known green globe artichokes in any way, either in looks or in taste. So if you started reading this post and immediately thought - "Ick. I hate artichokes" - don't despair. These are artichokes in name only. Just to confuse things, they also have absolutely nothing to do with Jerusalem. So the name is not only 100% misleading, it is also geographically incorrect. On top of the identity crisis, they are also - let's be frank here -pretty damned ugly looking. Now that we have that out of the way, let's talk flavour. Nutty, slightly creamy and delicious, these gorgeous winter vegetables taste great roasted', fried into crispy chips or pureed with potatoes for a beautiful tasting mash. Because they are in season at the moment, now really is the time to enjoy them at their best.


Jerusalem Artichokes
- not an artichoke and not from Jerusalem.
Go figure.

Today, I decided to team them with fresh seasonal cauliflower and create a creamy winter soup. These flavours work in perfect harmony and make a change from the usual repertoire of winter soups. This soup is not only great served in a rustic style with a hunk of freshly baked bread, it is also perfect all dressed up, as part of a dinner party or degustation menu.

Cauliflower and Jerusalem Artichoke Soup


So, give these mis-named, not so pretty winter vegetables a try. They are absolutely delicious - however you choose to cook them -  and will become part of many a winter menu once you discover their inner beauty. It's cold outside - let this relative of the sunflower bring some winter sunshine in!

You will need: 2 large brown onions, 2 large peeled potatoes, 1/2 cauliflower, about 400g jerusalem artichokes, 3 cloves garlic, 6 cups chicken or vegetable stock, 1/2 cup milk (if you want something really sumptuous, use cream), 1 apple, 1/2 cup flaked almonds, 1 tablespoon olive oil, salt, pepper, pinch of cayenne pepper, parsley or chives and a drizzle of fruity olive oil to serve.

Method: Scrub the artichokes to clean any dirt off them - you do not need to peel them. Cut the cauliflower into florets. Roughly chop the onion, potato and artichokes into generous chunks. Roughly chop the garlic.

Heat the olive oil in a pot and add the onion. Cook it gently for about 5 minutes until it starts to soften. Add the garlic and the artichokes and cook for another 5 minutes or so. Add the potato and the cauliflower, season generously with salt and pepper, add the pinch of cayenne and allow to cook for another 5 minutes.

Add the chicken stock. Bring the mixture to the boil and allow to simmer for about 30 minutes, until the vegetables are very soft. Remove from the heat and blend the mixture until smooth with a hand blender or food processor. Add the milk (or cream) and taste for seasoning. Add salt and pepper as required.

When you are ready to serve, spoon the soup into bowls and top with a little of the parsley or chives. Drizzle with olive oil and serve with crusty bread.

Serves 4-6 people

******

Thursday, March 8, 2012

Catalan Fish Stew

A note about today's recipe: You will notice that today's entry is not accompanied by the usual photo of the finished dish. I did, in fact take a number of suitably arty shots that were destined for my Gourmet Goddess readers' eyes. However, due to a rather unfortunate incident involving me getting a bit thumb happy with the delete function during the upload process, Andrew and I are the only ones who will ever know how pretty the dish actually looked. And it was so pretty, I promise! Next time I will pay a bit more attention. So, apologies everyone - you will just have to enjoy a groovy poster advertisement for Spanish olive oil that I found instead. I will be more careful next time!

Now, to the dish itself. The inspiration for today's dish comes from Spain - or more specifically, Catalonia. Catalan food is extremely diverse and dishes in different parts of the region will depend entirely on what grows well there. Away from the coastal areas, the focus is more meat such as pork - both fresh and cured meat, wild mushrooms, local vegetables and olive oil. Along the Mediterranean coast, particularly around Barcelona, they celebrate the abundance of fresh seafood. Being a big seafood lover, I thought I would share my version of a delicious Catalan Fish Stew  or "suquet de peix".

The stew has a rich tomato base, enhanced with aromatics such as fennel seed, peppercorns, fresh garlic and thyme - and heaps of succulent seafood. The sauce has extra depth with the addition of saffron and a little almond meal that is stirred in towards the end of the cooking process. Ground almonds or hazelnuts are commonly used in Catalan recipes to thicken sauces and to add another flavour dimension.

This dish is very robust and rustic and would be great served communal style -  in a generous serving bowl, with plenty of fresh crusty bread to mop up the sauce. Feel free to use whatever seafood you prefer - I think clams and scallops would be a nice addition. Using a couple of different varieties of fish would also provide extra flavour and possibly some texture contrast.


Mmmmm.....
Pure Spanish Olive Oil


You will need: (For the Sauce) 1 large red onion diced finely, 4 cloves garlic chopped, 1 cup finely diced celery, 1 cup finely diced red capsicum, 1 fennel bulb (the white part) diced finely, 1/2 cup finely diced carrot, 1 tablespoon olive oil (I used a Spanish one - seemed appropriate), 3 cups tomato passata (or tomato puree), 4 anchovies, 1 bay leaf, 1/2 tablespoon fresh thyme, 1 teaspoon fennel seeds, 1 teaspoon black peppercorns, 1 tablespoon sweet paprika, 2 teaspoons brown sugar, 1 tablespoon almond meal, 1/2 teaspoon saffron threads, 2 teaspoons sherry vinegar, 3 cups fish stock (you could also use vegetable stock if you wanted to), pinch of cayenne pepper,salt and pepper to taste.

(For the seafood) 1 large fish fillet (it should be at least 2cm thick and about 30cm long), 10 black mussels, 10 large prawns in the shell, 1 large squid.

Method: In a mortar and pestle, crush the peppercorns and fennel seeds. Set aside. Put the saffron threads in a small cup of boiling water and allow to infuse while you continue the preparation.

In a deep pan, heat the olive oil and add the ground up fennel and peppercorn mixture. Add the onion, celery, capsicum, fennel,and carrot. Cook for about 10 minutes until the mixture begins to go soft.

Roughly chop the anchovies, and add to the mixture along with the garlic and the bay leaf. Cook for another 5 minutes. Add the passata, paprika, brown sugar, sherry vinegar and cayenne pepper and combine well. Bring the mixture to a gentle simmer.

Add the soaked saffron (including the water) and the fish stock. Allow to simmer gently for around 45 minutes. Season with salt and pepper and adjust if necessary. Stir through the almond meal.

Now prepare your seafood. Remove any bones from the fish with tweezers and cut into chunks. Clean and de-beard the mussels, clean and skin the squid and cut into rings.

Heat a heavy based frypan with a drizzle of olive oil. Cook the fish, prawns and squid in small batches and set aside. Make sure you do not overcook your seafood - each batch will only take a minute or two.

Add the prawns and the mussels to the simmering sauce. Put the lid on and cook for a couple of minutes until the mussels open. Disgard any that don't. Gently stir through the fish and squid. Remove the bay leaf before serving.

Serve in pasta or soup bowls with crusty bread and a sprinkling of fresh continental parsley.

Serves 4 as a main meal or 6 as an entree.

******


Wednesday, November 2, 2011

Salted Almond and Pistachio Caramel

I have just returned from a fanatstic week in South Australia - actually a work trip, but I decided to take a bit on annual leave at the end of the official work duties to explore the city and spend a few days in the famous wine region, the Barossa Valley. I am preparing a full report for you - I discovered some fabulous food and beautiful local produce -  and I will be posting my South Australia report with pics later in the week.

In the meantime, I thought I would share something that I made a couple of weeks ago. I decided to channel my inner Willy Wonka and have a go at making confectionary - something I haven't tried since I destroyed one of my mother's best cooking pots making honeycomb when I was a kid. Disastrous. Burnt, rock hard sugar that was impossible to remove. I actually dug a hole in the backyard when my mother was at work and buried the pot to avoid getting into serious trouble. You can understand why I haven't attempted to make confectionary again since then!

Anyway, as it turns out, today's recipe is really easy, but does require your total attention as the sugar will turn to caramel quite quickly and needs to be monitored all the way to avoid it burning - burnt sugar = yuk!! I love salted caramel, and this delicious brittle uses those flavours, along with the crunch of almonds and the delicious taste of pistachios to make a tasty sweet treat.


Some hints before you start: The sugar syrup you will be making is very, very hot and can do some serious damage if you burn yourself with it. Also, being hot sugar, it sticks to things. Be very careful and do not leave the pot unattended at any stage. Also, do not use metal or plastic utensils during the process - wood is the only option. Plastic will melt and metal will get too hot in your hand. And don't be tempted to dip your finger in for a taste before it is on the tray and cooled - otherwise, ouch!


Freshly poured and waiting to set

After you have finished the cooking, the pot may end up with hard caramel on the sides and this can be a pain in the butt to clean the conventional way. Make it easy by filling the pot with water and letting it boil. The caramel will just melt off and this will save you time and hassle.


Salted Almond & Pistachio Caramel
Simply crack - and eat


You will need: 5 cups white sugar, 2 cups water, 100g butter, 1 cup whole blanched roasted almonds, 1 cup shelled, unsalted pistachios, 1/2 teaspoon quality salt (Murray River Pink Salt or Maldon are both good)

Method: Line a large metal tray with baking paper.

In a heavy bottomed pot place the sugar and water and bring it to the boil, stirring occasionally. Allow the mixture to continue to simmer until the water evaporates (about 15 minutes) The sugar will seem like it has become a dry mess at this stage but stay with it, stirring frequently.

The sugar will begin to turm a golden caramel brown and all of the granules of sugar will eventually dissolve. Once this has happened, remove the caramel from the heat. Add the butter and the salt and mix it through for a minute of so, until is is totally combined.

Now stir through the almonds and pistachios. Pour the mixture onto the papered baking tray and spread the mixture quickly, so it is in one thin, even layer that goes right to the edge.

Allow the caramel to cool. Snap into pieces to serve and store in an airtight jar or container. Try to stop at one piece!

To make praline - after you have broken the caramel into pieces, whizz them in the food processor until they are the texture of breadcrumbs. Use this praline for topping cakes, folded through icecream or as a component in other desserts.

******

Friday, October 7, 2011

Blueberry & Almond Muffins

Every time I see blueberries, my thoughts immediately turn to one of my favourite childhood stories - Charlie and the Chocolate Factory. I remember being delighted and very amused as the horrible gum chewing Violet Beauregarde swelled up and turned into a big round blueberry after ignoring Willy Wonka's pleas to not eat his experimental candy! As a bit of a nod to Willy Wonka, I have chosen candy striped wrappers for today's recipe - delicious blueberry and almond muffins.

These blueberry muffins are not overly sweet, and the addition of lemon rind and almond meal gives them a lovely aroma and texture - not to mention a delicious, slightly nutty taste. Although my recipe below says to use a punnet of blueberries, this is only a guide - I actually used more than that, as I wanted the muffins to be more packed with fruit. But use as many as you feel like. The slivered almonds on the top make a lovely crunchy texture, in contast with the soft, moist centres of the muffins.

This recipe is very easy to make - kids could easily put them together. The muffins only take 25 minutes to cook - more than enough time to tell them the cautionary tale of Violet Beauregarde!


Almond and Blueberry Muffins


You will need: 220g self raising flour, 1/2 cup caster sugar, 2 tablespoons almond meal, 3/4 cup milk, 3/4 cup vegetable oil, 1 freerange egg, grated rind of 1/2 a lemon, 1 punnet fresh blueberries, 1 tablespoon flaked almonds.
Method: Preheat the oven to 220C.

In a large mixing bowl, combine the flour, sugar, almond meal and lemon rind.

In another bowl, whisk together the milk, vegetable oil and egg.

Make a well in the centre of the bowl with the dry ingredients and pour in the wet ingredients. Add the blueberries and gently combine, using a spatula. The idea is not to overmix - use a light touch and only mix enough to just combine the ingredients.

Spoon the mixture into a greased muffin pan or patty pans. Sprinkle a few of the flaked almonds over the top of each muffin and bake in the oven for about 25 minutes, or until the muffins are golden.

******

Monday, August 22, 2011

Happy Birthday - A Celebration Menu

On the weekend we headed up to the Central Coast to visit my inlaws Kate and Peter, who happen to both have birthdays in August. After thinking of and subsequently discarding numerous completely underwhelming birthday gift ideas, I decided that I would treat them to a nice birthday dinner instead. I decided on a classic menu, based around seasonal ingredients - starting with an amuse bouche of vivid green fresh pea soup - given a luxurious touch with the addition of black truffle, brought back from our honeymoon in France.


Amuse Bouche
Fresh pea soup with black truffle


My original plan was a fish entree, however on visiting the fishmonger I could not resist the lure of gorgeous W.A lobster tails, so I built the entree around them, combining them with a crisp potato rosti, creamy horseradish and lashings of delicious salmon roe. The lobster was tossed in a touch of sea salt, paprika and pepper - then lightly sauteed in french butter (a recent purchase from the Sydney Good Food and Wine Show)


Entree
Pan fried lobster tail with potato rosti,
horseradish creme fraiche and salmon roe


The main course used lovely plump Game Farm duck breasts, rubbed with L'herbes de province, and pan fried to crisp the skin, followed by a brief stint in the oven, then rested and carved. I served the duck with sugar snap peas, maple roasted Dutch carrots and delicious caramelised eschallots. A duck jus accompanied the dish. An old fashioned favourite, but a lovely end of winter dish.


Main Course
Roasted Duck breast with winter vegetables,
caramelised eschallots and duck jus


I decided against a super heavy dessert, given the richness of the lobster and the duck. A handmade coffee icecream completed the meal, served with a delicious almond praline. Icecream and praline are both great options for a dinner party - you can make them a day or two ahead and they lend themselves to all sorts of presentation ideas. You can serve the icecream in slices, or as a base for posh icecream sandwiches, or go for sundaes or cones. I served our icecream and praline in lovely little paper patisserie cups I found in a homewares store last weekend, keeping it simple.


Dessert
Handmade coffee icecream with almond praline


The birthday dinner was a great success (I have decided to make it a yearly event) and Kate and Peter enjoyed having their dining room turned in to a restaurant for the night. Andrew provided his services as Sous Chef, waiter and dishwasher, which made everything go very smoothly, so I could just concentrate on the food. Special mention should also be made of the beautiful French champagne and wine that we enjoyed, courtesy of Peter's fabulous (and seemingly bottomless!) cellar.

One of the greatest joys of cooking for me is creating dishes for the people I care about, and Saturday night was no exception. I'm so glad that we ditched the dodgy birthday gift ideas and went with something personal and more meaningful. Happy Birthday Kate and Peter! Now.... to start musing on what to cook for you next year...........


******

Thursday, March 25, 2010

A lovely fig tart for Autumn....

You will remember that I purchased half a dozen lovely organic red figs at the Addison Road market on the weekend, so I decided to use those as the centerpiece for a quick and easy tart. I had to bake something for a work morning tea and I wanted something I could throw together easily - This tart fits the bill perfectly.

I am also in the process of trying to use up various bits and pieces in the freezer and pantry - something I do each season. It is always good to have a good pantry clear out at  least a few times a year and it is a good excuse to create ways to use up bits and pieces that you might have leftover from other culinary ventures.

I discovered I had some almond meal (just a handful), some hazelnuts and some walnuts so I ground them all together and used those on the base of the tart. Other random leftover ingredients were a couple of sheets of puff pastry in the freezer and some maple syrup in the cupboard. These also helped to create this dish. This tart is of the rustic, freeform variety - I didn't fuss around with it or attempt to make it particulary perfect or pretty. You can if you want to. You could also do individual ones. This tart can be served warm or cold and would be nice with a little double cream as a dessert. This is a great way to enjoy the beautiful new season's figs that have started to appear in the greengrocer, welcoming in Autumn.

Walnut, almond & hazelnut tart with organic red figs.

You will need: 1 sheet pre packaged puff pastry, 6 figs sliced, 1 cup maple syrup, 3 tablespoons butter, 1/2 cup each of ground hazelnuts and walnuts, 2 tablespoons almond meal, 1 teaspoon vanilla extract, 2 Tablespoons caster sugar, 1/4 teaspoon grated nutmeg, 1 egg lightly beaten.

Method: Preheat the oven to about 220C.

Melt the butter and combine well with the nuts, vanilla, sugar and nutmeg.

Lay the pastry sheet on a baking tray (I use baking paper on the tray - no washing up!) and spread the nut mixture over the pastry, leaving about 2cm free around the edges of the pastry.

Lay the sliced figs over the nut mixture. Fold up the edges of the pastry and pinch around the edges so that it sticks together and stays put. Bake the tart until golden.

When you remove it from the oven, brush with the maple syrup when it is still warm.

*****

Sunday, August 2, 2009

Mouthwatering Morocco

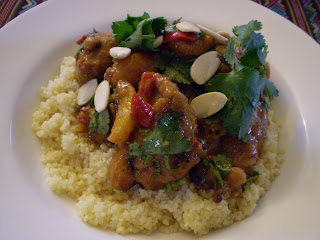
You might remember back in June I showed you how to make Moroccan Preserved Lemons. Well, I checked them this morning and they are ready to be used, so today's recipe includes this unique ingredient. I really enjoy Moroccan food for it's aromatic character, beautiful flavours and balanced use of sweetness and sourness. Today's dish has all of these things. It uses roasted spices, dried apricots, chilli and of course the lemony punch of the preserved lemons, to make a Chicken Tagine that can be a midweek dinner or a centerpiece for a full Moroccan style feast.
A Tagine gets its name from the conical earthenware pots used through North Africa to braise meat, grains and vegetables. The principle is that the meal is cooked slowly, and the moisture that collects in the lid runs back into the dish. This results in very tender meat and no loss of precious flavour. More recently, a Tagine has come to mean the dish itself - braised or stewed meat, vegetables and grains that may or may not actually be cooked in a Tagine. I just used a standard heavy based pot to cook my Tagine today.

Although my recipe includes chicken, you can easily adapt this to suit you. You can omit the meat altogether and add more vegetables (carrot, zucchini, eggplant for example) or you could use lamb or goat meat in place of the chicken. If you use lamb or goat, I would double the quoted cooking time. If you use vegetables alone, halve the cooking time. Also feel free to ramp up the chilli content if you like things spicy. I used both fresh chilli and Harissa (Moroccan chilli paste) in my dish. If you cannot buy Harissa where you are, substitute minced chilli or sambal olek. The flavour is different but it still works well. Serve the Tagine with couscous and warm flatbread to soak up all the delicious gravy. My recipe serves 4-6 and freezes extremely well if you want to save some for later.

A note about the preserved lemon - to prepare the presrved lemon, you need to remove all of the pulp and disgard it. You will only use the skin. With a sharp knife, cut off the pith close to the skin. Disgard this also. Wash the lemon skin well - it will be very salty. Then chop the lemon finely. Now it is ready to use.

Chicken Tagine


You will need: 1kg skinless chicken thighs cut into large chunks, 2 diced red onions, 1 diced red pepper, 3 cloves finely chopped garlic, 1/2 cup diced pumpkin, 1 tablespoon pitted black olives, 1 can chickpeas rinsed and drained, 1 large sliced red chilli, 2 teaspoons finely chopped preserved lemon, 300g halved dried apricots, olive oil, 1/2 cup plain flour, 1 tablespoon sweet paprika, 1-2 teaspoons Harissa (or minced chilli), 2 teaspoons honey, 1/2 teaspoon white peppercorns, 1/2 teaspoon black peppercorns, 1 teaspoon corainder seeds, 6 cloves, 1 stick cinnamon, 1 litre chicken stock (or vegetable stock), 1/2 cup toasted skinless almonds, 1 bunch fresh coriander roughly chopped, 1 tablespoon finely chopped mint.

Method: First, toast your spices. In a dry pan combine the cloves, coriander seeds and peppercorns and toast them gently until they start to release their fragrance. When they are done, crush them in a mortar and pestle or spice grinder. Next, splash some olive oil into a heavy based pot and cook the red onion, peppers, garlic and pumpkin until the onion starts to brown a little. Add the spice mixture, along with the olives, fresh chilli, cinnamon stick, preserved lemon, and Harissa. Cook for another minute or two. Remove from the heat and set aside.

In a plastic bag, combine the flour and paprika. Add the chicken and coat the pieces well in the flour mixture. Heat a frypan and add a generous splash of olive oil. Cook the chicken in batches until slightly golden on both sides.

Add the chicken, apricots,honey, chickpeas and stock to the spice/onion mixture. Combine and bring to the boil. Simmer gently uncovered (stirring occasionally) for about an hour. When ready to serve, taste for seasoning and stir through the fresh coriander and mint. Top with the toasted almonds.

*

Sunday, July 19, 2009

Cheeky Tart!!!

"The Queen of Hearts she made some tarts all on a summer's day;
The Knave of Hearts he stole the tarts and took them clean away"

Ok, so I'm not the Queen of Hearts and it isn't a summer's day (in fact it's bloody freezing!) but I have been baking tarts today. I headed into the kitchen this morning to make something to take to work for lunch this week and whilst I was waiting for that to cook, I decided to bake some tarts to use up some spare puff pastry that was taking up space in my freezer. I really didn't fancy the thought of leaving the house to go food shopping, so I hunted around in the pantry for inspiration, determined that there must be some kind of filling I had ingredients for. Well, turns out that I found a little more inspiration than I bargained for, and the result was six different kinds of tarts (although they all start with the same basic beginnings)

I was going for a rustic, free form style with these tarts - no pie tins or cutting out baking paper or blind baking or any of that kind of carry on! I love that every one is different and that they aren't perfect. You could eat them like a pastry with a cup of tea, or serve them as a dessert, warm with a dusting of icing sugar and some cream or a good quality icecream.

My six fillings were: almond and walnut , strawberry, fig, orange, apple and mixed berries. All I did was to place the various ingredients on the top of the tarts. None of the toppings were pre cooked. The figs and oranges are the glace kind (these came from the wonderful Pomona Fruits - best glace fruit ever! http://www.pomonafruits.com.au/ ) The apple and the strawberries were just sliced thinly raw, and the berries were just a handful of the frozen kind I had in the freezer. I sprinkled a little bit of castor sugar on the berries and the strawberries before putting them in the oven and when the tarts were cooked I brushed them all with maple syrup when they were still warm to give them a glaze.

I have given the basic tart recipe below, but go with any topping you fancy - I came up with six just based on what I had in the pantry today - the possibilities are endless. The filling is a simple almond based one that isn't overly sweet.

And here is today's tart selection - my recipe makes 16 tarts


You will need: 4 sheets puff pastry, 200g almond meal, 1 egg, 1/2 cup cater sugar, 100g butter, 1/3 cup maple syrup and whatever topping/s you have chosen.

Method: Melt the butter and combine with the almond meal, sugar and the egg. Set this aside. Cut the pastry into 4 rounds for each sheet (this will make 16 tarts) I used a small upturned rice bowl as a cutting guide.

Spoon the almond mixture onto the pastry and spread it out so it almost comes to the edge. Add your chosen topping. Fold/pinch the edges of the tarts the whole way around. Chill the tarts in the fridge for 15mins.

Bake in a moderate oven for 15-20 mins or until puffed and golden brown. When you take them out of the oven, brush them with maple syrup to form a light glaze.

*