Showing posts with label Budget. Show all posts

Saturday, May 10, 2014

Bookish Delights - Smoked Ocean Trout & Horseradish Tart

I am a member of a Bookclub made up of a group of literary minded mates who decided we would use our love of books and enjoyment of each other's company as an excuse to discover new things to read. It is also a great way to guarantee that we get together every couple of months. We also happen to be avid food lovers and good cooks, so Bookclub has also become a place to share great food. Even if the book turns out to be a dud, you know that the catering is going to be impeccable!

We found that often we were inspired by the books we were reading, cooking food related to the themes or settings. Sometimes, it is easy to come up with something relevant to the subject - other times, it is more of a challenge. Our latest book falls into the latter category. Our current Bookclub book is the magnificent Burial Rites, by Hannah Kent, telling the story of an accused murderess awaiting execution, set in harsh rural Iceland in 1830. The book actually talks quite a lot about the food that they ate back then - preserved whale blubber anyone?

There were also references to eating dried and preserved fish, which gave me the idea of what I would cook for today's Bookclub. Smoking fish is a very old preservation technique, and also happens to be delicious, so I made that the centrepiece of my dish. Even better was the fact that I happened to have some smoked ocean trout in the fridge (which I love having with poached eggs for a special weekend breakfast treat). I created this very simple to put together tart, with fresh herbs fro the garden, a silky cream cheese filling and the gorgeous bite of horseradish. You could use smoked salmon in place of the trout if you preferred.

I'm sure that folks in rural Iceland probably wouldn't be eating something so pretty and delicate looking - but the cheese, fish and herbs take some of the elements of what they would have eaten and make them fresh and modern. Enjoy!
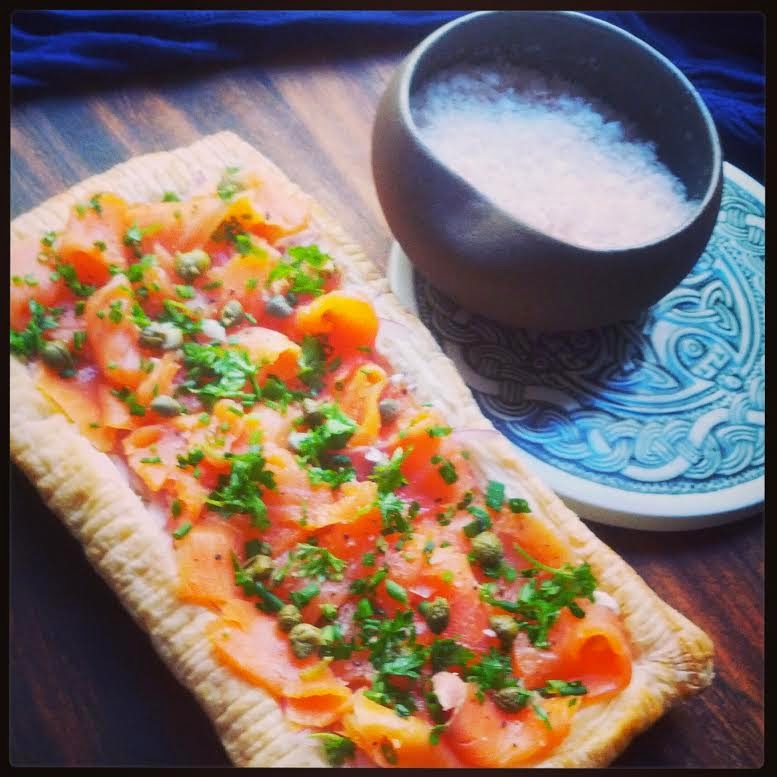

Smoked Ocean Trout & Horseradish Tart


You will need: 1 sheet pre-rolled puff pastry, 100g smoked ocean trout cut into strips, 1 cup cream cheese, 1 tablespoon horseradish cream, 1 tablespoon chopped parsley, 1 tablespoon chopped chives, 2 teaspoons washed and drained capers, 1/2 small red onion sliced very thinly, salt & pepper.

Method: Preheat the oven to 200C.

Cut the pastry sheet in half. Lay one half on a baking tray lined with baking paper. With the other half, cut a border about 2cm thick the whole way around. When you remove the pastry in the middle and you will be left with a rectangular frame shape. Lay the frame on top of the pastry on the tray, press down gently. Use a fork to prick the middle of the pastry only, not the "frame". I gently score the frame with a knife on the edges for presentation - you can do this if you like.

Bake the pastry in the oven for 10-15 minutes or until lightly golden. As it cooks, you will see the middle puff up - don't panic - you will press it down later when you add the topping of the tart. Once the tart is cooked, allow to cool completely before adding the filling.

Mix together the cream cheese, horseradish, half of the parsley, half of the chives and half of the capers. Season generously with salt and pepper.

Gently push down the pastry that has puffed up in the centre of the tart. If it is particularly puffy, you can also gently lift it out completely - it will still leave a layer of crispy pastry on the base.

Spread the cream cheese mixture over the tart base. Layer the finely sliced red onion and then arrange the strips of ocean trout on the top. Sprinkle over the remaining parsley, chives and capers. Add some cracked pepper and a little salt and serve.

Eat this tart cold or at room temperature.

******


Sunday, February 16, 2014

Melting Moments

From a really young age I always loved being in the kitchen and this was where my lifelong love of food and cooking began - watching my mum cook and picking up basic skills that I built on as I got older. There were surprisingly few cooking disasters along the way (the notable exception being a misguided attempt to make honeycomb which resulted in the totally trashed, burnt saucepan being buried in our back yard in suburban Perth to hide the evidence. It's probably still there!)

Today's recipe goes way back to my childhood and early cooking days - and is one of the first things that I remember making all by myself. Andrew has been asking me to make biscuits for him to take to work this week, so I thought I would dig in to my childhood repertoire and make a batch of Melting Moments.

These biscuits are simple to make, but require a light touch. The mixture is super soft, but cooks to a gorgeous, melt in your mouth consistency once cooled. I played around a little with the the filling - normally I would just make a basic icing with lemon juice and icing sugar  - but I had some lemon curd in the pantry, which I added along with lemon rind and some fresh lemon juice. The result was a lovely tangy filling with a much richer depth of flavour than the standard one. Passionfruit is also great as a filling flavouring if you have any. My recipe makes 12 generous sized Melting Moments - but you could make little bite size versions if you wanted something a bit more dainty. Here is what mine looked like -


Melting Moments
With Lemon Curd Icing Filling

In other news, regular readers might have noticed my new blog header banner at the top of the page. I had been thinking about refreshing the design for a while, when out of the blue my gorgeous and highly talented artist and designer friend Blair Parkinson sent through a new design he had been working on to get my feedback. Well of course I absolutely loved it, and it now holds pride of place here at Gourmet Goddess. Blair specialises in Opera design, as well as having a considerable portfolio of evocative and beautiful original works, many based on ancient mythology. As if that wasn't enough, he also offers a design service. He really is a man of many talents. His work is available for sale and he also takes commissions, so check out his website for more - http://www.blairparkinson.com/

It's struck me that I've been posting a lot of sweet things in the past few months, so I'm hoping to balance things with some more savoury dishes very soon. We are nearing the end of Summer here in Australia, so we will be seeing a change in the produce available too - always great inspiration for new dishes. In the meantime, enjoy these delicious Melting Moments....

Melting Moments
You will need: 
For the biscuits: 250g butter, 1/2 cup sifted icing sugar, 1 teaspoon vanilla. 2 cups plain flour, 1/3 cup cornflour.
For the filling: 3 Cups Icing Sugar, Rind of 1 lemon finely grated, 3 tablespoons lemon curd, Juice of 1 lemon.

Method: 
Preheat the oven to 160C. Line two baking trays with baking paper or silicone baking mats.

Beat together the softened butter, icing sugar and vanilla until light and pale. Fold in the plain flour and cornflour to make a super soft dough.

With floured hands, lightly roll the dough into balls and place on the baking trays, leaving at least a couple of finger widths of space between them. With a floured fork, gently press the balls down to form disc shapes.

Bake for 15 minutes. Allow to cool on the trays completely before filling them.

To make the filling, mix the icing sugar, lemon curd and rind well. A teaspoon full at a time, add the lemon juice until the mixture forms a firm icing (you may not use all of the lemon juice, that's ok)

Put a spoonful of the filling onto half of the biscuits and put the remaining biscuits on top. Cover and refrigerate for at least 20 minutes to set.

********


Friday, January 24, 2014

Too Many Plums!

Well, I got a little over enthusiastic at our local growers market last weekend and came home with a very large bag of sweet, dark plums. Although I've eaten them with my lunch every day for the last week, today I found myself with a fruit bowl full of them, that were super ripe and needing to be eaten pretty much right away. The thought of eating 8 plums today was rather daunting so I decided to come up with a more creative way to use them.

What I came up with is a golden plum cake, that would be lovely for morning tea - or even served warm as a pudding with some cream or custard. I used the same concept as an upside down cake, laying some of the plums on the bottom of the cake tin, so that when you turn the cake out to cool, you get the effect of the gorgeous ruby colour. I also chose to bake the plums with a little sugar first, instead of just chopping them up and adding them to the cake batter. What this does is to intensify the flavour and also the colour of the plums.

I think this cake would work really well with any stone fruit - peaches, apricots or nectarines - or even with mangoes. Just see what you have in your fruit bowl if you don't happen to have plums.


Golden Plum Cake
 

You will need: 8 medium sized plums, 2 tablespoons caster sugar, 250g butter, softened, 1 cup caster sugar, 2 teaspoons vanilla extract, 3 eggs, 2 1/2 cups self-raising flour, 2/3 cup milk.

Method: Heat the oven to 200C.

Remove the seeds from the plums and cut them roughly into quarters. Line a baking tray with baking paper and place the plums on the tray. Sprinkle the 2 tablespoons caster sugar over the plums and bake for about 20 minutes. Remove the plums from the oven and allow to cool a little.

Gently spoon the plums into a bowl, trying not to break them up too much. I use a slotted spoon for this, as it helps the extra moisture drain away - you don't want too much of the plum juice in the cake, just the cooked flesh. Set the plums aside.

Reduce the oven to 180C. Grease a cake tin and line the bottom with baking paper.

Using an electric beater, cream together the butter, caster sugar and vanilla until it becomes fluffy and a little lighter in colour.

Add the eggs one by one and beat till all combined. Now stir in half the flour and half the milk (a spatula is good for this) Repeat with the rest of the flour and milk.

Take the plums and place a few of them on the base of your cake tin - this will end up being the top of the cake and the "presentation" side. Now gently fold the remaining plums through the cake mixture.

Pour the mixture into the cake pan. Bake for 45 minutes to 1 hour (this will depend on your oven, so just keep an eye on it) It will be cooked when a skewer inserted into the centre comes out clean. Allow the cake to rest in the pan for 10 minutes.

Turn out onto a wire rack and gently peel away the baking paper. Allow the cake to cool and serve as it is - or with whipped cream, ice cream or custard.


******
 

  • Saturday, November 30, 2013

    Lovely Lemon Lusciousness

    Today I decided to go really old school and bake a very simple, traditional recipe that is not only absolutely delicious, but is also super economical to make. If you or a neighbour has a lemon tree, and you can score some free lemons, it will be even more economical. My old fashioned lemon bars only use a few basic ingredients - but the result is a moist, sweet and tangy treat perfect for afternoon tea, or served with a scoop of ice cream or freshly whipped cream for a lovely dessert.

    A luscious sweet treat deserves a pretty plate I say, so I served them on one of my favourite plates - a lovely green and white vintage number - one of a pair that I found in a flea market in Paris. I was on my honeymoon when I found them and every time I use those plates I get all nostalgic thinking of walking the streets of that gorgeous city - and the brilliant time we had. These are my instant feel good plates!

    So give these beautiful old fashioned lemon bars a try - and I warn you, they are extremely moreish.


    Old Fashioned Lemon Bars


    You will need:
    For the base: 150g soft butter, 1& 1/2 cups plain flour, 4 eggs, Juice and rind of 2 lemons, 1 & 1/2 cups caster sugar, 1/2 teaspoon salt.

    For the topping: 2 cups icing sugar, Juice and rind of 1 lemon.

    Method: Preheat the oven to 180C. Line a shallow brownie/slice tin with baking paper.

    Beat together the flour, sugar, salt and butter.

    In a separate bowl, whisk the eggs, lemon juice and lemon zest.

    Pour the wet ingredients into the dry ingredients and beat for about 2 minutes. Pour into the lined tin. Note: The mixture will not really rise, so don't choose a tin that is too large, otherwise your lemon bars will be flat as a pancake.

    Bake for about 30 minutes. Test with a skewer in the centre of the mixture. If it comes out clean, it's cooked.

    Remove from the oven and allow to cool completely.

    To make the glaze/topping, combine the icing sugar and lemon juice (add more icing sugar or water to make a spreadable consistency if you need to)

    Spread the topping evenly over the lemon base, sprinkle the lemon rind over the top. Allow for the topping to set and cut into squares or bars.

    ******


    Thursday, March 21, 2013

    Warm Carrot Salad with Goat Cheese

    So I came home from work last night and was about to throw together a quick rather bog-standard salad to have with some grilled meat for dinner, when I decided that I actually wanted something a lot more tasty and a bit more interesting. I checked the fridge and found I had a couple of bunches of heirloom carrots - one orange bunch and one gorgeous purple bunch. They became the inspiration for a side dish that was so delicious I'd thought I'd share it with you.

    This dish is super easy and would also work as a vegetarian starter or main course, as well as a side dish. In addition to the lovely carrots, I used sweet red onions, a bunch of asparagus, fresh continental parsley from the garden, creamy, tangy goat cheese, a little olive oil, balsamic, black pepper and sea salt - and that's about it. Very simple, but full of flavour.

    As well as having a great flavour and nice contrasting textures, I loved how colourful the dish looked on the plate. If you haven't seen the purple carrots at your greengrocer, ask for them. They used to be a bit hard to find but are becoming a lot more common now. They look great and taste beautiful, especially when roasted.

    I enjoyed this salad so much that I will definitely be making it again. Here at Gourmet Goddess we say - down with boring side salads! Three cheers for finding new and delish ways to eat your vegies!


    Roasted Carrot Salad with Goat's Cheese


    You will need: 2 large orange carrots, 2 large purple carrots, 1 large red onion, 1 bunch asparagus, 50g goat cheese, 1 tablespoon chopped fresh parsley, about 1 tablespoon olive oil, sea salt, pepper, 1/2 tablespoon balsamic vinegar.

    Method: First, prepare the vegetables. Cut the carrots into thick juliennes. Cut the woody ends off the asparagus and then cut each asparagus spear in half. Cut the onion into eight largish chunks.

    Preheat the oven to 200C. Line a tray with baking paper and place the carrots and onion on the tray. Brush or spray with olive oil, season well with salt and pepper. Bake in the oven for around 20 minutes, turning over the vegetables once during cooking.

    In a grill pan or fry pan, cook the asparagus with a little olive oil, and some salt at a high heat for a few minutes until they start to char.

    Allow the vegetables to cool a little before assembling the salad. Layer the vegetables and crumbled goat cheese on a serving plate. Drizzle over olive oil, balsamic and season with a little salt nad black pepper.

    Sprinkle over the fresh parsley and serve.


    ******

    Thursday, January 24, 2013

    Zucchini and Haloumi Fritters

    Ok, tonight it's something fast, simple and vegetarian with a Greek flavour. These haloumi and zucchini fritters make a lovely light lunch or a nice side dish for grilled or BBQ'd meat or seafood. I served mine with some simply marinated lamb cutlets, drizzled with olive oil, lemon and plenty of pepper. There were plenty left over for a fresh tasting lunch the next day. I was thinking that these would also be really nice finger foods - just make them bite sized instead of the meal sized ones pictured here.

    I love salty flavours and gorgeous Cypriot haloumi cheese really gives you that - so much so that you should be really careful not to add any extra salt to your mixture, or the dish will be overwhelmed. The fritters will be salty already because of the very strong haloumi and have a lovely aroma and taste, from the spring onion, garlic, fresh parsley and mint added to the batter.

    You can whip a batch of these in no time, so what are you waiting for?


    Zucchini and Haloumi Fritters
    with Garlic Yoghurt

    You will need: 
    For the fritters: 2 medium zucchini, 250g (1 small packet) Haloumi cheese, 2 teaspoons finely chopped mint, 2 tablespoons chopped continental parsley, 1/2 cup finely chopped spring onion, 2 eggs, 2 heaped tablespoons plain flour, 1 clove minced or very finely chopped garlic, 2 pinches cayenne pepper, olive oil for frying.

    For the sauce: 1 cup continental style thick plain yoghurt, 2 teaspoons finely minced or pureed garlic, pinch of salt, pepper to taste.


    Method:
    First, make the sauce - simply combine all the sauce ingredients, cover and refrigerate until ready to serve.

    Grate the zucchini, place in a bowl and allow to sit for 5 minutes. Squeeze out as much of the moisture as you can. Grate the haloumi.

    Combine the haloumi, zucchini, mint, parsley, spring onion,eggs, flour, garlic and cayenne and mix well. Heat a non stick fry pan with a little olive oil and cook the mixture a tablespoon at a time for about 5 minutes each side. Use a spoon to gently shape the patties. The mixture will be quite soft - this is normal, and the fritters will firm up a little as they cook and then again as they cool.

    Drain on paper towels. Serve warm or cold with the garlic yoghurt. Makes about a dozen medium sized fritters.

    ******


    Sunday, January 13, 2013

    Sweetness and Light

    Pancakes are about as old school as you can get - archaeologists have found evidence that they were the earliest and most widely consumed cereal based food eaten in prehistoric societies. You will find them in some form in cuisines all over the world and everyone seems to have a different version of them. Depending on where they are from, you will find preferences for sweet, savoury, thin or thick, soft or crispy. Yep, pancakes have been a favourite amongst human beings for a long time.

    Occasionally I whip up a batch of pancakes as a treat on a Sunday morning - they are a big favourite in our household, particularly a version I make with ricotta cheese and lemon. I thought I would share the recipe, as they are quite delicious and the perfect accompaniment for all of the lovely Summer fruit that is in season at the moment.

    These pancakes are light and lovely, and would be great as a dessert as well as a special breakfast treat. The key to good pancakes is to not go crazy with the whisk and over mix the batter. If you do, you will likely end up with tough, rubbery pancakes instead of light, airy ones. I know some recipes get you to beat the egg whites separately, but as long as you aren't heavy handed with the mixture I don't think this is really necessary. Keep it simple, don't over beat the mixture and ensure that you allow the mixture to rest and all will be well. I use a non stick pan to cook my pancakes, but if you don't have one, just grease a normal pan lightly and you are good to go.

    Because I serve these pancakes with sweet fruit and maple syrup, I don't put sugar in the pancake batter - I think this would make them too sickly. The lemon rind and the ricotta give the dish a lovely freshness and I don't want to drown that all out with a major sugar overload. These pancakes are best made close to serving time, but you can easily make the batter a couple of hours ahead if required and just keep the mixture in the fridge until you are ready to cook them.

    As for toppings, these ricotta pancakes are delicious with fresh natural yoghurt and pureed fruit as a sauce instead of maple syrup. They are also great with yoghurt, almonds and fresh honeycomb if you can get it. Yummy. Today, I chose nectarines, mango, blueberries and fresh figs - a perfect way to celebrate the fruits of Summer.

    As if this dish wasn't nice enough to look at already, I increased the pretty factor by serving the pancakes on my lovely green vintage china plates that I found in a flea market whilst on my honeymoon in Paris. Something about them is very happy making to me - lovely memories. And anyway, who needs an excuse to eat off the nice china? Keeping it in the cupboard and not using it is utterly pointless.

    So, channel your prehistoric ancestors and whip up a batch of pancakes - but maybe mix it up a bit by eating them off the good china? Hell, why not?!


    Lemon and Ricotta Pancakes
    with Summer Fruits and Maple Syrup


    You will need: 1 cup milk, 2 eggs, finely grated rind of half a lemon, 1 1/3 cups self raising flour, two pinches salt, 3 heaped tablespoons ricotta cheese. To serve - maple syrup, fresh fruit .

    Method: Whisk together the milk, salt, eggs and lemon rind. Add the flour gradually, continuing to whisk until smooth. Put in the fridge to rest for at least 30 minutes.

    Fold through the ricotta cheese - it does not have to be smooth - leave some lumps in it. A bit of texture is pleasant and you will get delicious pockets of ricotta as you eat the pancakes.

    Heat a non stick fry pan to a medium/high heat and cook the pancakes in batches until golden. Serve the pancakes right away stacked with fresh fruit and drizzled with maple syrup.

    Makes 6-8 pancakes.


    ******

    Saturday, January 12, 2013

    Rockin' Ribs

    A hot Sydney Saturday night, a new BBQ, a recent trip to the butcher and the inclination for something simple and tasty was the inspiration for today's recipe. It's been really hot this week, so the idea of not being stuck in the kitchen and doing some cooking outside was especially appealing. Yesterday we went out and bought a new BBQ. The process of finding one has taken a while, as we wanted something that would suit our needs but also not take up too much space. So many of them these days are bloody gigantic!! After much online research and household discussion we decided on the highly rated and very snazzy looking Ziegler and Brown Twin Grill. And yes, I had to choose the fire engine red model, couldn't help myself. Have to say we are really happy with it so far - I predict I'll be cooking with it all week as I experiment with different cooking modes and ingredients.

    There was a selection of meat to choose from tonight, as this week we visited our meat supplier Grant at Feather and Bone - and had restocked the freezer in preparation for returning to work next week. Regular readers will have heard me talk about Feather and Bone before - a local company that supplies sustainably raised meat with guaranteed provenance. With a focus on supporting small producers, a commitment to the whole journey their food makes, from paddock to plate and their philosophy of sustainability, they are the pick of the crop as far I'm concerned if you choose to eat meat. I won't pretend that they are a cheap option - their meat is not produced on a large scale and you do pay a fair bit more for their products. We decided however, that we would rather pay more, get top quality food that has been ethically produced but have it less often in order to work it into our household budget.

    If you live in Sydney and are interested in what Feather and Bone do, or you want to source their products, then the details for their website is at the bottom of this post. Oh, and by the way, this is not a paid endorsement - I'm just a regular customer who thinks highly of them and their excellent produce. To give you an idea of the sort of quality we are talking about, they supply meat to some of the best restaurants in the city - including Rockpool, Billy Kwong, Universal and Red Lantern among others.

    So, what was for dinner tonight? Well, we had bought some gorgeous dry aged Gundooee beef ribs from the folks at Feather and Bone and thought that they would be perfect on the new BBQ. I made a delicious, smoky, sticky sauce - given a bit of a fresh kick with lime, chilli and a splash of tequila. I didn't bother putting the ribs on a plate - just served them on a huge chopping board in the middle of the table with BBQ'd corn on the cob, pickled red chillies and some extra lime. We ate the whole lot with our hands - messy, fun and delicious!


    Tequila Lime Beef Ribs
    served with BBQ corn and pickled chillies

    A handy hint when cooking ribs (or anything else for that matter) where you are using a sauce that contains sugar - in this case, in the form of honey - is to pretty much cook the meat first, then glaze it. This will stop the sauce from burning quickly and your meat being undercooked in the middle. You want that lovely sticky sauce packed with flavour - but not cremated within an inch of it's life!

    This simple recipe would work just as well with pork ribs or chicken wings, so crank up the barbie and give it a try. And remember, plates and cutlery are optional!

    Tequila Lime Beef Ribs
    You will need: 1kg Beef ribs, 1/2 cup BBQ Sauce, 1/4 cup Tequila, 4 minced or finely chopped garlic cloves, 1 tablespoon sweet paprika, 1/2 teaspoon black pepper, 1/4 teaspoon salt, Juice of one fresh lime, 1 teaspoon smoked paprika, 2 teaspoons hot chilli sauce (or less, if you don't like spice)
    3 tablespoons honey. Extra lime, pickled chillies to serve. Extra salt and pepper.

    Method: If the ribs are particularly large, cut them into smaller pieces so they are easy to eat with your hands. To make the sauce, combine the BBQ sauce, garlic, lime, chilli sauce, both kinds of paprika, pepper, lime juice, Tequila and honey in a small bowl.

    Heat the BBQ to a medium heat. Season the ribs with salt and pepper and cook for about 10 minutes until they start to brown. If your BBQ has a lid, keep the lid down for most of this time.

    Once the ribs are pretty much cooked, start to baste them with the sauce and cook for about another 10 minutes. Turn them and continue to baste from time to time. When cooked, remove the ribs to a plate and cover with foil. let them rest for about 10 minutes before serving.

    Serve with extra lime and pickled chillies. Serves 2-4 people.

    Note: You could easily cook these in a conventional oven if you wish - I would do them for about 25-30 minutes on about 200C. 

    For more info on Feather and Bone check out their website:  www.featherandbone.com.au


    ******

    Friday, August 24, 2012

    An Italian Classic

    Heading home tonight I realised I had no plans as to what to make for dinner - a pretty rare occurence for me! Friday night after a long week, I wanted something with simple ingredients, tasty and satisfying - but also quick to throw together. I love pasta, but we don't tend to eat it very often at home, so I thought that for a treat I would make that Roman classic - Carbonara. It contains just a handful of ingredients, but is full of robust flavours and that gorgeous rich texture that is pretty irresistible.

    Carbonara is usually made with either spaghetti or bucatini (thick spaghetti that is hollow in the centre) I chose bucatini, which is thicker and slightly chewier to eat than the more delicate spaghetti. There are a whole range of stories about this famous pasta dish - some say that it was named from the word carbonaro which means charcoal burner in Italian, and that it was a hearty dish made for coal miners. Another story goes that it is named for the specks of black pepper that make up part of the seasoning, that look like coal dust on the top. Regardless of where the name comes from, it is a fabulous dish that can be whipped up in just a few minutes.

    This recipe is very simple and traditional. Just some cheese, fresh eggs and some diced speck or pancetta. Carbonara does not - I repeat -  not contain cream. Never, ever, ever! I have eaten some truly awful versions of this dish in my time. I'm having food flashbacks to horrible, wallpaper paste like concoctions containing pressed ham or mystery meat, usually served from a bain marie. Ewwwwwww! It beggars belief that anyone would try to "improve" on something that is already simple perfection just as it is. The Italians didn't feel the need to gussy up the dish by drenching it in cream and god knows what else - and as far as I'm concerned, neither should we.

    Carbonara should be made just prior to serving - it is not a "do ahead" recipe, and it is not suitable for freezing either. Cook it fresh while everyone is at the table -  forks in hand, ready to dig in. Buon Appetito!


    Bucatini Carbonara
     

    You will need: 300g Spaghetti or Bucatini, 250g diced speck (or pancetta), 1 whole peeled clove garlic, 2 large fresh free range eggs, 1/2 cup freshly grated parmesan, splash of olive oil, black pepper, salt.

    Method: Whisk together the eggs, a pinch of salt, pepper and about half of the parmesan. Set aside.

    Bring a large pot of salted water to boil. Add the pasta and cook until just al dente. Be careful not to overcook it, as it will cook a little more when you create the sauce. Drain the pasta and set aside.

    Working quickly, heat the oil in the pasta pot and cook the speck/pancetta and the garlic for about 5 minutes, until the meat starts to colour. Remove the whole garlic clove.

    Add the drained pasta to the pot and toss the speck/pancetta through. Remove the pot from the heat and add the egg mixture, combining it quickly. The heat of the pasta will cook the egg mixture in a very short time. Add the rest of the parmesan, season with plenty of black pepper and serve right away.

    Serves 2-4 people

    ******


    Sunday, June 10, 2012

    Winter Sunshine

    As most of you would be aware, each week the Gourmet Goddess kitchen receives a delivery of local, organic and chemical free produce from the fabulous folks at Food Connect in Sydney. One of the great things about this, apart from the first rate, ethical produce - is that they often include seasonal vegetables or fruit that are not terribly common on most dinner tables. This was one of those weeks. Amongst the cornucopia of seasonal produce was a stash of freshly dug Jerusalem artichokes - dirt still attached. At first glance I thought they were ginger roots, but I was thrilled when I realised that they were in fact the first Jerusalem artichoke crop of the winter.

    Native to the eastern part of North America, also called sunroot or earth apple, the Jerusalem artichoke is in fact not an artichoke at all. It is actually a tuber vegetable related to the sunflower and does not resemble the well known green globe artichokes in any way, either in looks or in taste. So if you started reading this post and immediately thought - "Ick. I hate artichokes" - don't despair. These are artichokes in name only. Just to confuse things, they also have absolutely nothing to do with Jerusalem. So the name is not only 100% misleading, it is also geographically incorrect. On top of the identity crisis, they are also - let's be frank here -pretty damned ugly looking. Now that we have that out of the way, let's talk flavour. Nutty, slightly creamy and delicious, these gorgeous winter vegetables taste great roasted', fried into crispy chips or pureed with potatoes for a beautiful tasting mash. Because they are in season at the moment, now really is the time to enjoy them at their best.


    Jerusalem Artichokes
    - not an artichoke and not from Jerusalem.
    Go figure.

    Today, I decided to team them with fresh seasonal cauliflower and create a creamy winter soup. These flavours work in perfect harmony and make a change from the usual repertoire of winter soups. This soup is not only great served in a rustic style with a hunk of freshly baked bread, it is also perfect all dressed up, as part of a dinner party or degustation menu.

    Cauliflower and Jerusalem Artichoke Soup


    So, give these mis-named, not so pretty winter vegetables a try. They are absolutely delicious - however you choose to cook them -  and will become part of many a winter menu once you discover their inner beauty. It's cold outside - let this relative of the sunflower bring some winter sunshine in!

    You will need: 2 large brown onions, 2 large peeled potatoes, 1/2 cauliflower, about 400g jerusalem artichokes, 3 cloves garlic, 6 cups chicken or vegetable stock, 1/2 cup milk (if you want something really sumptuous, use cream), 1 apple, 1/2 cup flaked almonds, 1 tablespoon olive oil, salt, pepper, pinch of cayenne pepper, parsley or chives and a drizzle of fruity olive oil to serve.

    Method: Scrub the artichokes to clean any dirt off them - you do not need to peel them. Cut the cauliflower into florets. Roughly chop the onion, potato and artichokes into generous chunks. Roughly chop the garlic.

    Heat the olive oil in a pot and add the onion. Cook it gently for about 5 minutes until it starts to soften. Add the garlic and the artichokes and cook for another 5 minutes or so. Add the potato and the cauliflower, season generously with salt and pepper, add the pinch of cayenne and allow to cook for another 5 minutes.

    Add the chicken stock. Bring the mixture to the boil and allow to simmer for about 30 minutes, until the vegetables are very soft. Remove from the heat and blend the mixture until smooth with a hand blender or food processor. Add the milk (or cream) and taste for seasoning. Add salt and pepper as required.

    When you are ready to serve, spoon the soup into bowls and top with a little of the parsley or chives. Drizzle with olive oil and serve with crusty bread.

    Serves 4-6 people

    ******

    Sunday, April 29, 2012

    Creamy Mushroom Ragout with Polenta

    The weather has been cooling down here in Sydney and on Saturday I was really in the mood for some Autumn comfort food. Looking in the fridge I had a whole pile of gorgeous seasonal mushrooms and thought I would create a dish around them. At first I thought maybe a soup or pasta, but then remembered that I also had a packet of organic polenta in the cupboard, and for me, nothing says comfort like that delicious northern Italian staple. If you have never used it, polenta is a basically pure dried corn meal used in cuisines all around the world from Italy to Mexico.

    I decided on a mushroom ragout to serve with my polenta, using 6 kinds of fresh mushrooms, as well as a handful of dried porcini mushrooms to ramp up the flavour. Using dried mushrooms is a great way to boost the richness of the dish but they are also a great ingredient to have in your cupboard for use in stocks and sauces too. They keep pretty much forever in an airtight jar. I used porcini mushrooms in this dish, but I always have dried shitake and forest mushrooms in the pantry as well.

     Mushies!

    The variety of mushrooms work really well with the creamy golden polenta, both in flavour and texture contrast. As well as tasting fabulous, polenta is also very good for you, being packed with complex carbohydrates (so it has a very low GI) lots of fibre, a great source of vitamin A and C, iron, thiamin and zinc. It is also low in fat. Traditionally it is served with lots of grated parmesan and butter, however I have omitted this in my recipe as I wanted the dish dish to be the healthier version. Feel free to add some butter and grated parmesan though if the mood takes you - it really is delicious. I do find though, that if you are serving it with a very flavoursome accompaniment, then the cheese and butter aren't really necessary.

    Polenta is a great alternative to pasta for those people who need to avoid wheat in their diet and is very versatile. See my hints at the bottom of the recipe for ideas about what to do with your leftovers if you have any. It may even be worth making extra so that you can make another dish the next day.

    This ragout and polenta is a great vegetarian dish, but you can also serve it as a side dish with roasted red meat, pork, poultry - or game such as rabbit, venison or quail. It looks beautiful served on a large platter, but if you want to go really traditional, serve it poured onto a big chopping board in the middle of the table, for the ultimate rustic effect.


    Creamy Mushroom Ragout with Polenta


    You will need:
    For the polenta - 1 cup polenta (cornmeal),3 cups water or stock,salt, pepper.

    For the ragout - around 500g fresh sliced mushrooms - choose as many varieties as you can get your hands on - shitake, swiss brown, pine, field, button, oyster, enoki, porcini. 1/2 cup dried mushrooms (I used porcini) 1 large finely sliced onion, 2 cloves finely chopped garlic, 1 tablespoon olive oil, 2 teaspoons balsamic vinegar, salt, pepper, 1 tablespoon soft cream cheese (I use the low fat Philadelphia brand one in the tub), 1/2 cup stock (vegetable, beef or chicken) 1 tablespoon chopped fresh herbs - I use parsley, chives, thyme.


    Method: First, place the dried mushrooms in a small bowl and cover with boiling water. Allow to soften while you make the polenta.

    To cook the polenta, bring the water or stock to the boil in a heavy-based saucepan. Gradually add the polenta in a slow, thin, steady stream, whisking constantly until all the polenta is incorporated into the water. Whisking ensures that the polenta is dispersed through the liquid as quickly as possible and doesn't clump.

    Reduce heat to low and simmer, stirring constantly with a wooden spoon for 10 - 15 minutes or until the mixture thickens and the polenta is soft. To test whether the polenta is cooked, spoon a little of the mixture onto a small plate and set aside to cool slightly. Rub a little of the polenta between 2 fingers to see if the grains have softened. If the grains are still firm,cook the polenta for a little longer. Whisk through the butter and parmesan and season with salt and pepper. Adjust seasonings as required. Cover and set aside.

    Now to the mushrooms. Drain the dried mushrooms well and chop them finely. Heat a pan and add the olive oil. Add the onions and garlic and cook gently until the onions are transparent and soft. Add the dried and fresh mushrooms (except the enoki mushrooms if you are using them - these cook very fast so don't add them until the last moment) Cook the mushrooms for a minute or so until they start to soften. Add the stock, balsamic and a little salt and pepper. Simmer until the stock starts to reduce - a couple of minutes.

    Stir through the cream cheese until it is well incorporated. If the mixture is a bit too thick, add a small amount of water or stock. Add the enoki mushrooms if you are using them and stir through until just softened. Taste the ragout for seasoning and adjust accordingly.

    Give the polenta one last whisk to ensure it is smooth and serve with the mushroom ragout. Top with fresh herbs and serve.

    Note: If you have leftover polenta, turn it out on a plate and put it in the fridge for the next day. Cut it into slices, pan fry and serve with grilled veges, nepolitana sauce and parmesan - or cut it into batons and fry it in hot oil to make polenta chips. When it is set, it can easily be cut into whatever shape you like. I have used it to make into little bite sized discs as a base for Italian inspired canapes, or little cubes to dip in gorgonzola sauce. Pretty much anything you can think of - it is super versatile.

    Serves 2 as a main meal or 4 as a side dish.


    ******


    Sunday, April 1, 2012

    Little Bites of Goodness

    We have been making a conscious effort in our household to eat a lot more healthily lately - which means cutting down on meat, fat and sugar and upping the vegetable content of everything. Today I am heading off to meet with our book club group (today's book for discussion - Joseph Conrad's tale of colonialism and man's dark nature -  "Heart of Darkness") Just because the subject we are discussing this afternoon is uber heavy, doesn't mean that the snacks for the afternoon have to be - so I made a batch of these delicious savoury muffin bites to take for the refreshment table.

    These little muffin bites are full of vegetables, as well as gorgeous sorrel from my garden (you can substitute baby spinach if you can't find sorrel) and very low fat cheese, so they are good for you, as well as being delicious. They are also quick and easy to throw together. They have a very moist, soft texture due to the vegetables and the cheese and do not resemble the more "cakey" style muffins.

    These muffins are also my first attempt to include Chia seeds in my cooking. Chia seeds contain an insane amount of anti-oxidants, fibre, protein and omega 3 oils -  as well as having lots of other health benefits - balancing blood sugar levels,helping to regulate blood pressure, having anti aging and anti inflammatory properties and providing a boost of energy without caffeine or drugs.

    So, these little bites of healthy goodness will provide a dose of good stuff, whilst not being bad for the waistline or the tastebuds either. They would be great in lunchboxes or as a healthy snack. You can of course bake large ones if you want to - the recipe below will make 6 muffins if you decide to do that. Otherwise, the amount below will bake 12 mini muffins.


    Vegetable and Chia Seed Muffin Bites


    You will need: 2 cups self raising flour, 1 tablespoon baking powder, 1/3 teaspoon cayenne pepper, 1 teaspoon salt, 1 egg, 1 cup low fat milk, 1/2 cup reduced fat grated cheese, 1 cup low fat cottage cheese, 1/2 cup chia seeds, 1 cup grated carrot, 1 cup grated zucchini, 1 leek sliced finely, 1 cup finely chopped sorrel or baby spinach, olive oil spray.


    Method: Preheat the oven to 200C. Spray a pan with a little oil and cook the leeks until soft. Set aside.

    In a large bowl, combine the flour, baking powder, cayenne pepper, salt, chia seed, grated cheese. Mix well.

    In a separate bowl, whisk together the egg, milk and cottage cheese.

    Add the grated carrot, zucchini, leek and sorrel/spinach to the dry mixture and combine gently. Now add the wet mixture and fold through with a spatula until just mixed.

    Spray a mini muffin tin with oil and spoon the mixture into the pan.

    Bake for 15-20 minutes until they start to turn golden on top. Remove from the oven and allow to cool before removing them from the pan.

    Makes about 12 small muffin bites.

    ******


    Sunday, February 12, 2012

    Rustic Coconut Banana Bread

    As most of you know, I'm not really into baking that much. It is quite an exact science and I'm much happier creating dishes on the fly, tasting as I go and not slavishly measuring every ingredient. I made an exception this weekend when I realised that we had forgotten to eat the bananas that had been sitting in the fruit bowl since the beginning of the week. We had a handful of very ripe bananas that were crying out to be put in some kind of recipe asap. I decided to make banana bread with a couple of my own twists. Having never attempted banana bread in my life, I took a basic recipe and swapped all white flour for a mixture of white and wholemeal flour, as well as adding a little nutmeg and good quality vanilla.

    I realised that I also had a pack of threaded, dessicated coconut in the cupboard (originally purchased with the intention of making coconut prawns that have not, as yet eventuated) so I thought I would add the coconut to the banana bread and see how it turned out. I was happy with the result - a home style banana bread that has a rustic, dense texture due to the wholemeal flour. If you wanted a lighter style bread, you could replace the wholemeal component with all white flour. My banana bread is not the light, highly processed style that you will find in cafes, however it has a great robust flavour that is really lovely toasted and served with some salted butter.


    Just out of the oven


     The recipe below makes a small sized loaf - if you are using a larger sized loaf pan (similar to the sized loaf you would need to make the banana bread you see in cafes) then do what I did and double the amounts. I actually started with the amounts listed below, but when I looked at the large loaf pan I had chosen, I realised that I would need twice the amount to fill it. If you are using a standard loaf pan, the quantities below should be just right. Remember too that a bigger loaf will mean longer cooking time.

    The coconut and banana combination works really well, both in terms of taste and texture. The bread is very moist, with a slightly crunchy outside crust and a sweet coconut aroma that smells just beautiful. I'm certainly not a baker, but I was happy with my first attempt at banana bread.


    Coconut Banana Bread


    You will need: 1 cup plain white flour, 1 cup wholemeal plain flour, 2/3 cup caster sugar, 1 1/2 teaspoon baking powder, 1 cup dessicated or threaded coconut, 2 large eggs, 1 teaspoon vanilla extract,3-4 ripe bananas, a few pinches of freshly grated nutmeg.

    Method: Preheat the oven to 160C. Grease a loaf tin (or spray it with cooking spray) and line the base of the loaf pan with baking paper.

    Mash the bananas well and add the vanilla, nutmeg and the eggs.

    In a separate bowl, sift the flours and baking powder. Add the sugar and the coconut and combine well.

    Add the wet mixture to the dry mixture and mix thoroughly. Pour the mixture into your prepared loaf pan.

    Bake for about 60 minutes - the cooking time is going to vary depending on your oven, the sized pan and your ingredients (size of eggs, moisture in the bananas etc) The loaf is cooked when you insert a skewer in the centre and it comes out clean. Your loaf may take a little more or a little less time - just keep an eye on it and do the skewer test.

    Remove the pan from the oven and allow it to cool for 10-15 minutes before turning it out on a wire rack to cool.

    Serve as is, or toasted with butter.


    ******

    Tuesday, February 8, 2011

    Corn and Zucchini Muffins

    As most of you know, baking isn't usually my bag, but occasionally I like to get out the mixing bowl and make up a batch of something tasty. Whilst I can usually take or leave sweet muffins, I do really enjoy the savoury ones. They are beautiful straight out of the oven, served with good quality butter. Try and stop at one.

    My vegetarian savoury muffins today were made with what I happened to have around and you can easily adapt these muffins to include whatever you have in the cupboard or the fridge. Throw in some grated carrot, or some spinach, a handful of herbs, some leftover cooked pumpkin chopped into small chunks, rocket, sundried tomatoes, olives, some fresh chilli. A great way to use up bits and pieces. If you aren't vegetarian, you could also add some finely chopped bacon, ham or proscuitto. Experiment with different cheeses too - some crumbled feta or blue cheese would give your muffins a real flavour punch.

    The recipe below will make 10 - 12 standard sized muffins. You could also use small cocktail sized muffin tins and make mini muffins, which would be great as finger food. Serve them as they are, or cut them in half and add some cream cheese spiked with some fresh dill and smoked salmon - delicious.

    As well as loving the taste of these muffins, I also love that they are easy to throw together - baking doesn't always have to be a three act drama, thank god! The preparation of the mixture took about 10 minutes, then you can relax while the oven does the rest. And here they are....


    Corn and Zucchini Muffins


    You will need: 2 cups self raising flour,1 tsp Dijon mustard, 2 tbsp chopped spring onion, 1 cup grated cheese (I used Mozzerella, but use Cheddar or whatever you like), 1/4 cup grated parmesan cheese, 1 medium sized zucchini grated, 1 cup creamed corn, 1 cup cold vegetable stock, 2 eggs, 2 tablespoons extra virgin olive oil, 1 tablespoon poppy seeds, pinch cayenne pepper, salt.


    Method: Preheat the oven to 200C.

    Sift flour in a bowl then stir in cheeses, spring onion and zucchini. Set aside.


    Combine the stock, eggs, mustard and oil in a jug and whisk together. Stir in the creamed corn, cayenne pepper and a generous pinch of salt.

    Pour the wet mixture into dry mixture then stir gently to just combine all ingredients. Be careful not to overmix or the muffins will not rise.


    Spoon the mixture into a greased muffin tray. I also line mine with patty pans - makes getting them out so much easier. Sprinkle the tops of the muffins with poppy seeds.

    Bake in your preheated oven for 25 minutes or until golden. Allow the muffins to rest in the pan for at least 5 minutes before removing them.

    Serve warm with good quality butter.


    ******

    Thursday, October 21, 2010

    Very Vegetarian

    It was my intention this week to post pics of the housewarming lunch that we held last Saturday, however once the food was on the table I completely forgot to take photos of it before it was demolished. Sorry guys - you will have to close your eyes and imagine what it looked like! We enjoyed a starter of antipasto, along with italian style pork meatballs with a spicy tomato dipping sauce, a selection of cheeses and wonderful olive bread from Bourke Street Bakery. For mains, there was a selection of garlicky leg of lamb cooked over coals, stir fried garlic and chilli prawns, greek sausages, chicken, fetta and spinach sausages, grilled asparagus, tomato, basil and bocconcini salad, 2 vegetarian tarts - mint, pea and fetta and wild mushroom and a roasted pumpkin, rocket and pomegranate salad served with a pomegranate balsamic dressing. Our guests seemed to really enjoy it (special mention must be made of my lovely finacee's spectacular lamb - cooked over coals and so succulent and tender) but as always I over catered - we lived off the leftovers for breakfast, lunch and dinner for 2 days!

    Today I thought I would share what we had for dinner last night. A nice vegetarian dish that is cheap and easy to make - zucchini and chickpea fritters. You can serve them as a main or a starter - or grab some nice rolls and turn the fritters into vege burgers. The accompaniment is a creamy horseradish and mint sauce which is a lovely tangy, creamy contrast to the nutty flavour of the fritters. The addition of mint gives a lovely fresh note to this dish. You could easily add other vegetables or herbs to the fritters - I think that grated carrot or some finely chopped spinach would work well. Make sure that you don't scrimp on the seasoning of the fritter mixture - plenty of salt and pepper please. Chick peas and other legumes can be a bit bland if you don't give them a boost with some seasoning. Salt and pepper will help bring out their natural flavour. These fritters are best eaten soon after making and are not suitable to freeze. My recipe will make about 12 large fritters.


    Zucchini and Chickpea Fritters with horseradish and mint sauce


    You will need:
    For the fritters: 1 x 400g tin chick peas rinsed well and drained, 2 medium sized zucchini grated, 1 tablespoon grated parmesan, 1 tablespoon chopped parsley, 1/2 tablespoon finely chopped mint, 2 eggs, 1 cup milk, 1 1/4 cups self raising flour, a couple of pinches of cayenne pepper, salt and pepper.

    For the sauce: 1 cup sour cream, 1 dessert spoon horseradish cream (buy this in the mustard/condiment section of the supermarket), 1 dessert spoon finely chopped mint, salt and pepper.

    Method: Whisk together the eggs, milk, cayenne and 1/4 teaspoon salt. Gradually add the flour, to form a smooth batter. You may use more or less flour depending on the size of the eggs - the mixture should be the consistency of pancake batter.

    Mash the chickpeas. You can also use a food processor for this, but don't make the mixture too smooth - you want some texture there.

    Fold in the zucchini, parmesan, parsley and mint into the batter. Season generously and allow the mixture to stand for 10-15 minutes.

    To make the sauce, combine the sauce ingredients and mix well.

    Heat a frypan and add some vegetable oil. Spoon the fritter mixture onto the pan and cook until golden. I make these fritters a bit larger than say, corn fritters. I used a couple of spoonfuls of mixture each and they come out the size of a hamburger patty. You can of course make them smaller if you like. Drain them on paper towels and serve right away with the sauce.

    ******

    Sunday, September 27, 2009

    Pumpkin Head

    Today I decided to make some soup to have for my lunch this week. My criteria was that I wanted something with Asian inspired flavours, it had to be vegetarian and it had to be good for me. I love pumpkin soup, so I played around with my usual pumpkin soup recipe and came up with something brand new, that ticked all the boxes. The result is today's recipe - Spicy Pumpkin and Coconut Soup.

    Because I wanted a coconut flavour, but still wanted the soup to be healthy (An average 400ml tin of Coconut milk has a whopping 60g of fat in it, which is ok for the occasional treat - but I planned to eat this soup almost every day this week!) I decided to try the reduced fat coconut infused evaporated milk from the supermarket. I have never used this before and frankly I wasn't convinced that it would be all that great but I was pleasantly suprised by the result. Rich coconut flavour? Check. Creamy texture? Check. Low fat option? Check. (It only has around 6g of fat in a whole tin)

    The soup has a lovely velvety texture and has a delicious aromatic taste, with the addition of ginger, garlic, chilli and of course the coconut. Serve the soup with fresh coriander and some extra fresh chilli to ramp up the flavour even more.


    Spicy Pumpkin and Coconut Soup

    You will need: 500g pumpkin, 1 large onion, 2 large carrots, 2 large potatoes, 4 cloves garlic, 4cm piece ginger, 1 x 375ml tin coconut evaporated milk, 1.5 litres vegetable stock, 1 Tablespoon vegetable oil, 1/4 teaspoon chilli powder (or more, if you want it spicier), salt and pepper to taste. Fresh coriander and chilli to serve.

    Method: Peel and then roughly chop the ginger, garlic and onions. Set aside. Peel and roughly chop the pumpkin, potatoes and carrots.

    Heat the oil in a pot and add the garlic, onion and ginger. Cook on a medium heat until the onion starts to turn transparent. Add the pumpkin, potato, carrots and the chilli powder. Combine well and cook for 5 minutes, stirring often.

    Add the vegetable stock and bring it to the boil. Reduce the heat slightly and allow it to simmer for 25 minutes. After 25 minutes, add the evaporated milk and mix well. Let the soup simmer for another 10 minutes.

    Blend the soup until very smooth with a hand blender or food processor. Taste for seasoning and add salt and pepper as required. Serve with fresh chilli and coriander.

    Serves 6

    *

    Saturday, September 19, 2009

    Frittata - With a little help from my friends......

    I'm heading off with my other Beatles obsessed friends to our mate Damon's house this afternoon to play the eagerly anticipated "Beatles Rock Band". Word has it that he has set up his attic to accomodate us (closest thing we have to "The Cavern"!) and I have no doubt it will be a riotously entertaining time for all. Lots of gin and tonics and bad singing will ensue, I'm sure. Now, even the real Fab Four must have had to stop for a snack break occasionally, so I cooked a few things this morning to make sure that we keep our strength up for those dodgy renditions of "I am the walrus". The recipe I'm posting today is one of the things I have made to take to Damon's.

    Today's dish is a simple to make mushroom, leek and fennel frittata but I have given it a bit of a twist by serving it with a delicious, fresh tasting horseradish and mint cream. I will be serving small slices of it with a dollop of the cream on the top. Of course you can serve the frittata alone if you want to. This dish works as a finger food but would also be a nice spring entree or a vegeatarian main course. It would also be perfect for a picnic.
    Either way, you'll love it. (Yeah! Yeah! Yeah!)


    Mushroom, Leek and Fennel Frittata with Mint and Horseradish Cream

    You will need: (For the frittata) 1 doz free range eggs, 1 cup cream, 1/2 cup grated cheddar cheese, 1/3 cup grated parmesan, 1 bulb fennel sliced finely, 1 large onion sliced finely, 1 large leek sliced finely, 1/2 cup sliced spring onion, About 3 cups sliced mushrooms, 1 tablespoon finely chopped continental parsley, 1 tablespoon Dijon mustard, splash of olive oil, salt and pepper.

    (For the topping) 1 cup sour cream, 1/2 cup natural yoghurt (I use an organic Greek style yoghurt), 1 tablespoon each of chopped continental parsley and fresh mint, 1 tablespoon horseradish cream ( You will find this in the mustard/condiment section of the supermarket)

    Method: First, combine all of the topping ingredients well and then refrigerate until you areready to serve.

    In a frypan, add a splash of olive oil, the spring onions,regular onion, fennel and leek. Cook on a moderate heat for about 5 minutes. You do not want the ingredients to brown, so keep an eye on it. Add the mushrooms, season with salt and pepper. Cook for another 5-8 minutes, until the fennel and leeks are soft. Turn off the heat and set aside.

    In a mixing bowl, combine the eggs, cream, grated parmesan, Dijon mustard and salt and pepper. Whisk until well combined.

    Line a baking dish with baking paper. Tip the leek/fennel mixture into the dish and spread it out evenly. Sprinkle the cheddar cheese over the top and mix it in a little bit, so it doesn't all sit on the surface. Pour over the egg mixture and ensure it is evenly distributed.

    Sprinkle with the parsley and cook in a moderate oven for about 20 mins, until the frittata is set. Let it cool for at least 10mins before cutting it into pieces. Serve topped with a spoonful of the horseradish cream mixture and some extra mint leaves.

    This recipe will make around 40 small pieces or will serve 6-8 people as an entree or main course.

    *

    Sunday, August 30, 2009

    The Great Muffin Experiment

    I was in the mood for baking this morning and as many of you would know I'm not a big sweet fan, so I thought I would experiment with savoury muffins. I decided on vegetable based ones, full of zucchini and flavoured with cheese, spring onion, olives and sundried tomatoes. The result was a lovely light and flavoursome muffin that would make a great breakfast or brunch, perfect with a bowl of soup or a nice addition to a picnic.
    These will freeze really well, so it's worth making a couple of batches if you have freezer space. Alas I don't, so I will be taking these to work to give to my favourite geeks in the I.T department tomorrow. I make sure that they always get the results of my muffin experiments -I tell them it is a form of bribery - it always pays to have the tech guys on your side! I was happy with the recipe today, particularly the lightness of the texture. I was worried they might be a bit heavy, but they were quite the opposite. I think I will use this recipe for the basis of other savoury muffins in the future. I am already having ideas for other varieties. Watch this space...

    Cheesy Zucchini Muffins with sundried tomato and olives

    You will need: 3 cups plain flour, 6 teaspoons baking powder, 2 large grated zucchini, 1 cup finely chopped spring onion, 2 tablespoons chopped olives, 2 tablespoons finely chopped sundried tomatoes, 1 1/2 cups grated cheddar, 1/2 cup grated parmesan, 4 eggs, 1 cup milk, 2/3 cup olive oil, 1 tablespoon poppy seeds, salt and pepper.

    Method: Preheat the oven to 180C. Line a non stick muffin pan with paper patty cases.
    Sift the flour and baking powder into a generous sized bowl. Add the olives, zucchini, sundried tomato, spring onion, parmesan and all but 2 tablespoons of the cheddar cheese. (You will save this for the top of the muffins later) Season generously with salt and pepper. Mix well with your hands.

    In another bowl, whisk together the eggs, oil and milk. Add this wet mixture to the dry ingredients and mix until just combined with you hands. Do not overmix or your muffins will be very flat and heavy.

    Fill the prepared muffin pans with the mixture and sprinkle the leftover cheese and poppy seeds over the top of the muffins. Cook for 25-30 mins. Let them cool in the pan for about 10mins before taking them out and letting them cool further on a wire rack.

    Makes about 20 muffins.

    *

    Sunday, August 23, 2009

    Veg-A-Rama!!

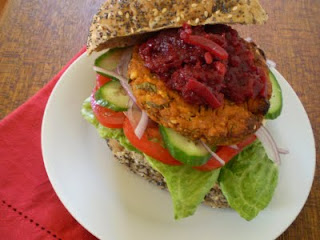
    I've had some really bad, tasteless vege burgers in my time. Do people think that because you are choosing the vegetarian option that you have also had your tastebuds removed and have lost your culinary will to live??? No people! Mashing a cup of lentils and making them burger shaped does not a vege burger make!!! There are so many other great ingredients that you can include that will give your vege burger bucketloads of flavour and make it delicious.

    My recipe includes lovely creamy sweet potato, lentils, chickpeas and plenty of other seasonal vegetables and is served with a delicious and easy to throw together beetroot relish. I make a batch and then freeze the burger patties individually. Heat them in the microwave for a minute or two and you are ready to go. I do not fry my burgers - I find that doing them in the oven is a lot less hassle and you don't have to worry about the burgers breaking up, which can happen if you cook them in the frypan. The oven option also means that these burgers are very low in fat, so this recipe makes a ridiculously healthy, great tasting lunch or dinner.

    This recipe makes about 12 burgers and the relish recipe will make two jars. Store the relish in the fridge and use within a couple of weeks. The relish also goes beautifully with grilled meat.


    Gourmet Goddess Vege Burgers with Beetroot Relish


    You will need:
    (For the burgers- makes 12) 1 x rinsed and drained can of chickpeas, 1 x rinsed and drained can of lentils, 4 cups mashed sweet potato, 2 grated zucchini, 1 grated carrot, About 2 cups fresh breadcrumbs, 1 egg, 3 tablespoons BBQ sauce, 2 teaspoons Dijon mustard, 1 tablespoon paprika, 2 small red chillies, 2 cloves garlic, 1 cup chopped continental parsley, 1 teaspoon celery salt, 1 tablespoon sesame seeds, pepper.

    (For the relish - makes 2 jars) 3 large sliced onions, 2 cloves crushed garlic, 2 x 400g tins drained sliced beetroot, 2 tablespoons balsamic vinegar, 1 tablespoon sugar, salt and pepper, 2 tablespoons olive oil, 1 cup water.

    Method: First, make the burgers. Put the chickpeas, garlic and chillies in the food processor with a couple of tablespoons of water. Blend until the chickpeas have broken down. Don't blend too much - you want to have a bit of texture to them, so don't make the mixture too smooth.

    In a large bowl, combine the chickpea mixture, lentils, mashed sweet potato and all of the other ingredients. Using your hands is best for this. The mixture should be quite soft, but still hold together. Add more breadcrumbs if the mixture is too soft.

    Using wet hands, form the mixture into generous sized burgers and place them on a baking tray that is lined with baking paper. (I find that because they are soft, they stick if you don't use the baking paper) Bake them in a moderate oven for 30-40 mins. They will start to brown slightly.
    Cool the burgers on the trays before using an egg slice to remove them.

    While the burgers are cooking, it's time to make the Beetroot Relish. Place the beetroot in the food processor and blend until the mixture is quite fine (you don't want massive chunks of beetroot)

    Heat the olive oil in a pan and cook the onion until translucent. Add the garlic and beetroot. Cook the mixture for a couple of minutes. Add the balsamic, salt, pepper and water and let the mixture simmer until most of the moisture is absorbed. Allow the relish to cool and put in jars.

    Serve your burgers in a crusty roll with salad and beetoot relish.
    *

    Sunday, August 9, 2009

    The Mother of Invention

    They say that neccessity is the mother of invention and it is often the case when it comes to creating new dishes. Today's dish came about when friends dropped by one day. I invited them to stay for lunch, only remembering a short time later that I had not done any food shopping for a few days (unusual for me) and that the fridge and pantry were not exactly groaning with a cornucopia of ingredients. In fact it was looking pretty dismal - I had even run out of garlic!

    I tried not to panic, took stock of the bits and pieces I did have ( a tin of tuna, tomatoes, olives, parsley and a few other things) and ended up accidentally creating a pasta dish that is now one of my favourites. My guests loved it and my hostess reputation was saved! The beauty of this dish is it's simplicity of preparation and its gorgeous fresh flavour. To top it off, it is healthy and you don't even cook the sauce. Yep, just chop the ingredients and add it to the hot cooked pasta and presto! Lunch. If you are a vegetarian you don't have to miss out - you can omit the tuna and you will still end up with a great dish, just increase the amounts of olives, parsley and tomatoes.

    You can use any kind of pasta you like for this dish. The day I accidentally invented this recipe I had spaghetti in the cupboard, so that was what I used. Today I used what is probably my favourite type of pasta - Orecchiette. The literal Italian translation means "little ears", due to thier shape. I love them because whatever sauce you make gets trapped in the "little ears" and you don't end up with most of the sauce on the bottom of the plate - it stays on the pasta where it belongs. I also think they're pretty :)

    So here it is, "mother of invention" pasta (serves 4)

    Tuna and Olive Orecchiette


    You will need: Enough pasta to serve 4 people, 2- 3 ripe tomatoes diced finely, 1/2 red onion diced finely, 1/2 cup chopped continental parsley, 1 finely chopped red chilli, 1 tablespoon chopped black olives, 2 teaspoons chopped capers, 1 tablespoon roughly chopped semi-dried tomatoes, 1 tin chunk style tuna in oil (my preferred brand is Sirena - it has a great flavour and the flesh is dense, which is ideal for a dish like this), 2 teaspoons butter, splash of extra virgin olive oil, salt and pepper, dash of tabasco.

    Method: Bring a large pot of well salted water to the boil and add the pasta. Keep an eye on it and give it the odd stir while you make the sauce. You want the pasta to be al dente, not overcooked.

    Combine the fresh and semi-dried tomatoes, onion, chilli, parsley, tuna, tabasco, olives and capers.

    When the pasta is cooked, drain it and then return it to the pan. Add the butter and toss it through the pasta. Add the tuna mixture, a splash of olive oil, a few pinches of salt and plenty of pepper to season.

    Serve with fresh grated parmesan.

    *