Showing posts with label Baking. Show all posts

Saturday, May 10, 2014

Bookish Delights - Smoked Ocean Trout & Horseradish Tart

I am a member of a Bookclub made up of a group of literary minded mates who decided we would use our love of books and enjoyment of each other's company as an excuse to discover new things to read. It is also a great way to guarantee that we get together every couple of months. We also happen to be avid food lovers and good cooks, so Bookclub has also become a place to share great food. Even if the book turns out to be a dud, you know that the catering is going to be impeccable!

We found that often we were inspired by the books we were reading, cooking food related to the themes or settings. Sometimes, it is easy to come up with something relevant to the subject - other times, it is more of a challenge. Our latest book falls into the latter category. Our current Bookclub book is the magnificent Burial Rites, by Hannah Kent, telling the story of an accused murderess awaiting execution, set in harsh rural Iceland in 1830. The book actually talks quite a lot about the food that they ate back then - preserved whale blubber anyone?

There were also references to eating dried and preserved fish, which gave me the idea of what I would cook for today's Bookclub. Smoking fish is a very old preservation technique, and also happens to be delicious, so I made that the centrepiece of my dish. Even better was the fact that I happened to have some smoked ocean trout in the fridge (which I love having with poached eggs for a special weekend breakfast treat). I created this very simple to put together tart, with fresh herbs fro the garden, a silky cream cheese filling and the gorgeous bite of horseradish. You could use smoked salmon in place of the trout if you preferred.

I'm sure that folks in rural Iceland probably wouldn't be eating something so pretty and delicate looking - but the cheese, fish and herbs take some of the elements of what they would have eaten and make them fresh and modern. Enjoy!
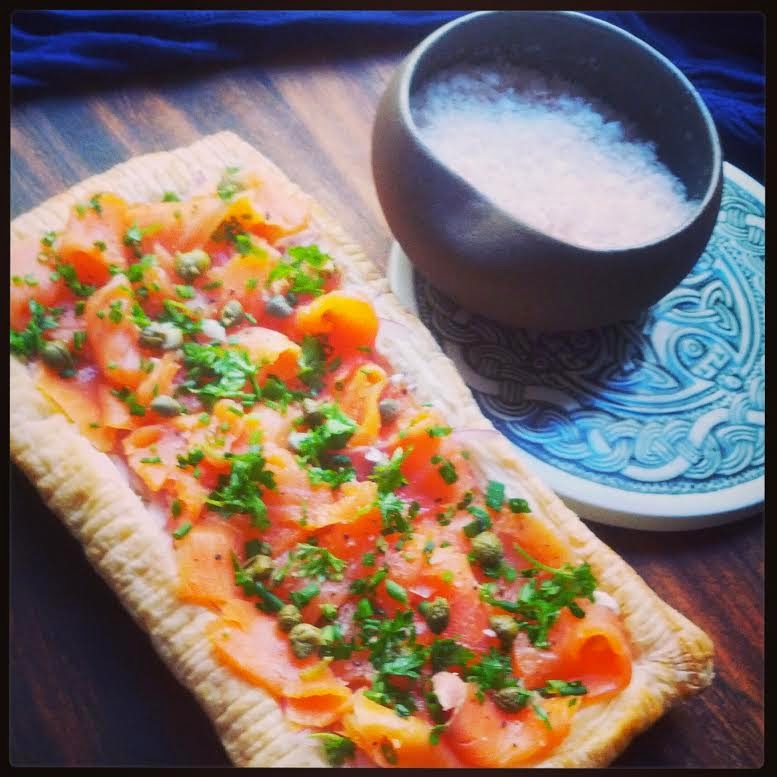

Smoked Ocean Trout & Horseradish Tart


You will need: 1 sheet pre-rolled puff pastry, 100g smoked ocean trout cut into strips, 1 cup cream cheese, 1 tablespoon horseradish cream, 1 tablespoon chopped parsley, 1 tablespoon chopped chives, 2 teaspoons washed and drained capers, 1/2 small red onion sliced very thinly, salt & pepper.

Method: Preheat the oven to 200C.

Cut the pastry sheet in half. Lay one half on a baking tray lined with baking paper. With the other half, cut a border about 2cm thick the whole way around. When you remove the pastry in the middle and you will be left with a rectangular frame shape. Lay the frame on top of the pastry on the tray, press down gently. Use a fork to prick the middle of the pastry only, not the "frame". I gently score the frame with a knife on the edges for presentation - you can do this if you like.

Bake the pastry in the oven for 10-15 minutes or until lightly golden. As it cooks, you will see the middle puff up - don't panic - you will press it down later when you add the topping of the tart. Once the tart is cooked, allow to cool completely before adding the filling.

Mix together the cream cheese, horseradish, half of the parsley, half of the chives and half of the capers. Season generously with salt and pepper.

Gently push down the pastry that has puffed up in the centre of the tart. If it is particularly puffy, you can also gently lift it out completely - it will still leave a layer of crispy pastry on the base.

Spread the cream cheese mixture over the tart base. Layer the finely sliced red onion and then arrange the strips of ocean trout on the top. Sprinkle over the remaining parsley, chives and capers. Add some cracked pepper and a little salt and serve.

Eat this tart cold or at room temperature.

******


Friday, April 18, 2014

Fluffy Easter Pancakes

Some of the fluffiest, nicest pancakes I've ever eaten are made with buttermilk. Buttermilk is the liquid that is left from churning butter or cream, and although you can buy buttermilk reasonably easily, it is not something that most people would have as a staple in the fridge. This means that if you decide to make buttermilk pancakes one morning, it is likely to involve a special trip to the shops to get it.

Today I'm sharing a recipe I use for pancakes that give the same result as the buttermilk kind, but is much less hassle to make -  with a technique for lightly souring the milk to create a perfect substitute for the buttermilk. These pancakes are deliciously light and fluffy and not overly sweet. You can of course top them with anything you like, but today I have topped mine with mixed berries and maple syrup.

These pancakes make a perfect Easter brunch, or even a simple dessert served with yoghurt, ice cream or any manner of toppings that you can dream up. I have also made small pikelets from this mixture and topped them with jam and cream to make a sort of Devonshire Tea style treat.

However you adapt them to your taste, this recipe is a keeper, with great results every time. Maybe give it a try this Easter long weekend?


Fluffy Buttermilk Style Pancakes
With Berries and Maple Syrup

You will need: 1 cup milk, 2 teaspoons white vinegar, 3 eggs, 2 cups Self Raising Flour, 1 Teaspoon Baking Powder, 2 cups mixed frozen berries, 2 tablespoons caster sugar, maple syrup to serve.

Method: Add the 2 teaspoons of vinegar to the milk, stir through and allow it to stand for a couple of minutes. This will lightly sour the milk.

Combine the berries and the sugar, microwave them for 1 minute and stir well. You could also do the berries in a small pan on the stove, but I find the microwave is quick and easy - and less cleaning up.

Whisk together the milk and the eggs. Add half of the flour and all of the baking powder to the mixture and whisk until smooth. Now add the remaining flour and whisk through, ensuring there are no lumps. If the mixture feels too thick, add a little extra plain milk. If it is too thin, add extra flour.

Allow the pancake batter to rest in the fridge for 10-15 minutes.

Cook the pancakes in a lightly greased or non stick pan. When bubbles appear on the surface, they are ready to turn over. The pan should be moderately hot - watch the temperature, as if the pan is too hot, the pancakes will be overcooked and dark on the outside and not cooked in the middle.

Serve the pancakes with the berries and maple syrup - or anything you fancy.

Makes 4 large or 8 medium sized pancakes.

*******


Sunday, February 16, 2014

Melting Moments

From a really young age I always loved being in the kitchen and this was where my lifelong love of food and cooking began - watching my mum cook and picking up basic skills that I built on as I got older. There were surprisingly few cooking disasters along the way (the notable exception being a misguided attempt to make honeycomb which resulted in the totally trashed, burnt saucepan being buried in our back yard in suburban Perth to hide the evidence. It's probably still there!)

Today's recipe goes way back to my childhood and early cooking days - and is one of the first things that I remember making all by myself. Andrew has been asking me to make biscuits for him to take to work this week, so I thought I would dig in to my childhood repertoire and make a batch of Melting Moments.

These biscuits are simple to make, but require a light touch. The mixture is super soft, but cooks to a gorgeous, melt in your mouth consistency once cooled. I played around a little with the the filling - normally I would just make a basic icing with lemon juice and icing sugar  - but I had some lemon curd in the pantry, which I added along with lemon rind and some fresh lemon juice. The result was a lovely tangy filling with a much richer depth of flavour than the standard one. Passionfruit is also great as a filling flavouring if you have any. My recipe makes 12 generous sized Melting Moments - but you could make little bite size versions if you wanted something a bit more dainty. Here is what mine looked like -


Melting Moments
With Lemon Curd Icing Filling

In other news, regular readers might have noticed my new blog header banner at the top of the page. I had been thinking about refreshing the design for a while, when out of the blue my gorgeous and highly talented artist and designer friend Blair Parkinson sent through a new design he had been working on to get my feedback. Well of course I absolutely loved it, and it now holds pride of place here at Gourmet Goddess. Blair specialises in Opera design, as well as having a considerable portfolio of evocative and beautiful original works, many based on ancient mythology. As if that wasn't enough, he also offers a design service. He really is a man of many talents. His work is available for sale and he also takes commissions, so check out his website for more - http://www.blairparkinson.com/

It's struck me that I've been posting a lot of sweet things in the past few months, so I'm hoping to balance things with some more savoury dishes very soon. We are nearing the end of Summer here in Australia, so we will be seeing a change in the produce available too - always great inspiration for new dishes. In the meantime, enjoy these delicious Melting Moments....

Melting Moments
You will need: 
For the biscuits: 250g butter, 1/2 cup sifted icing sugar, 1 teaspoon vanilla. 2 cups plain flour, 1/3 cup cornflour.
For the filling: 3 Cups Icing Sugar, Rind of 1 lemon finely grated, 3 tablespoons lemon curd, Juice of 1 lemon.

Method: 
Preheat the oven to 160C. Line two baking trays with baking paper or silicone baking mats.

Beat together the softened butter, icing sugar and vanilla until light and pale. Fold in the plain flour and cornflour to make a super soft dough.

With floured hands, lightly roll the dough into balls and place on the baking trays, leaving at least a couple of finger widths of space between them. With a floured fork, gently press the balls down to form disc shapes.

Bake for 15 minutes. Allow to cool on the trays completely before filling them.

To make the filling, mix the icing sugar, lemon curd and rind well. A teaspoon full at a time, add the lemon juice until the mixture forms a firm icing (you may not use all of the lemon juice, that's ok)

Put a spoonful of the filling onto half of the biscuits and put the remaining biscuits on top. Cover and refrigerate for at least 20 minutes to set.

********


Friday, January 24, 2014

Too Many Plums!

Well, I got a little over enthusiastic at our local growers market last weekend and came home with a very large bag of sweet, dark plums. Although I've eaten them with my lunch every day for the last week, today I found myself with a fruit bowl full of them, that were super ripe and needing to be eaten pretty much right away. The thought of eating 8 plums today was rather daunting so I decided to come up with a more creative way to use them.

What I came up with is a golden plum cake, that would be lovely for morning tea - or even served warm as a pudding with some cream or custard. I used the same concept as an upside down cake, laying some of the plums on the bottom of the cake tin, so that when you turn the cake out to cool, you get the effect of the gorgeous ruby colour. I also chose to bake the plums with a little sugar first, instead of just chopping them up and adding them to the cake batter. What this does is to intensify the flavour and also the colour of the plums.

I think this cake would work really well with any stone fruit - peaches, apricots or nectarines - or even with mangoes. Just see what you have in your fruit bowl if you don't happen to have plums.


Golden Plum Cake
 

You will need: 8 medium sized plums, 2 tablespoons caster sugar, 250g butter, softened, 1 cup caster sugar, 2 teaspoons vanilla extract, 3 eggs, 2 1/2 cups self-raising flour, 2/3 cup milk.

Method: Heat the oven to 200C.

Remove the seeds from the plums and cut them roughly into quarters. Line a baking tray with baking paper and place the plums on the tray. Sprinkle the 2 tablespoons caster sugar over the plums and bake for about 20 minutes. Remove the plums from the oven and allow to cool a little.

Gently spoon the plums into a bowl, trying not to break them up too much. I use a slotted spoon for this, as it helps the extra moisture drain away - you don't want too much of the plum juice in the cake, just the cooked flesh. Set the plums aside.

Reduce the oven to 180C. Grease a cake tin and line the bottom with baking paper.

Using an electric beater, cream together the butter, caster sugar and vanilla until it becomes fluffy and a little lighter in colour.

Add the eggs one by one and beat till all combined. Now stir in half the flour and half the milk (a spatula is good for this) Repeat with the rest of the flour and milk.

Take the plums and place a few of them on the base of your cake tin - this will end up being the top of the cake and the "presentation" side. Now gently fold the remaining plums through the cake mixture.

Pour the mixture into the cake pan. Bake for 45 minutes to 1 hour (this will depend on your oven, so just keep an eye on it) It will be cooked when a skewer inserted into the centre comes out clean. Allow the cake to rest in the pan for 10 minutes.

Turn out onto a wire rack and gently peel away the baking paper. Allow the cake to cool and serve as it is - or with whipped cream, ice cream or custard.


******
 

  • Saturday, November 30, 2013

    Lovely Lemon Lusciousness

    Today I decided to go really old school and bake a very simple, traditional recipe that is not only absolutely delicious, but is also super economical to make. If you or a neighbour has a lemon tree, and you can score some free lemons, it will be even more economical. My old fashioned lemon bars only use a few basic ingredients - but the result is a moist, sweet and tangy treat perfect for afternoon tea, or served with a scoop of ice cream or freshly whipped cream for a lovely dessert.

    A luscious sweet treat deserves a pretty plate I say, so I served them on one of my favourite plates - a lovely green and white vintage number - one of a pair that I found in a flea market in Paris. I was on my honeymoon when I found them and every time I use those plates I get all nostalgic thinking of walking the streets of that gorgeous city - and the brilliant time we had. These are my instant feel good plates!

    So give these beautiful old fashioned lemon bars a try - and I warn you, they are extremely moreish.


    Old Fashioned Lemon Bars


    You will need:
    For the base: 150g soft butter, 1& 1/2 cups plain flour, 4 eggs, Juice and rind of 2 lemons, 1 & 1/2 cups caster sugar, 1/2 teaspoon salt.

    For the topping: 2 cups icing sugar, Juice and rind of 1 lemon.

    Method: Preheat the oven to 180C. Line a shallow brownie/slice tin with baking paper.

    Beat together the flour, sugar, salt and butter.

    In a separate bowl, whisk the eggs, lemon juice and lemon zest.

    Pour the wet ingredients into the dry ingredients and beat for about 2 minutes. Pour into the lined tin. Note: The mixture will not really rise, so don't choose a tin that is too large, otherwise your lemon bars will be flat as a pancake.

    Bake for about 30 minutes. Test with a skewer in the centre of the mixture. If it comes out clean, it's cooked.

    Remove from the oven and allow to cool completely.

    To make the glaze/topping, combine the icing sugar and lemon juice (add more icing sugar or water to make a spreadable consistency if you need to)

    Spread the topping evenly over the lemon base, sprinkle the lemon rind over the top. Allow for the topping to set and cut into squares or bars.

    ******


    Saturday, November 23, 2013

    Pumpkin Pie - Danish/Scottish/Australian Style!

    Today's dish has had an interesting journey to get to you - from Denmark - via Scotland, via Australia. The original recipe was passed on to me from my sister, who lives in the Highlands of Scotland. Where she is in the Northern Hemisphere, they have recently celebrated the old festival of Samhain, a celebration marking the end of the harvest season and the beginning of winter on October 31. This old Pagan festival has morphed into what is celebrated around the world in modern times as Halloween. Foods of the harvest are traditionally shared at this time of the year, with pumpkin being a very common ingredient to go into Samhain celebration dishes.

    Andrew has been asking me to make a pumpkin pie for a while, and so when my sister sent me a Danish pumpkin pie recipe this week that she had made and recommended - and we had a glut of pumpkin at our house - I thought it was a great time to give it a try. I made a few changes to the original recipe, omitting the brandy (not being brandy drinkers, we didn't have any in the house so I just left it out), tweaking the dairy and spice component and adding vanilla, as well as a pecan/hazelnut pastry base.

    You could easily use store bought plain shortcrust pastry for this recipe if you wanted to simplify the preparation, but if you have time, the nutty base is really delicious and adds another taste and texture element to the dish. I used a mixture of ground hazelnut and pecans - just because I had them in the pantry. I blitzed the nuts in the food processor until they were blended finely. You could use almond meal too if you liked.


    Pumpkin Pie
    with Hazelnut & Pecan Pastry

    The pumpkin pie is rich, so I served it in quite small slices, dusted with a little icing sugar and eaten with a small scoop of vanilla ice cream, a few walnuts and a drizzle of maple syrup. It would also be great with some thick cream on the side, dusted with some praline.

    The very warm, spicy aroma of this dish remind me very much of traditional Christmas flavours. The pumpkin pie would be a great addition to a Christmas dinner - or if you are in the States, Thanksgiving.  Although the flavours are rich, the texture is light, so it gives you lots of taste without heaviness. You could also do little individual tarts which would look fantastic.

    Whether you are celebrating Christmas, Thanksgiving, Halloween or Samhain - or even if you are not - this is a delicious dish to serve and share.


    Pumpkin Pie
    served with walnuts & maple syrup


    You will need:

    For the pastry - 2 1/2 cups plain flour, 1/3 cup caster sugar, 1/2 cup ground hazelnuts, 1/2 cup ground pecans, 175g chilled butter, 2 egg yolks, 2 tablespoons iced water.

    For the filling - 500g peeled pumpkin, 175g brown sugar, 4 eggs, 2 cups cream, 2 teaspoons cinnamon, 1/2 teaspoon allspice, 1/2 teaspoon grated nutmeg, 1 teaspoon vanilla extract, 1/2 teaspoon salt.

    Method:

    Chop the pumpkin into cubes and steam until very soft (I do this by putting the cubes of pumpkin on a large flat plate, covering with plastic wrap and cooking on high in the microwave for about 6 minutes - you do not need to add any water at all) Place the cooked pumpkin in a strainer for at least 30 minutes and allow the excess moisture to drain away.

    In the meantime, make the pastry. Place the flour, sugar, nuts and butter in a food processor and blend until just combined.

    Whisk together the egg yolks and cold water. Add to the flour mixture and process until it mixes and then forms a large ball of dough. Do not over process your mixture.

    Turn the ball of dough onto a floured board and knead gently until the dough holds together well. Shape into a rough disc shape, cover with plastic wrap and put in the fridge to rest for 30 minutes.

    Once the pastry has rested, roll the pastry flat and line a pie dish. Bake at 180C for about 15 minutes.
    Remove from the oven and set aside.

    To make the filling, put the pumpkin and all of the other filling ingredients into a food processor and blend until smooth. The consistency will be quite runny - don't be concerned - it will firm up during the cooking process.

    Pour the filling into the pastry case.

    Bake the pie at 180C for about 1 1/4 hours. Allow to cool before dusting with icing sugar. I serve mine with walnuts, a drizzle of maple syrup and a scoop of cream or ice cream.

    *******


    Friday, November 1, 2013

    Hazelnut Meringue-A-Rama

    Whilst sweet things are not generally my favourite dishes to cook or to eat, I do admit that I love anything remotely meringue-like. Whether they are crispy or mallow-ish, creamy like the Italian style meringue, bite size or king size, I love them. I will say no to cake, but always say yes to pavlova, or pretty meringues in a cake shop window. Today I had a day off and thought I would have a go at making a hazelnut meringue, which is my absolute favourite kind.

    The nuts add a great texture dimension, as well as that heavenly hazelnut taste. You could make individual meringues, but today I went with a large round one, which I decided to serve with Chantilly cream and fresh strawberries, which are in season now and are particularly good. I confess that I cracked the meringue a bit when getting it from the tray to the serving dish, but the beauty of this sort of dish is that you can hide any cracks under a delicious topping. No dramas.

    The Chantilly cream is very easy to make, (you could add some cocoa to it if you wanted a chocolate cream) but I beg you not to use that awful fake vanilla essence in this recipe - or any other for that matter. Invest in proper vanilla extract - it is worth the few extra dollars I promise. Fake vanilla essence is the work of Satan and has no place in the kitchen, except for cleaning the inside of your fridge with.

    Although this dish needs over an hour in the oven, it is actually quite simple, so worth giving a go - even if like me , you aren't really the baking type. You could get really creative with the toppings too - roasted nuts, shaved chocolate, different kinds of seasonal fruit. Drizzling it with raspberry or chocolate sauce would be lovely too. You could also shape the meringue to be taller than mine, if you wanted it to be more pavlova like.

    Bon Appetit!


    Hazelnut Meringue
    with Chantilly Cream & Strawberries


    You will need: 4 free range egg whites, 1 cup caster sugar, 1 cup ground hazelnuts, 1 teaspoon white vinegar, 2 teaspoons cornflour, 300ml whipping cream, 2 teaspoons vanilla extract, 2 tablespoons icing sugar, 1 punnet strawberries.

    Method: Preheat the oven to 120C. Line an oven or pizza tray with baking paper.

    In a very clean, dry, metal or ceramic bowl, beat the egg whites until soft peaks form. Gradually add the sugar, a tablespoon full at a time and continue to beat until all combined. Add the cornflour and vinegar until mixed through.

    Gently fold in the hazelnuts until evenly mixed. Transfer the mixture to the baking tray and using a spoon or spatula, form the meringue to the desired shape. I build up the sides a little for presentation purposes and for ease of serving later.

    Wipe any excess off the baking paper. Bake meringue for 1 hour and 15 minutes. When it is done, turn off the oven and allow the meringue to cool there, without removing it. You can leave the oven door slightly ajar to speed up the process a bit.

    In a bowl, combine the cream, sugar and vanilla extract. Beat together until firm enough to spread. Use this to top the cooled meringue. Finish with the strawberries and serve.

    Serves 6-8 people

    *******


    Sunday, October 20, 2013

    Sunday Brunch - Pumpkin & Feta Muffins

    Morning everyone. I've been out in the garden bright and early this gorgeous Sunday morning tending to my tomato plants - which in time I hope are going to deliver crops of delicious, home grown tomatoes. I didn't have a lot of luck with them last year - they were sad and scraggy looking, and I lost some to a leaf spot thing that attacks the plants and makes the fruit drop. However this year I decided I would read up about tomato growing in my area, to educate myself on what will make happy plants and lots of fruit. I also decided on four very different varieties (two of them heirloom) as a bit of an experiment to see which ones like my backyard. So far they are all going beautifully, looking strong and healthy and already sporting plenty of flowers that will turn into fruit. This morning they got a good watering and a dose of potash, which they seem to love. Fingers crossed I will have some great tomatoes to show you and to eat very soon. The bees are also loving the new flowers, and anything that brings them into the garden is a good thing.

    So, as I was out pottering in the garden, I was thinking about what to make for Sunday breakfast/brunch. I noticed that my herbs were looking particularly lush, so I decided whatever it was, it had to include a handful of fresh herbs. I always like to use what I have on hand, so I checked out the fridge to see what might give me some ideas for this morning's breakfast. Today's inspiration was - pumpkin, feta cheese and natural yoghurt. I decided to bake a batch of savoury muffins, full of the sweetness of pumpkin, the tang of the yoghurt and cheese and the freshness of herbs just picked from the garden.

    As well as a great breakfast idea, these would also be ideal picnic food, or as an accompaniment for a bowl of soup or a salad anytime. These also freeze well, so it would be worth making a couple of batches and keeping some for whenever you fancy something savoury and delicious. As with most of my recipes, you can tailor make these muffins to include whatever flavours you like, or what you have on hand - olives, spring onion, corn kernels, extra cooked vegetables or whatever herbs you have in the garden - the basic recipe will work regardless. These muffins are lovely and moist, as well as being packed with flavour. You can eat them warm or cold, with or without a little butter. Personally, I think they are delicious warm, without anything at all!


    Pumpkin and Feta Muffins


    You will need: 3 cups raw pumpkin cut into small cubes, 1 diced Spanish onion, Splash of olive oil, 2 cups self raising flour, 1/2 teaspoon salt, 1 tablespoon vegetable oil, 1/2 cup unsweetened natural yoghurt, 1/2 cup milk, 2 free range eggs, Pinch of cayenne pepper, 1/2 cup grated tasty cheese, 1/2 cup crumbled feta cheese, 1 tablespoon finely chopped fresh herbs (I used a combination of thyme, parsley and chives), 1 tablespoon poppy seeds, salt and pepper.

    Method: Preheat the oven to 200C.

    Combine the pumpkin, onion, a splash of olive oil and a very generous seasoning of salt and pepper. Mix together until well coated. Bake on a tray (I line mine with baking paper for easy clean up) for about 25-30 minutes until the pumpkin is soft. Set aside to cool.

    In a bowl, combine the eggs, milk, yoghurt, cayenne and oil. Whisk together thoroughly.

    In another large bowl, put the flour, both the cheeses, herbs and pumpkin/onion mixture. Season well with salt and pepper. Using your hands, very gently combine these ingredients - you don't want to smash up the soft components too much, but you want to ensure that they are evenly combined.

    Add the wet mixture to the dry mixture until just combined. Remember the golden rule with muffins - don't over mix. The mixture should just barely hold together.

    Spoon into a greased or oiled muffin pan and sprinkle with the poppy seeds.

    Bake for 15-18 minutes. Allow to sit in the pan for a few minutes, before removing them and placing them on a wire rack to cool. Serve warm or cold.

    Makes 12 regular sized muffins.


    *******


    Sunday, July 7, 2013

    Apple, Rhubarb and Pecan Muffins

    A very good Sunday morning to all of you Gourmet Goddess peeps! Today I thought I would share a simple recipe for something that I baked last weekend, that turned out to be rather lovely. I decided to make a batch of muffins for brunch, and as I wasn't very motivated to get out of my track suit pants and go to the shops, it had to involve ingredients I already had on hand. I checked out the fruit bowl, the fridge and the pantry and came up with a combination of Pink Lady apples, a few stalks of rhubarb and a couple of handfuls of pecan nuts.

    The result was these tasty, rustic fruit packed muffins.


    Apple, Rhubarb and Pecan Muffins

    The pecans add a wonderful textural element to these beauties - I chose to leave the skin on the apples for the same reason. The skins also have lots of fibre so they are better for you as well. The muffins aren't overly sweet and you can really taste the natural flavours of the fruit coming through, without this being overwhelmed by too much sugar. To add some warmth and spice, I included some cinnamon, allspice and nutmeg to the mixture, as well as a touch of vanilla. These ingredients add flavour without the sugar - feel free to add more than I state in the recipe if you want your muffins extra aromatic and spicy.

    I would be inclined to use whatever you have in your fruit bowl as a basis for these muffins - any combination of apples, pears or even plums would work well. I adore rhubarb, but if you aren't keen on it, you could substitute chopped strawberries if you wanted to. Don't have pecans on hand? Chopped almonds, walnuts or hazelnuts would be great too.

    Eat these muffins warm with good butter. Oh, and they would freeze well too.

    Have a lovely Sunday!

    You will need:
    3 apples (I used Pink Lady variety), 3 or 4 stalks rhubarb, 2 cups self raising flour, 1/2 cup sugar, 1 free range egg, 1 cup milk, 1 teaspoon vanilla extract, 1/4 cup vegetable oil (I used rice bran oil),
    1 cup chopped pecans, 1/4 teaspoon allspice, 1/4 teaspoon cinnamon, 2 pinches nutmeg.

    Method:
    Wash and trim the rhubarb and ensure no leaves are left on. Chop the stalks into small pieces. Core and chop the apples into small pieces (I leave the skin on). Spread the apple and rhubarb onto a lined baking tray and cook for 20 minutes in a preheated oven at 200C. Remove and allow to cool.

    Whisk together the milk, oil, vanilla and egg. Set aside about a tablespoon of the pecans to sprinkle on the tops of the muffins once in the pan. In another bowl, combine the flour, sugar, remaining pecans, allspice, nutmeg and cinnamon.

    Add the fruit to the flour mixture, then pour in the wet mixture. Combine gently until just mixed together. Do not over mix, or your muffins will be tough and flat. Spoon into a large muffin pan. Sprinkle the remaining pecans over the tops of the muffins.

    Bake in a preheated oven at 180C for about 20-25 minutes. Allow to cool in the pan before turning out the muffins. Makes 10 large sized muffins.

    ******

    Saturday, June 15, 2013

    Tasmanian Travelbug

    Greetings from the gorgeous southern island state of Tasmania! I thought I would give you all a brief progress report on what we have been up to food wise, in this place that seems to have stunning produce and food experiences at every turn. It has been wonderful returning to Tasmania in the winter - the last time we were here the landscape and the seasonal food for sale was very much in Spring mode. Now at the beginning of the cold season, the landscape and the weather looks very different from when we were here in November. Still beautiful and wild, but harsher and less forgiving. Everyone is rugged up for the new conditions, and as you drive around you see tendrils of smoke drifting from farmhouse (and urban house) chimneys as everyone lights their fire to create a cosy respite from the winter cold.

    The morning we arrived we dumped our bags at the hotel and headed straight down to Salamanca Market (my favourite market in the country) to explore and grab some lunch. The market is bursting with fresh local produce, hand made items of wood and metal and wool, sweet treats, fresh flowers, vintage goods and all kinds of treasures. As we wandered around we couldn't resist the delicious aroma of wood fired pizza cooking. A portable wood fired oven was cranking out hand made pizza made from all local ingredients - including scallops, Huon Valley mushrooms, organic beetroot and local goat's cheese. We grabbed a couple of slices to munch on as we strolled around the market - the delicious roasted pumpkin and feta was a standout.
     

    Wood Fired Pizza
    - with great local produce on the menu.


    Those of you who have been watching Gourmet Farmer on SBS would be familiar with their small gourmet shop under the stairs at Salamanca Arts Centre - A Common Ground. We dropped in to see if their eagerly awaited raw milk saffron cheese had arrived yet - but alas there is still a few weeks before it will be available. This means we will have to purchase it by mail order and have it shipped to Sydney when the time comes! We did however buy some beautiful free range ham, raw milk cheese and pickled cherries to take home with us. The biggest score though was managing to procure a rare bottle of their small batch sloe gin. Although technically sold out, (I had already tried to buy it online) we got chatting to the delightful Common Ground lady and in the process ended up with the very last sneaky bottle from under the counter as the result of an order mix up. Score!! I'm thinking that I may use the sloe gin as a component in a dish when I get home.

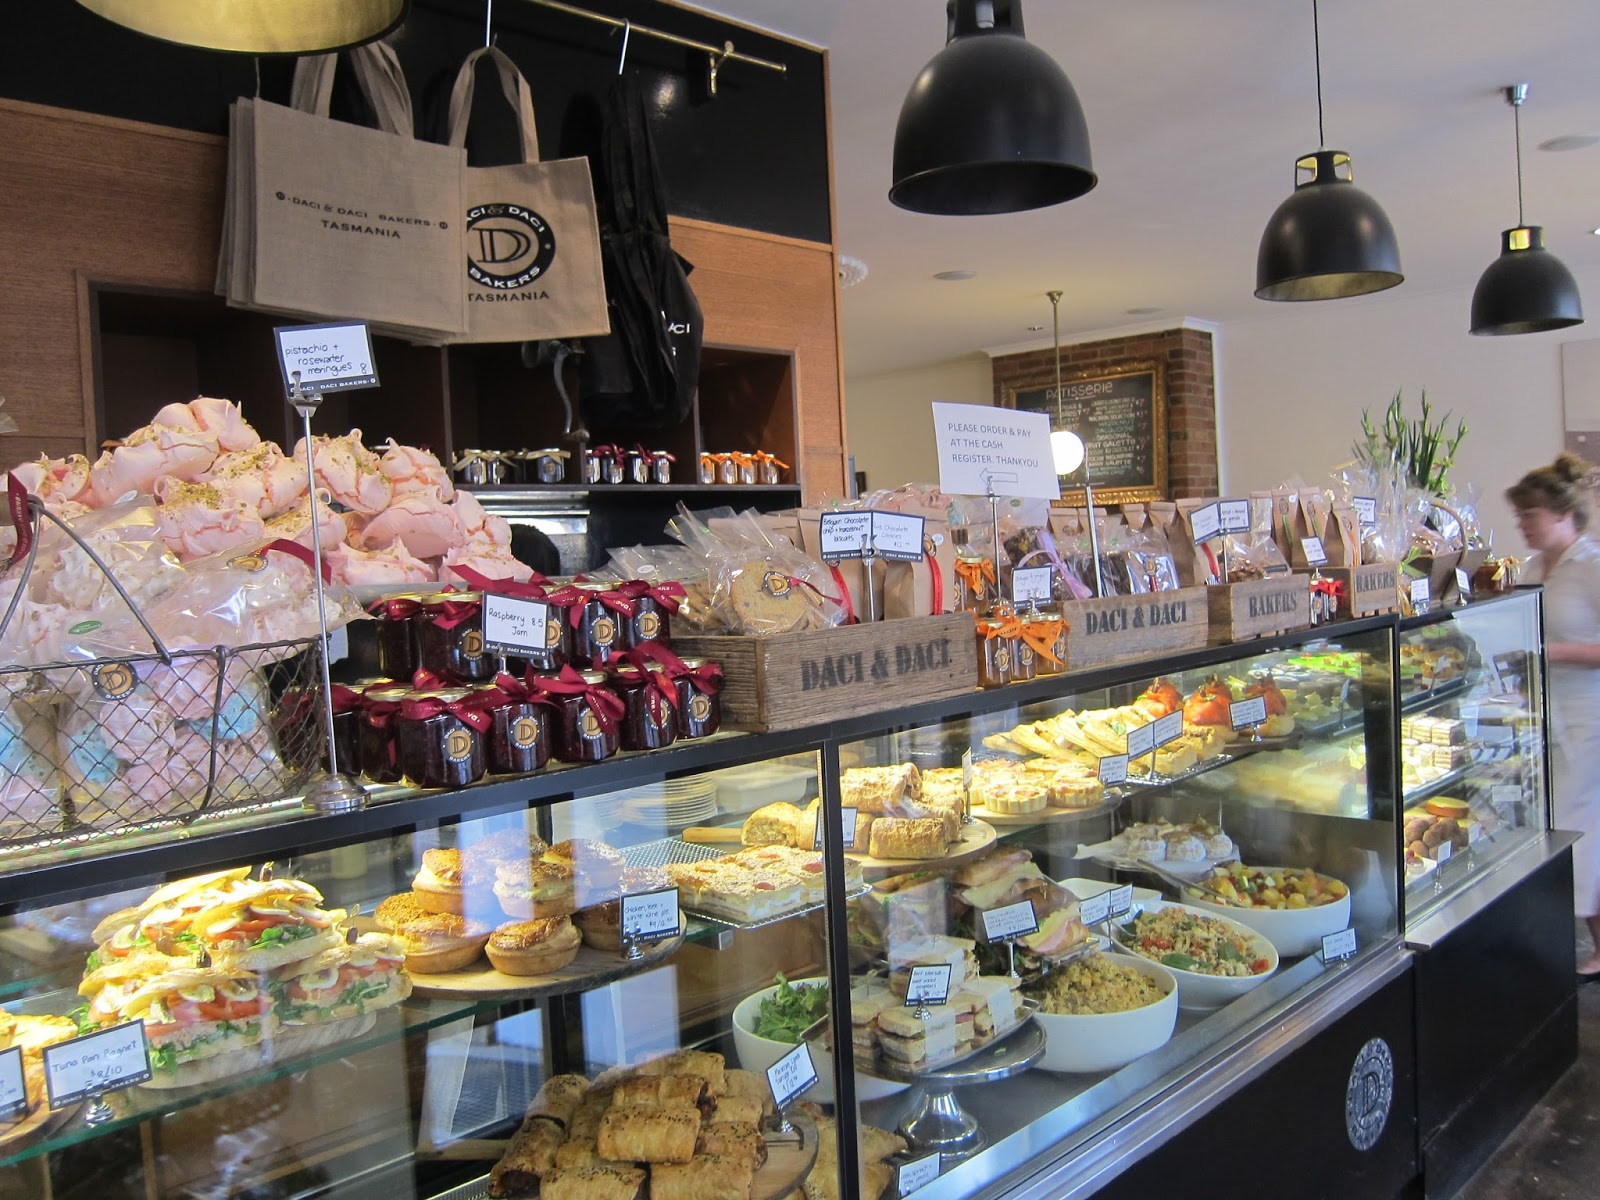
    Just down the hill from our accommodation, we found a brilliant European old style bakery - Daci & Daci - that is choc full of the most delectable breads, pies and pastries to suit every taste. We have ended up there for breakfast a few times so far. This place pretty much sets the standard for baked goods, and to be honest I thought it was even better than a lot of the bakeries we have visited overseas - even France where they have such a big reputation for patisseries. As well as breakfast, we have been getting treats to take away when we have been road tripping around. They have a huge variety to choose from, and so far everything we have tasted has been exceptional.


    Freshly Baked
    -Treats from Daci & Daci


     Daci & Daci
    Just one of the counters full of delicious things

    A few days ago we took a drive to Port Arthur, site of one of the most notorious prison colonies in Australia. The day was suitably sombre and grey for such a sombre place. A lot of the buildings are now ruins, but the Commandant's convict built house is still complete. They have turned this into a museum, showing a bit of how the ruling classes lived there - including the original kitchen. I thought it was rather lovely to look at, but you can imagine it would have been less than lovely for the servants who had to work with this very basic arrangement - carting water and keeping fires going and managing on supplies brought in by ship. I'm always intrigued by historical kitchens - they tell you so much about how people lived.


    The Commandant's Kitchen
    Port Arthur

    We could not visit Tasmania without crossing the water to one of our favourite places - the wild and lovely Bruny Island. This island is the source of a whole lot of amazing produce and there are lots of folks making really exceptional products there. If you love oysters, then you are in for a treat. They have what are easily the best oysters I have ever eaten. The day we went, we actually ate them for breakfast - shucked while we waited, sitting under a tree at the oyster farm. They taste so clean and fresh, with that gorgeous salty brine of the sea. I love the taste of oysters and seafood from very cold waters - they have a pristine character about them that warm water varieties just don't have for me.

    We checked out some of the beautiful smoked trout and salmon from the Bruny Island Smokehouse, as well as smoked wallaby (you will commonly find wallaby on the menu in Tasmania) and free range smoked ham. We came away with some of the ham, their award winning trout pate and the delicious buttery tasting salmon pate too. Next stop was the Bruny Island Cheese Company for second breakfast - a simple wood fired pizza topped simply with tomato and their stunning cheeses. They also bake excellent rustic wood fired bread, so we came away with a loaf which ended up being dinner that night, along with their excellent cheese - particularly the delicious C2 raw milk cheese which is a favourite in our house.

    Bruny Island Smokehouse, Get Shucked Oyster Farm,
    Bruny Island Cheese Company.


    Yesterday we drove out to Cygnet, an area we really love and where we hope to live eventually. As well as exploring, we had lunch at The Red Velvet Lounge, a local cafe/meeting place that I had read about recently. I was surprised to find a quite large, but very cosy and welcoming place that seems to be a hub for locals as well as visitors. We had a delicious comfort food style lunch in front of the fire there, and was really impressed by the very simple, but beautifully prepared food. I chose a slow cooked lamb shoulder with roasted potatoes and salad. This was served with a little jug of lamb jus and a great punchy salsa verde - all local ingredients and just delicious.


    Lamb Shoulder
    - served with Lamb Jus and Salsa verde


    As you all know, I'm not a big dessert fan - but my very favourite sweet treat in the world is a simple sponge cake with cream. The Red Velvet Lounge version of this looked so beautiful, we had to share a slice. Old school, just like your Nanna would make sponge was sandwiched between whipped cream and fresh local berries. Just perfect. And proof that simplicity and excellent ingredients rule!


    The Red Velvet Lounge Sponge Cake
    - with cream and local berries


    All of the food we have been enjoying so far has been rustic and quite simple, but tonight we will change gear somewhat for a fine dining degustation menu at The Source. Located at the Museum of Old and New Art (MONA), Michelin star winning chef Phillipe Leban creates dishes with all Tasmanian ingredients, but with a French influence. We are really looking forward to seeing what he comes up with for us this evening. I will report back, so watch this space.

    *******


    Friday, May 24, 2013

    Just popped out for a sec......

    So, after just over a month of no Gourmet Goddess updates I decided that I really needed to check back in and let you know that all is well and that I haven't fallen off the face of the earth. Life has been insanely hectic over the past few weeks, with work and everything else. This has meant not a huge amount of blog worthy cooking and even when there was, no time to sit down and write up anything that might have been of interest. Food at our place has been back to basics, with a few notable exceptions, which I did snap pictures of with Instagram on my mobile phone - so here are the highlights to bring you up to speed.

    I acquired an almost new bread machine from a friend who discovered she can't eat bread anymore (boo!) but who passed her bread maker on to me (yay!) I have now gotten into the habit of baking bread every Saturday morning. Have experimented with a few different recipes for a basic loaf and think I will venture into the realm of grainy breads and fruit loaves soon. A few weekends ago we had some bread left over by Sunday morning, so I decided to make us a batch of French Toast with my day old, homemade bread. This loaf was made with organic unbleached flour. I teamed the golden bread up with some fresh blueberries, raspberries and strawberries - and maple syrup of course. It was a delicious treat and the best French Toast I had ever made. The home baked bread was a real winner.

    French Toast and Mixed Berries
    Made with GG's Home Baked Bread


    A road trip down to Canberra one weekend yielded an esky full of fresh produce that we picked up in our travels - including a beautiful big pumpkin, organic garlic, berry vinegar, locally made sausages, chicken terrine, organic beef mince and a small pheasant. Although I have eaten pheasant a few times before, I had never cooked it and thought it was time I had a go. I decided to go with a very old technique for cooking game, which was to soak it in milk overnight before roasting it. To the milk I added fresh thyme and bay leaves from my garden, along with crushed peppercorns and juniper berries. The pheasant soaked in the milk for a good 12 hours, then I drained the milk off, patted the pheasant dry and roasted it with seasonal vegetables. I made a gravy with the pan juices and served it as a traditional roast.

    The pheasant was not a large one - just under a kilogram - and it came already plucked but with the head still intact. I removed the head to roast it, although if I was being really old school it would have been left on during the roasting process. The enzymes in the milk help to tenderise the flesh, and the herbs and juniper I added gave it a lovely herbal aroma and flavour. The meat was not overly gamey and came out quite soft and juicy, with the exception of the legs where the meat was darker and not as tender. This is almost always the case with game, or any meat for that matter - the parts of the animal that do most of the work tend to be tougher than the less active parts. The flavour though, was fantastic. I am a fan of game meat - rabbits, pigeon, duck - and I was very happy with my first attempt at cooking pheasant.


    Roasted Pheasant with Bay, Thyme and Juniper
    Served with Autumn Vegetables

    Fast forward to this week, where my work colleagues and I hosted Australia's Biggest Morning Tea, which raises money for The Cancer Council - a very worthy cause. My contribution was a couple of dozen rather kitsch looking pink cupcakes. The cake and icing was spiked with lemon, which gave a little freshness to them and balanced out the sweetness. I went a bit mental with the decorations - lots of sparkly stuff and coloured baubles and flowers. Thought a bit of whimsy in the workplace can't be a bad thing! They were a big hit, and along with the contributions from my workmates who baked their favourite recipes to share, raised over $500 for The Cancer Council. Not bad for some tea and cake!


    Pink-a-Rama!
    My fundraising cupcakes - 
    for Australia's Biggest Morning Tea

     
    So, what is in store in the coming weeks? Well, tomorrow our bookclub meets and we have decided that instead of our usual Sunday afternoon gathering with coffee and cakes we would do a Saturday version and everyone would bring along a dish so we could have dinner and some wine instead. It's my turn to host so I will have a full house Saturday evening. The weather is quite chilly, so my contribution will be a leg of sustainably produced local lamb from Feather & Bone - my favourite meat supplier here in Sydney. They are fussy about how their meat is raised and produced, and boy does it show in the quality of the produce. I'm thinking I might season the meat with garlic, lemon thyme from the garden and native pepperberries that I brought back from out last trip to Tasmania. If it isn't raining we will cook the lamb over coals outside. Delicious.

    Speaking of Tasmania, we are only weeks away from heading back there for a ten day holiday and recon mission. We have completely fallen in love with the place and plan to one day make it our home, where we will grow as much of our own food as possible in that very special and pristine part of the world. As well as having a break there, we are planning to further explore the area where we think we would like to settle eventually. We also thought it would be good to visit in winter so we know what we are in for. I've been watching the weather forecasts and it's going to be freezing. Good thing we both like the cold!

    Now you are all up to date, I'm hoping that we will be resuming normal transmission, with more regular Gourmet Goddess installments - so watch this space. The coming weeks look like they are going to be less of a frenzy than most of May has been - thank the Goddess! The weather has really cooled down, it gets dark a lot earlier and that seasonal change just cries out for cosy, comfort food with seasonal ingredients I think. Maybe I will check out out local farmer's market this weekend and see what inspires?

    ******

    Saturday, April 13, 2013

    Autumn Fruit Pudding

    I love Autumn. The weather is cooling down (especially the nights), the days are crisp and clear and the season brings a whole new batch of fresh produce. The Summer fruit and vegetables are starting to disappear and the Autumn harvest begins. Today's recipe is inspired by that change of season, using a range of delicious Autumn fruits to create a comforting, warming and flavour filled pudding - just perfect for the cooler weather.

    This pudding is comprised of aromatic roasted fruits, given a extra punch with vanilla and a touch of lime - and a light vanilla cake top that is just delicious served warm with something creamy like ice cream or custard. I made mine in one pan, but you could easily make individual serves if that takes your fancy. The recipe is very adaptable. Use whatever fruits you can find wherever you are. In my case, I had some wonderful organic nectarines, black plums, a punnet of strawberries and a big bunch of rhubarb. This combination not only made for a beautiful flavour, but a fantastic ruby coloured result.


    Gorgeous Autumn Fruit
    - about to go into the oven
     
     
    I thought the dessert had an old fashioned vibe about it, so I served the Autumn Fruit Pudding on some gorgeous vintage English china that I picked up last Christmas holidays at a secondhand store in Nowra, NSW. (If you are ever in that part of the world, look up "The Everything Store" - full of all kinds of treasures!) The china really caught my eye with it's beautiful peacock coloured pattern. The set comprised of a large serving bowl and six smaller dessert bowls and was made by Keeling & Company in Staffordshire, England. They produced a range of striking brightly coloured china called Losol Ware from 1886 to 1936. I did a bit of online research and found that my china is the "Rushton" design pattern and circa 1912. 
     
    Although this china is over 100 years old, it gets plenty of outings. I have taken to using the bigger bowl as a salad dish. I absolutely hate the idea of having beautiful things locked up in a cupboard and not used. That whole notion is just so stupid and precious. These items were made to be used, so that's just what I do! I do draw the line though, at putting them in the dishwasher - I wash and dry these by hand due to the fine gold edging around the rim of the bowls. I don't think they would fare well being machine washed under extreme heat. Every time I eat off these beautiful dishes, I ponder who may have owned them before, and what kinds of food was served on them. I wonder who brought them here from England, and how they have survived 100 years without a chip or crack. Amazing. Makes me enjoy this Autumn Fruit Pudding even more.


    Autumn Fruit Pudding


    You will need:
    For the filling: 1 bunch rhubarb, 1 punnet strawberries, 4 nectarines, 4-6 plums, 1 vanilla bean, 2 tablespoons brown sugar, juice of 1 lime, 1 vanilla pod

    For the pudding top: 125g butter, 1/2 cup caster sugar, 2 teaspoons vanilla extract, 1 1/2 cups self raising flour, 1/3 cup milk, 2 eggs, 2 tablespoons icing sugar (to dust on the top)

    Method: Remove and discard the leaves from the rhubarb and chop the rhubarb stalks into pieces about 3cm long. Cut the stalks from the strawberries and remove the stones from the plums and nectarines. Leave the strawberries whole but chop the plums and nectarines into large chunks. Split the vanilla pod down the middle, scrape out the seeds with a knife.

    Preheat the oven to 200C. Combine the fruit, lime juice and brown sugar and vanilla beans (including the pod) and bake on a tray or shallow baking dish for 25 minutes, stirring through once, about halfway through cooking. Set the fruit aside to cool.

    To make the pudding top, Cream together the butter, sugar and vanilla until pale and fluffy. Add the eggs one at a time and beat together until all combined. Now add half of the flour and half of the milk until well mixed. Add the remaining milk and flour and combine thoroughly.

    Preheat the oven to 160C. In a heatproof dish, spoon the fruit mixture. Remove the vanilla pod.  Now pour the pudding mixture over the top and bake for around 45 minutes until lightly golden. Allow to cool for 10 minutes before dusting with icing sugar.

    Serve warm with cream, yogurt, custard or ice cream.

     
    ******

    Saturday, April 6, 2013

    Pork and Fennel Sausage Rolls

    I love a homemade sausage roll. The flaky pastry, the moist, seasoned filling - pure comfort food that makes me think of childhood birthday parties and Mum making trays of them on the holidays. Look, I don't even mind a dodgy servo sausage roll either if truth be told! Whole different ball game of course, but who can resist meat in pastry? Sausage rolls are not a new invention and folks have loved their sausage rolls for hundreds of years.

    The original ye olde sausage roll first appeared as a picnic food in the 1800's, was served hot and cold and at first did not contain any pastry. The filling was frequently comprised of cold roast veal and ham, or cold fowl and tongue minced and seasoned with dried herbs. The mixture was shaped and then breadcrumbed and fried - a little like that other well known picnic staple, the Scotch egg. Eventually, people started encasing the mixture in shortcrust pastry and eventually the puff pastry versions that we know today.

    My recipe is based on one of my favourite combinations - pork and fennel, and inspired by the delicious sausage rolls they make at the fabulous Bourke Street Bakery in Sydney. Yes, it is a bit of a tarted up sausage roll, but the flavours are just delicious and they aren't difficult to make. I strongly suggest you make an extra batch , as they freeze brilliantly and are a great thing to have up your sleeve for a quick lunch or if guests drop by. Who doesn't love a homemade sausage roll?

    My other suggestion is not to use pork mince that is super, super lean or has not even a touch of visible fat in it. Like any sausage, it needs a little fat for moisture and flavour. Using "diet" pork mince will result in a dry sausage roll - you have been warned. So what are you waiting for? Head to the kitchen and whip up a few trays of these beauties!


    Pork and Fennel Sausage Rolls
     

    You will need: 1kg free range pork mince. 1 bulb fennel diced finely, 1 large white onion diced finely, 1 tablespoon breadcrumbs, 2 cloves finely chopped garlic, 1 tablespoon finely chopped parsley, 2 teaspoons sweet paprika, 2 teaspoons yellow mustard seed, generous pinch of allspice, 1 teaspoon fennel seed chopped, pinch of cayenne pepper, 1 tablespoon olive oil, 1 lightly beaten free range egg, salt, ground, black pepper, 1 tablespoon poppy seeds. 3-4 sheets pre- rolled puff pastry.

    Method: Preheat the oven to 220C.

    In a pan, heat the olive oil and cook the fennel, fennel seed, garlic and onion down until soft. Season with a little salt and pepper as it cooks.

    Combine the pork mince, breadcrumbs, parsley, paprika, mustard seed, allspice, cayenne pepper, and plenty of salt and pepper in a large bowl with the cooked onion and fennel mixture. Combine extremely well - clean hands are best for this.

    Cut each of the sheets of pastry into two rectangular pieces. Brush one edge with some of the beaten egg. Lay the meat mixture in the middle of the pastry, ensuring it is densely packed (you don't want big air holes in the sausage roll as it cooks)

    Roll up the sausage roll and press the pastry together well where the pastry joins - ideally, it should overlap a little to avoid splitting as it cooks. I use a fork for this. Place seam side down onto a lined baking tray or silicone baking sheet. Gently cut each roll into two, to make large sausage rolls, or into four to make party size roll.

    Repeat with the rest of the pastry and pork mixture. Prick each sausage roll with a fork, brush with the beaten egg and sprinkle lightly with the poppy seeds.

    Bake until the pastry is puffed and golden brown - about 25 minutes.

    NB: These sausage rolls freeze really well. Just ensure they are cold when you put them in the freezer and wrap well.


    ******


    Sunday, March 17, 2013

    Berry Nut Tart

    I always love entertaining and catching up with friends and this weekend I got to hang out with my good friend Yvette who has been living and working in Cambodia for the last 2 years. As well as being excited to see her after so long, I was also very excited to meet her lovely Cambodian husband Vanda for the first time. It was Yvette and Vanda's first anniversary and they chose to celebrate it by sharing their vows in our back garden, with Andrew and I as witnesses and my celebrant mother in law Kate and father in law Peter in attendance. Celebratory champagne and lunch followed of course!

    I decided on a quite simple family style lunch. Yvette had previously commented on the fact that in Cambodia, there isn't the option to indulge her craving for roasted lamb, so I thought this was the obvious choice for lunch. I deboned and butterflied out a leg of Cooma lamb and allowed it to marinate overnight with plenty of garlic, paprika, olive oil, lemon and orange rind, a squeeze of orange juice, rosemary from the garden, sea salt, cayenne pepper and a few crushed up anchovies. I then char grilled the lamb on the BBQ, and served it with crispy golden potatoes, plenty of seasonal vegetables, gravy and a native Pepperberry and Pinot Noir jelly that I brought back from our trip to Tasmania. The Pinot and Pepperberry was a really tasty accompaniment to the grilled lamb as an alternative to mint jelly.

    For dessert, I wanted something that I could do ahead. When having lunch or dinner guests, I try to include at least one course that can be made - or at least mostly prepared - the day before. It makes things so much easier. There is nothing worse than feeling rushed and stressed when your guests arrive. I mean, entertaining is supposed to be fun right? My second criteria for the dessert dish was that it also had to be pretty much dairy free. I chose a French style homemade almond tart that showed off the delicious berries that are in season right now. I had a handful of macadamia nuts in the cupboard too, so I used those as part of the topping, for a buttery tasting, golden crunch. Normally I would serve a tart like this with creme anglaise or ice cream, but I chose a dairy free sorbet instead from Cow and Moon, a local artisan gelato shop that make delicious, award winning frozen treats. I chose a blackberry and blueberry sorbet that was lovely and tangy against the sweetness of the tart.


    Berry Nut Tart


    This tart could easily be adapted for all kinds of other seasonal fruit. I think that peach or nectarine would be lovely in place of the berries - or you could go really classic and use apples or pears. This recipe would also work well as smaller, individual tarts.


    Tart served with Blackberry & Blueberry Sorbet
    from Cow & Moon artisan gelato @ Enmore


    You will need: 150g soft butter (I used salted butter), 120g caster sugar, 2 teaspoon vanilla extract, 1 tablespoon cornflour, 200g almond meal, 3 eggs, 1/2 cup roughly chopped macadamias, 1 punnet fresh blueberries, 1 punnet fresh raspberries, 1 to 1 1/2 sheets sweet shortcrust pastry (the amount will depend on the size of you tart tin)

    Method: Preheat the oven to 180C. Grease and line a tart tin with baking paper. I use a metal tart tin with a removable base - I think they give a good result and it is much easier to get the tart out of the tin.

    Line the tart tin with the pastry and then place another sheet of baking paper on the top. Fill with baking beads (or if you don't have them, use dry beans or lentils) Blind bake the pastry in the oven for 15 minutes. Remove and allow to cool.

    To make the filling, beat together the softened butter, sugar and vanilla until light and fluffy. Add the cornflour and half of the almond meal and beat together thoroughly. Add the eggs one at a time, beating as you go. Finally, add the last of the almond meal and beat until all combined.

    Spread about half of the raspberries and blueberries across the empty tart shell. Pour the filling mixture into the tart and spread out evenly. Press the remaining berries into the mixture.

    Sprinkle the macadamias over the tart and bake at 180C for around 30-40 minutes, or until lightly golden. Allow to cool for 20 minutes uncovered before slicing and serving. Can be served either warm or cold.

     
    ******


    Friday, January 18, 2013

    The GG Test Kitchen: Adriano Zumbo Macaron Kit

     Hi folks - I thought I would share with you a bit of a test kitchen experiment that I did this week with something that caught my eye at the supermarket recently. Normally I'm not a fan of packaged mixes, preferring to make things completely from scratch - but when I saw this Adriano Zumbo macaron kit when out shopping the other day I was really curious to see if they actually worked. Living where we do in the Inner West of Sydney, we are pretty close to Zumbo's flagship Balmain patisserie and sometimes pop over to indulge in something from his sweet treat wonderland. One of our favourites is the delectable salted caramel macaron. The Zumbo macaron kit in the salted caramel variety was the obvious choice for my experiment. The kit comes in a passionfruit variety too if you want something fruity and less rich.

    The kit sells for $8.50rrp and contains pretty much all you need to make about 15-20 macarons. For a price comparison, a single macaron from Zumbo's patisserie costs $2.50. Apart from the kit, the only extras you will need are baking paper and a little butter for the filling but everything else is included. As well as the mixture components, there is also a template for when it comes to correctly piping the macaron mixture and two piping bags for the base mixture and the filling. The instructions are very straightforward and I was careful to follow them to the letter, despite my usual tendency to not follow instructions at all and do my own thing. I did as I was told this time I promise!


    The Zumbo Salted Caramel Macaron Kit
    - it also comes in a passionfruit variety

    So, how did I go? The process of making up the two components - the meringue part and the filling - was pretty straightforward and I was happy with that side of things. When it came to piping the macaron mixture onto the baking trays, I found it quite fiddly and I imagine that any self respecting pastry chef looking over my shoulder would have been mortified at my technique - but hey, these kits are pitched at home cooks like us, right? I did notice that the mixture was looking very smooth and glossy, which I knew was how it is meant to look at that point in the proceedings (that Masterchef episode with the Zumbo macaron tower challenge was all coming back to me!) Despite my clumsy piping technique, all was looking good.

    The moment of truth, and I took the first tray of macarons out of the oven. Most of them looked pretty good but a few had cracked a little here and there. I don't have the best oven in the world, so I suspect that this may have been the cause of the cracking on some of the macaron shells, as I really was careful to follow the instructions on the box exactly.

    Piping the filling and assembling the final product was fun (I think I perfected my piping technique by then and was more confident with it) and for the most part, I was reasonably happy with how the batch turned out - notwithstanding the odd crumbly macaron here and there.


    Salted Caramel Macarons
    the finished product

    Taste wise, the macarons were sweet and tasty with a decent salted caramel flavour - but I have to be honest here, they aren't in the same ballpark as the genuine Zumbo article from the patisserie. The filling they make in the shop is a lot deeper and richer in colour, with that slight touch of bitterness that a good salted caramel should have. The kit filling lacked that bitter/salty counterpoint to the sugar/meringue, resulting in the macarons being far too sweet for my taste.

    The Verdict
    The Zumbo Macaron Kit certainly makes whipping up a batch of macarons pretty easy, with all the equipment the home cook needs. The end result is a very sweet (perhaps over sweet for some)  macaron that you would be quite happy to serve. For me though, they lacked the perfect texture and extra salted caramel punch of the genuine article. I guess the real test is, would I buy the kit again? For me, the answer is no. I wasn't completely won over - maybe I'm too aware of how different they are to what Adriano sells in his shop and it was impossible not to compare. Overall I give the kit a score of 6.5/10.

    The kits are available from some supermarkets and from Adriano Zumbo stores. For more info, head to the website: http://adrianozumbo.com/


    ******


    Saturday, October 20, 2012

    Fruity Inspiration

    You guys are all aware by now that baking isn't really my bag. I will happily spend 3 days making a master stock, or painstakingly put together a 9 course degustation menu, but setting aside half an hour to make a cake just doesn't do it for me. Well, the Goddess of baking and sweet things must have aligned all the planets of something, because this week I had an idea for a cake recipe buzzing around in my head that just wouldn't go away. I took this as a sign from the universe that I should head to the kitchen and give this cake experiement a bit of a whirl.

    I don't eat cake really - but when I do, my sweet thing of choice is lemon syrup polenta cake. I love the texture that the polenta has, and the tang of the lemon. Yum. My recipe idea is a bit of a variation on that type of cake, using fresh lime and lashings of passionfruit. I decided to add some almond meal to the equation, as well as using olive oil instead of butter. The result is a beautifully textured but very moist crumb and a sticky, tangy, fresh tasting syrup.

    These cakes are lovely by themselves with a hot cuppa, but I think they would work really well as a do-ahead dessert. I'd serve them slightly warm with some clotted cream, creme anglaise or maybe some marscapone with some fresh lime rind folded into the mixture. You could also use those very small muffin tins and serve them as tiny sweet petit fours after dinner.


    Sticky Passionfruit and Lime Polenta Cakes


    As this was an experiment, it was all a bit free form. I used the quantities that I hoped would work, based roughly on the proportions I use when making normal muffins - and on the amount of almond meal and polenta I had in the pantry. Once I had that in mind as a starting point, I added some other ingredients and let my instincts take over. I was really happy with the result - the proportions worked a treat and I ended up with the texture I was hoping for. Dealing with the egg whites seperately really helped with this I think. I wasn't going to bother with the egg white thing, but it only took an extra two minutes and was worth it.

    These cakes were fast to make and only take about 20 minutes to cook, so they aren't too much of a stretch for someone like me who doesn't usually have the patience or inclination for cake baking. Hell, I whipped up these on a Saturday morning while I stacked the dishwasher and sipped my morning coffee! Very do-able indeed.

    You will need:
    For the cake - 4 free range eggs, 1/2 cup caster sugar, 1/2 cup almond meal, 1/2 cup fine polenta, 1/2 cup plain flour, 1 teaspoon baking powder, 2 tablespoons olive oil, Juice and rind of 1 fresh lime, Pulp from about 3 passionfruit.

    For the syrup - 1 cup caster sugar, Juice and rind of 1 fresh lime, Pulp of 2 passionfruit, 2 tablespoons water.

    Method:  First, make the cake. Preheat the oven to 180C. Grease your muffin tins if you are not using silicone tins like I did.

    Separate the eggs and put the yolks in one mixing bowl and the whites in another. With an electric beater, whip the egg whites until they form soft peaks. Set aside. (Hint - it is always better to beat egg whites in a metal bowl, or a ceramic one as a second choice. Plastic bowls tend to retain grease and oil, which is the enemy of fluffy egg whites!)

    Combine the half cup of caster sugar with the yolks and beat until the mixture is lighter in colour and increases slightly in volume.

    To the egg yolk mixture, add the almond meal, polenta, plain flour, baking powder, olive oil, lime juice and rind. With a spatula, combine all of the ingredients.

    Now gently fold a third of the egg white into the cake mixture. Put in the rest and fold in until combined. Don't be too heavy handed with the mixture.

    Spoon the mixture into the muffin tins, remembering that these cakes do not rise a whole lot, so you can fill them almost to the top.

    Bake at 1080C for 15-20 minutes. The cakes are cooked when they are slightly brown and the mixture springs bak a little when you touch the top of them.

    While the cakes are cooking, put together the syrup - just combine all of the syrup ingredients in a small saucepan and simmer gently for a few minutes until the sugar is dissolved completely and the syrup thickens slightly.

    When you remove the cakes from the oven, spoon over about half of the syrup while they are still warm. When you are finished, run a knife around the edges so that they don't stick to the pan. Spoon over the remaining syrup and allow the cakes to soak up the mixture.

    Serve warm or cold with cream, marscapone or icecream. Or scoff them without the extras.

    Makes 10-12 small cakes

    ******


    Thursday, June 14, 2012

    Baking Bliss

    This week has been rather exciting in the Gourmet Goddess kitchen, as we took delivery of a new fan forced oven to replace the evil, contankerous old beast that I have been cooking with since we moved into our house almost two years ago. I have to admit I was pretty happy to see the demise of the old one, which had a penchant for cremating the bottom of whatever you put in it, whilst leaving the top of everything unpalatably raw. I don't really bake much at the best of times, but the crappy oven really didn't make me want to change that situation!

    Well, I am very happy to report that the new oven is a whole other world - one where things cook as they are meant to and your pastry ends up golden and puffed (and cooked evenly!) just like it should. Hell, I may even be tempted to bake a cake - or Goddess forbid - a meringue! Watch this space.

    So, my first oven baking experiment was a couple of simple apple, almond and nashi pear tarts. The golden tarts are given a lovely sweetness and glossy finish by an easy maple syrup glaze.

    You could actually use any kind of fruit for these - apricots, peaches or nectarines when in season would be gorgeous - cherries, berries or quinces would work a treat too. I used apples and nashi pears because they happened to be in the fruit bowl at the time. Whatever fruit you decide to use,  the result is a delicious, easy to make tart that looks lovely too. This style of tart reminded me a lot of the apple galettes that you would always see in the patisseries around Paris. I confess I enjoyed a slice of mine with a nice big milky Cafe au Lait, and a generous serve of nostaligia -  imagining I was back, sitting in a cafe in St Germain on my honeymoon watching the world go by. Food is always so evocative of past memories and this one really did that for me.

    Maple Glazed Apple and Nashi Pear Tarts


    You will need: 2 sheets ready rolled puff pastry, 2-3 apples or nashi pears (I used some of both), 1 1/2 cups almond meal, 1 teaspoon vanilla extract, 2 tablespoons brown sugar, 2 tablespoons warm water, 30g melted salted butter, 1/3 cup maple syrup, 1 beaten egg.

    Method: Preheat the oven to 200C.

    Peel and core the apples/nashi pears, cut them in half and slice them thinly. In a bowl, combine the almond meal, vanilla, brown sugar, melted butter and warm water. Mix well to make an easily spreadable paste. Add a little more warm water if the mixture is a little too firm.

    Take the two sheets of pastry and cut them in half, lengthways. You should now have four lengths of pastry of equal size. Take two of the pastry sheets and cut a border into them, about 2 cm wide, removing the pastry in the middle. You will be left with two "frames"made of pastry.

    Brush the other two peices of whole pastry with a little of the egg. Carefully lay one of the "frames" onto each of the pastry peices. Press the edges down gently. Now evenly spread half of the almond mixture onto each of the tarts, smoothing it up to the edge of the border you have created.

    Take the sliced apple/nashi pears and carefully arrange the slices, so that they slightly overlap, until you have covered the tarts. Brush the edges of the pastry with a little bit of the egg wash.

    Bake the tarts for 15-20 minutes until they are lightly golden. Remove them from the oven and using half of the mixture, brush the top of the tarts with the maple syrup. Return to the oven for another 5-10 minutes until they turn a deeper golden colour.

    Remove the tarts from the oven, and while they are still warm, brush the remaining maple syrup over them.
    Serve warm or cold. Makes two medium sized tarts.

    ******

    Sunday, April 1, 2012

    Little Bites of Goodness

    We have been making a conscious effort in our household to eat a lot more healthily lately - which means cutting down on meat, fat and sugar and upping the vegetable content of everything. Today I am heading off to meet with our book club group (today's book for discussion - Joseph Conrad's tale of colonialism and man's dark nature -  "Heart of Darkness") Just because the subject we are discussing this afternoon is uber heavy, doesn't mean that the snacks for the afternoon have to be - so I made a batch of these delicious savoury muffin bites to take for the refreshment table.

    These little muffin bites are full of vegetables, as well as gorgeous sorrel from my garden (you can substitute baby spinach if you can't find sorrel) and very low fat cheese, so they are good for you, as well as being delicious. They are also quick and easy to throw together. They have a very moist, soft texture due to the vegetables and the cheese and do not resemble the more "cakey" style muffins.

    These muffins are also my first attempt to include Chia seeds in my cooking. Chia seeds contain an insane amount of anti-oxidants, fibre, protein and omega 3 oils -  as well as having lots of other health benefits - balancing blood sugar levels,helping to regulate blood pressure, having anti aging and anti inflammatory properties and providing a boost of energy without caffeine or drugs.

    So, these little bites of healthy goodness will provide a dose of good stuff, whilst not being bad for the waistline or the tastebuds either. They would be great in lunchboxes or as a healthy snack. You can of course bake large ones if you want to - the recipe below will make 6 muffins if you decide to do that. Otherwise, the amount below will bake 12 mini muffins.


    Vegetable and Chia Seed Muffin Bites


    You will need: 2 cups self raising flour, 1 tablespoon baking powder, 1/3 teaspoon cayenne pepper, 1 teaspoon salt, 1 egg, 1 cup low fat milk, 1/2 cup reduced fat grated cheese, 1 cup low fat cottage cheese, 1/2 cup chia seeds, 1 cup grated carrot, 1 cup grated zucchini, 1 leek sliced finely, 1 cup finely chopped sorrel or baby spinach, olive oil spray.


    Method: Preheat the oven to 200C. Spray a pan with a little oil and cook the leeks until soft. Set aside.

    In a large bowl, combine the flour, baking powder, cayenne pepper, salt, chia seed, grated cheese. Mix well.

    In a separate bowl, whisk together the egg, milk and cottage cheese.

    Add the grated carrot, zucchini, leek and sorrel/spinach to the dry mixture and combine gently. Now add the wet mixture and fold through with a spatula until just mixed.

    Spray a mini muffin tin with oil and spoon the mixture into the pan.

    Bake for 15-20 minutes until they start to turn golden on top. Remove from the oven and allow to cool before removing them from the pan.

    Makes about 12 small muffin bites.

    ******