Showing posts with label Onion. Show all posts

Sunday, June 1, 2014

First Day of Winter

Welcome to the first day of winter here in the southern hemisphere. We could be forgiven for thinking that it would never get here, given the unseasonably warm weather that we have been experiencing. Autumn barely made an appearance at all, and frankly I feel a little bit ripped off, given how much I love the cooler weather (actually, the colder the better as far as I'm concerned). Happily, we got some welcome rain overnight and  the day has been cool, with a steely grey winter sky - just gorgeous.

I headed out into the garden to check out how my winter veges are faring, and they were looking beautiful and healthy after a soaking of rain. The lettuce is ready to start harvesting this week, I picked the last of the tomatoes, the first baby carrots should be ready in another couple of weeks, as well as the spring onions. I plan to plant some beetroot and maybe a few other vegetables in the coming weeks. Always a good idea to plant a few vegetables at different times, so you have things to pick at various times during the winter. The herbs, such as parsley, lemon balm, chives, sage and bay leaves are all powering along. I used fresh bay and parsley from my garden in today's recipe.

I thought I would welcome Winter with the comfort food of comfort foods - slow cooked lamb shanks. They are the perfect dish to cook if you are having a lazy Sunday at home. Although the cooking time is long - about 3 hours - the preparation time is short, and there are minimal ingredients. It's set and forget cooking.

To make the dish more complex, you could always add vegetables such as carrots, parsnip and celery with the meat  - but I keep mine really simple, preferring to add fresh vegetables after the meat is cooked as side dishes. With a rich dish like this, I think it's good to have some fresh greens or other vegetables on the side to balance things out a bit and provide contrast to the richness. Because the cooking time is so long, if you put veges in the pot, they are going to break down completely anyway - and believe me, these lamb shanks already have buckets of flavour, so they don't need help in that department.

A dish like lamb shanks really benefits from being served with creamy potato mash or polenta to soak up all that delicious sauce - not to mention that buttery, falling off the bone tender meat. Enjoy this gorgeous welcome to Winter dish.
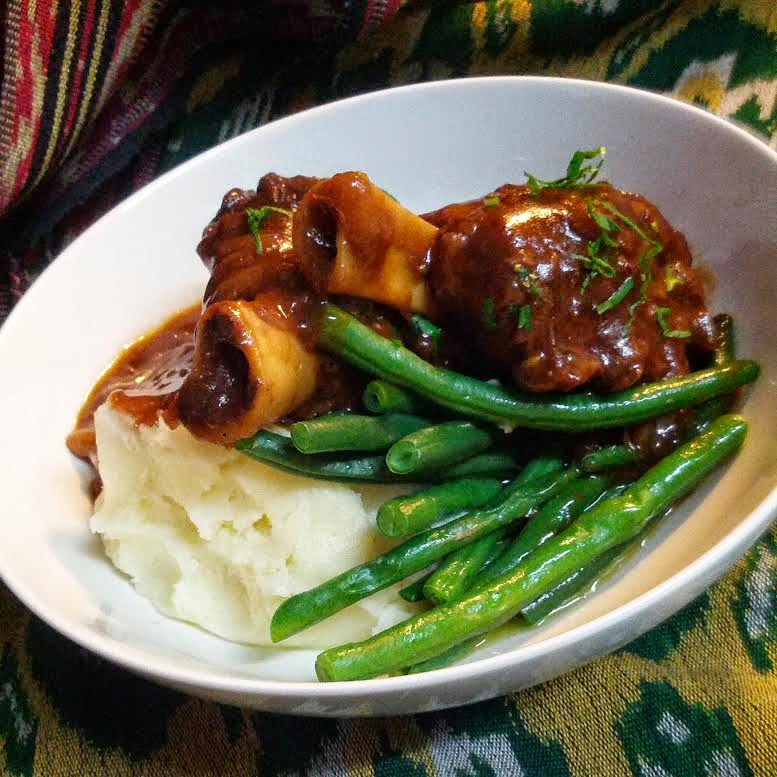

Slow Cooked Lamb Shanks

You will need: 
4 lamb shanks, 2 large sliced brown onions, 1 large sliced red onion, 2 cups beef stock, 2 tablespoons soy sauce, 1 tablespoon brown sugar, 1 tablespoon sweet paprika, 1 bay leaf, 2 tablespoons finely chopped parsley stalks, 2 tablespoons finely chopped parsley leaves, 1 tablespoon butter, 2 cloves finely chopped garlic, 2 tablespoons olive oil, 4 teaspoons cornflour, salt and pepper to taste.

For the seasoning mix:
2 tablespoons plain flour, 1 tablespoon sweet paprika, 1/2 teaspoon allspice, 1 teaspoon salt, pinch of cayenne pepper.

Method: Preheat the oven to 160C.

Combine all of the seasoning mix ingredients and set aside.

Heat the olive oil in a pan and while that is happening, coat the lamb shanks well in the seasoning mix. Add the shanks to the pan and cook until very well browned on all sides. Transfer the lamb to an ovenproof casserole dish.

Add the butter, and when this has melted, the onions and the bay leaf. Cook the onions on a medium heat until very soft. Add the parsley stalks, paprika, brown sugar and garlic. Cook and combine well for another 5 minutes. Add the onion mixture to the lamb.

Combine the stock and the soy, and pour over the lamb. Cover well with foil (I use 2 layers) - or a tight lid.
Cook the lamb covered for 2 hours.

After 2 hours, uncover the lamb, add half of the parsley leaves, stir well and cook uncovered for a further 30 minutes. Combine the cornflour with a little cold water until smooth. Remove the lamb from the oven and stir through the cornflour and water mixture quickly. Taste the sauce for seasoning and add salt and pepper as required. Return it to the oven for another half an hour. Finish off with fresh parsley to serve.

Note: Depending on the amount of fat in the individual lamb shanks, you may end up with a thin layer of oil on the top of the dish. I choose to get rid of this and use a big spoon to skim it off before serving.

Serves 4 people.


******


Thursday, April 3, 2014

Simply Delicious - Pea and Pancetta Linguine

Tonight's recipe ticks all the boxes for a fast, simple and delicious meal that you can knock up when you get home from work - but is nice enough to quite happily serve to guests as a great no drama dinner party dish. It uses very few ingredients, and doesn't require a lot of kitchen skill - but really delivers on taste.

We love this dish in our house and it is a real favourite. A simple combination of salty, punchy tasting Pancetta (salt cured and spiced pork belly) and the sweet peas are just gorgeous. I only use a small amount of Pancetta (200g) as it's richness is more than enough to carry through the pasta. The sauce is created by simply stirring the Pancetta, peas and Parmesan/egg mixture through the hot, freshly cooked pasta. Talk about low maintenance!

I made this whole dish tonight in well under 30 minutes. It is not a do ahead kind of thing - it needs to be cooked and served right away. So, gather everyone around the table, get the pasta pot boiling and enjoy this Gourmet Goddess favourite.

We are now in Autumn here in Australia, and it is my favorite time of the year. I love the cooler days, all the nature colours around us, and the lovely Autumn produce. Check out my "What's in Season" section to get some inspiration and to see what is at it's best right now. Even better, head out to your nearest farmers market if you have one close by, and check out what you can find - as well as top notch, seasonal produce, you also get the pleasure of dealing with the folks who actually grow the food.

Autumn is also the time I start to plant vegetables for harvesting in the winter. I've been a bit slack and have not been out in the garden to do this yet, or even actually decided on what I will plant this time around. I plan to get organised and make this all happen in the next couple of weeks. There is so much pleasure in growing your own food, regardless of whether you have a big kitchen garden - or like mine, just a collection of pots, hanging planters and odd bits and pieces in my little inner city patch of green.

Until next time - live and eat well!


Pea and Pancetta Linguine


You will need: 200g piece of Pancetta diced into cubes, 1 small finely chopped onion, 1 clove of garlic, 1 1/2 cups cooked peas, 4 eggs, 1/3 cup finely grated Parmesan cheese, 1 tablespoon olive oil, salt, pepper, 250g linguine (or spaghetti.)

Note: If you cannot buy Pancetta, you can substitute Speck, Prosciutto - or even good bacon.

Method: Heat the oil in a fry pan and add the onion. Cook for a few minutes until it starts to become translucent. Add the Pancetta and cook until the it begins to get crisp at the edges. Add the garlic and the peas, toss through for a couple of minutes. Turn off the heat and set aside.

Put a large pot of well salted water on the stove to boil. While that is happening, whisk together the eggs and Parmesan. Season generously with salt and pepper.

Once the water is boiling, add the pasta and cook until al dente. Working quickly, drain the pasta and return it to the original pot. Add the egg mixture and the peas and Pancetta and stir it all together thoroughly. As you stir, the egg will cook, creating a fine coating on the pasta. The heat of the pasta will do this, and you should not need to return it to the heat. It will take about 5 minutes.

Serve right away with cracked pepper and a little more Parmesan.
Makes 2 generous mains or 4 entree sized serves.

******


Sunday, October 27, 2013

Purple Power! Beetroot & Apple Relish

I LOVE beetroot. As well as the gorgeous earthy, sweet flavour I also love the amazing purple colour that looks so fantastic on a plate. This weekend I found myself with 2 bunches of beetroot in the fridge that I hadn't got around to cooking yet and that really needed to be put to use (they were also taking up heaps of crisper space!) so I thought that I would make my own beetroot relish. I happened to have a few really nice organic apples in the fruit bowl as well, so I thought I would put the two together with onions and some spices and see what I could come up with. It was all a bit of an experiment, but the result was so good that I thought I would share it with you all.

Unlike most relishes that are made completely on the stovetop, I did mine mainly in the oven. The reason for this, is that roasting the onions, apples and beetroot will give you a much richer, more complex flavour, as well as caramelising all of the natural sugars found in the ingredients. The resulting relish is quite thick, instead of the thinner, vinegar based relishes that you might be used to.


Mmmmm....Beets!


This relish is beautiful with grilled or roasted red meat, perfect for homemade hamburgers or to enjoy with all kinds of cheese - it is especially good with a sharp cheddar or a tangy, creamy goat cheese. You could also eat it with fresh carrots or radishes as a dip. The other great thing about this tasty purple concoction is that it makes a really excellent edible gift for food loving friends. Just fill up a jar with the relish (gives you a perfect chance to recycle any jars you have lying around in the cupboard) add a cool, homemade label and a gift tag and there you go - a delicious, inexpensive and handmade gift.


Beetroot and Apple Relish


As well as tasting great, you also have the added health bonus of beetroot being ridiculously good for you. It is a powerful antioxidant, choc full of potassium, magnesium, iron, folic acid, vitamin A,C and B6. It is great for lowering cholesterol, stabilises blood sugar and is excellent for fatigue. Lots of good reasons to eat it regularly. Beetroot is currently in season, so it is at it's best right now. What are you waiting for? Embrace purple power.


You will need: 8 large raw beetroot, 3 large red onions, 3 large apples, 4 cloves garlic, 2 tablespoons olive oil, 2 tablespoons balsamic vinegar, 2 heaped tablespoons brown sugar, 1 tablespoon sweet paprika, 1 tablespoon ground coriander, 2 teaspoons fennel seeds, salt, pepper.

Method: Chop the leafy tops off the beetroot and place the beets in a pot of plain water, ensuring they are covered. Bring them to the boil and allow them to simmer for about 20 minutes.

Drain off all the water and run the beets under cold water. When they are cool enough to touch, rub off the outside skin and stalks with your hands. Doing this in a bowl of cold water makes this process easier, and also stops your hands from getting too stained with beetroot juice. Chop each beet into 4-6 pieces. Put the beetroot aside.

Roughly chop the onions and the apples (you can leave the skin on the apples, but remove the cores) Peel the garlic cloves and cut them in half.

Preheat the oven to 200C

In a baking paper lined baking dish, combine the beets, onions and all of the other ingredients. Season generously with salt and pepper. Mix thoroughly (clean hands are best for this)

Bake the mixture in the oven for an hour, stirring it a couple of times during cooking. When done, allow the ingredients to cool.

In a food processor, blend the mixture into a consistency you are happy with. You could make it super smooth, almost like a sauce or a little more rustic, which is how I like it. If the relish is a little too stiff, simply add small amounts of warm water. Taste for seasoning and add salt and pepper if required.

Decant the relish into clean, well sealed jars or an airtight container. Store in the fridge and use within 4 weeks.


*******

Sunday, October 20, 2013

Sunday Brunch - Pumpkin & Feta Muffins

Morning everyone. I've been out in the garden bright and early this gorgeous Sunday morning tending to my tomato plants - which in time I hope are going to deliver crops of delicious, home grown tomatoes. I didn't have a lot of luck with them last year - they were sad and scraggy looking, and I lost some to a leaf spot thing that attacks the plants and makes the fruit drop. However this year I decided I would read up about tomato growing in my area, to educate myself on what will make happy plants and lots of fruit. I also decided on four very different varieties (two of them heirloom) as a bit of an experiment to see which ones like my backyard. So far they are all going beautifully, looking strong and healthy and already sporting plenty of flowers that will turn into fruit. This morning they got a good watering and a dose of potash, which they seem to love. Fingers crossed I will have some great tomatoes to show you and to eat very soon. The bees are also loving the new flowers, and anything that brings them into the garden is a good thing.

So, as I was out pottering in the garden, I was thinking about what to make for Sunday breakfast/brunch. I noticed that my herbs were looking particularly lush, so I decided whatever it was, it had to include a handful of fresh herbs. I always like to use what I have on hand, so I checked out the fridge to see what might give me some ideas for this morning's breakfast. Today's inspiration was - pumpkin, feta cheese and natural yoghurt. I decided to bake a batch of savoury muffins, full of the sweetness of pumpkin, the tang of the yoghurt and cheese and the freshness of herbs just picked from the garden.

As well as a great breakfast idea, these would also be ideal picnic food, or as an accompaniment for a bowl of soup or a salad anytime. These also freeze well, so it would be worth making a couple of batches and keeping some for whenever you fancy something savoury and delicious. As with most of my recipes, you can tailor make these muffins to include whatever flavours you like, or what you have on hand - olives, spring onion, corn kernels, extra cooked vegetables or whatever herbs you have in the garden - the basic recipe will work regardless. These muffins are lovely and moist, as well as being packed with flavour. You can eat them warm or cold, with or without a little butter. Personally, I think they are delicious warm, without anything at all!


Pumpkin and Feta Muffins


You will need: 3 cups raw pumpkin cut into small cubes, 1 diced Spanish onion, Splash of olive oil, 2 cups self raising flour, 1/2 teaspoon salt, 1 tablespoon vegetable oil, 1/2 cup unsweetened natural yoghurt, 1/2 cup milk, 2 free range eggs, Pinch of cayenne pepper, 1/2 cup grated tasty cheese, 1/2 cup crumbled feta cheese, 1 tablespoon finely chopped fresh herbs (I used a combination of thyme, parsley and chives), 1 tablespoon poppy seeds, salt and pepper.

Method: Preheat the oven to 200C.

Combine the pumpkin, onion, a splash of olive oil and a very generous seasoning of salt and pepper. Mix together until well coated. Bake on a tray (I line mine with baking paper for easy clean up) for about 25-30 minutes until the pumpkin is soft. Set aside to cool.

In a bowl, combine the eggs, milk, yoghurt, cayenne and oil. Whisk together thoroughly.

In another large bowl, put the flour, both the cheeses, herbs and pumpkin/onion mixture. Season well with salt and pepper. Using your hands, very gently combine these ingredients - you don't want to smash up the soft components too much, but you want to ensure that they are evenly combined.

Add the wet mixture to the dry mixture until just combined. Remember the golden rule with muffins - don't over mix. The mixture should just barely hold together.

Spoon into a greased or oiled muffin pan and sprinkle with the poppy seeds.

Bake for 15-18 minutes. Allow to sit in the pan for a few minutes, before removing them and placing them on a wire rack to cool. Serve warm or cold.

Makes 12 regular sized muffins.


*******


Sunday, July 28, 2013

Show us your Mussels!

This week I managed to get my hands on some beautiful fresh "blue" mussels and was all set to cook them as I always do -  in a basic Nepolitana sauce with a little chilli, and a side serve of crusty bread - when I was reminded of the delicious Belgian style mussels that you find in many a Belgian Beer Café. Cooked simply in wine or cider, and served with frites (chips) and mayonnaise, they are delicious - and a change from the way I tend to cook my mussels.

My husband Andrew (aka Mr Smith) spent part of his childhood living in Belgium and was keen for me to recreate and serve up this dish that he ate as kid. A little research and I discovered that the ingredients were very simple and I was more than willing to give it a go. I even did a batch of frites and served them with some garlic mayo on the side to make the dish even more authentic. The result was a fragrant, tasty dish that was so quick and easy to prepare. It would be an ideal fast after work meal, or great to serve guests as a no hassle entrée or main course.

As with any produce, ensure that your mussels are super fresh - they should smell like the sea and not "fishy". To prepare them, scrub off any seaweed or dirt from the outside with cold water and de-beard them if necessary (pull out any tendrils of seaweed sticking out of the mussels) I used cider for my recipe, but many versions use white wine. I just happened to have cider in the house, so that's what went in. I also saw some versions of this dish that added a little cream to the sauce, to create a richer taste - feel free to add this if you want to.

I remember eating mussels cooked in this style many times in France, where they are also served with frites (French Fries). Despite the fact that they are known by this name over much of the world, the origin of the thinly cut fried potatoes that we call French Fries is actually Flemish, originating from Belgium. The earliest written account of people eating potatoes cooked in this style comes from the Meuese Valley, Belgium in 1680. They were eaten by fishermen and their families along with whole fried fish. So I guess you could say that fish and chips originated in Belgium too! Regardless of where they come from, they taste good and are the perfect accompaniment for a bowl of mussels.

This dish would be an ideal one to try if you are a bit unsure about cooking seafood, because it is very easy to do. The only thing you need to be aware of is to avoid overcooking the mussels. Once the shells have popped open, they are done and you are good to go. Mussels are a good choice if you aim to eat seafood in a sustainable way, and have the added bonus of being cheap and great for you.


Belgian Style Mussels
with Frites and Mayonnaise


You will need:
1-2kg fresh, cleaned mussels, 1 cup cider (I used a pear based cider, but apple is good too),1 white or brown onion finely chopped, 2 cloves garlic finely chopped, 1 tablespoon chopped parsley, 2 tablespoons olive oil, 1 tablespoon salted butter, salt & pepper.

Note: 1kg of mussels will serve two people as a main course or four people as an entrée.

Method: Heat the olive oil to a medium heat and cook the onion and garlic until soft and translucent.

Add the cider, a few pinches of salt and half of the parsley. Simmer for 5 minutes or so.

Add the butter and stir until well combined. Add the mussels and stir them so that they are all covered in the sauce.

Put the lid on the pot and allow the mussels to steam for 5 - 8 minutes, stirring gently now and then. The mussels are cooked when the shells open.

As soon as the shells are open, remove the pot from the heat (avoid overcooking, or your mussels will be tough). Season with some salt and a generous amount of freshly ground black pepper. Discard any mussels that do not open.

Serve in bowls with some of the sauce/pan juices spooned over the top. Sprinkle the rest of the parsley over the mussels and serve right away with crusty bread, or frites and mayonnaise.

*******


Saturday, April 6, 2013

Pork and Fennel Sausage Rolls

I love a homemade sausage roll. The flaky pastry, the moist, seasoned filling - pure comfort food that makes me think of childhood birthday parties and Mum making trays of them on the holidays. Look, I don't even mind a dodgy servo sausage roll either if truth be told! Whole different ball game of course, but who can resist meat in pastry? Sausage rolls are not a new invention and folks have loved their sausage rolls for hundreds of years.

The original ye olde sausage roll first appeared as a picnic food in the 1800's, was served hot and cold and at first did not contain any pastry. The filling was frequently comprised of cold roast veal and ham, or cold fowl and tongue minced and seasoned with dried herbs. The mixture was shaped and then breadcrumbed and fried - a little like that other well known picnic staple, the Scotch egg. Eventually, people started encasing the mixture in shortcrust pastry and eventually the puff pastry versions that we know today.

My recipe is based on one of my favourite combinations - pork and fennel, and inspired by the delicious sausage rolls they make at the fabulous Bourke Street Bakery in Sydney. Yes, it is a bit of a tarted up sausage roll, but the flavours are just delicious and they aren't difficult to make. I strongly suggest you make an extra batch , as they freeze brilliantly and are a great thing to have up your sleeve for a quick lunch or if guests drop by. Who doesn't love a homemade sausage roll?

My other suggestion is not to use pork mince that is super, super lean or has not even a touch of visible fat in it. Like any sausage, it needs a little fat for moisture and flavour. Using "diet" pork mince will result in a dry sausage roll - you have been warned. So what are you waiting for? Head to the kitchen and whip up a few trays of these beauties!


Pork and Fennel Sausage Rolls
 

You will need: 1kg free range pork mince. 1 bulb fennel diced finely, 1 large white onion diced finely, 1 tablespoon breadcrumbs, 2 cloves finely chopped garlic, 1 tablespoon finely chopped parsley, 2 teaspoons sweet paprika, 2 teaspoons yellow mustard seed, generous pinch of allspice, 1 teaspoon fennel seed chopped, pinch of cayenne pepper, 1 tablespoon olive oil, 1 lightly beaten free range egg, salt, ground, black pepper, 1 tablespoon poppy seeds. 3-4 sheets pre- rolled puff pastry.

Method: Preheat the oven to 220C.

In a pan, heat the olive oil and cook the fennel, fennel seed, garlic and onion down until soft. Season with a little salt and pepper as it cooks.

Combine the pork mince, breadcrumbs, parsley, paprika, mustard seed, allspice, cayenne pepper, and plenty of salt and pepper in a large bowl with the cooked onion and fennel mixture. Combine extremely well - clean hands are best for this.

Cut each of the sheets of pastry into two rectangular pieces. Brush one edge with some of the beaten egg. Lay the meat mixture in the middle of the pastry, ensuring it is densely packed (you don't want big air holes in the sausage roll as it cooks)

Roll up the sausage roll and press the pastry together well where the pastry joins - ideally, it should overlap a little to avoid splitting as it cooks. I use a fork for this. Place seam side down onto a lined baking tray or silicone baking sheet. Gently cut each roll into two, to make large sausage rolls, or into four to make party size roll.

Repeat with the rest of the pastry and pork mixture. Prick each sausage roll with a fork, brush with the beaten egg and sprinkle lightly with the poppy seeds.

Bake until the pastry is puffed and golden brown - about 25 minutes.

NB: These sausage rolls freeze really well. Just ensure they are cold when you put them in the freezer and wrap well.


******


Sunday, March 24, 2013

Calamari Mediterranean Style

Sunday night dinner tonight was something so rustic, simple and super tasty that I'm not even going to worry about writing down the proper recipe! Our cooler Autumn weather has receded a little here in Sydney and it was actually quite hot today, so I felt like something that would suit the weather - and the fact that my stove is out of action at the moment. To me, warm weather says seafood and BBQ, so we headed to the fishmonger this afternoon and picked up some lovely whole local calamari.

I cleaned the calamari, removing and reserving the tentacles (my favourite bit!) and keeping them whole. I then scored the calamari down the side - cutting almost to the edge so that they looked like tiger stripes. This creates rings, however not cutting them right through keeps the calamari in one piece, making them easier to handle on the BBQ. I drizzled them with some good quality extra virgin olive oil, plenty of sea salt and pepper and then cooked them on a super hot (smoking actually) BBQ. They took only a couple of minutes to become golden and charred, just the way I like them.


Grilled Calamari Mediterranean Style


I accompanied the calamari with some gorgeous organic cherry tomatoes, capers, finely chopped cucumber and onion, olives, chilli, red capsicum, fresh basil and continental parsley from the garden, a splash of olive oil, a drizzle of balsamic and a little salt and pepper - all of this was tossed together to make a rustic salsa.

Then, it was just a case of piling the salad onto the plate, laying the calamari on the top, drizzling over a little touch of extra olive oil and presto! Sunday night dinner. All of this was done in the time it would take to microwave a TV dinner. I know which option I'd prefer!!

As I mentioned, my oven is not working at present, so I predict lots of BBQ action this week until it is fixed/replaced. I had vague notions of attempting some Easter themed baking -  however this is going to depend on the fate of the oven. I even bought some groovy, rather kitsch Easter cupcake patty-pans to use in my baking dammit! Still, we may be up and cooking up a storm again in a day or two. In the meantime, have a great week everyone. Hope you get to eat something delicious!


*******


Thursday, March 21, 2013

Warm Carrot Salad with Goat Cheese

So I came home from work last night and was about to throw together a quick rather bog-standard salad to have with some grilled meat for dinner, when I decided that I actually wanted something a lot more tasty and a bit more interesting. I checked the fridge and found I had a couple of bunches of heirloom carrots - one orange bunch and one gorgeous purple bunch. They became the inspiration for a side dish that was so delicious I'd thought I'd share it with you.

This dish is super easy and would also work as a vegetarian starter or main course, as well as a side dish. In addition to the lovely carrots, I used sweet red onions, a bunch of asparagus, fresh continental parsley from the garden, creamy, tangy goat cheese, a little olive oil, balsamic, black pepper and sea salt - and that's about it. Very simple, but full of flavour.

As well as having a great flavour and nice contrasting textures, I loved how colourful the dish looked on the plate. If you haven't seen the purple carrots at your greengrocer, ask for them. They used to be a bit hard to find but are becoming a lot more common now. They look great and taste beautiful, especially when roasted.

I enjoyed this salad so much that I will definitely be making it again. Here at Gourmet Goddess we say - down with boring side salads! Three cheers for finding new and delish ways to eat your vegies!


Roasted Carrot Salad with Goat's Cheese


You will need: 2 large orange carrots, 2 large purple carrots, 1 large red onion, 1 bunch asparagus, 50g goat cheese, 1 tablespoon chopped fresh parsley, about 1 tablespoon olive oil, sea salt, pepper, 1/2 tablespoon balsamic vinegar.

Method: First, prepare the vegetables. Cut the carrots into thick juliennes. Cut the woody ends off the asparagus and then cut each asparagus spear in half. Cut the onion into eight largish chunks.

Preheat the oven to 200C. Line a tray with baking paper and place the carrots and onion on the tray. Brush or spray with olive oil, season well with salt and pepper. Bake in the oven for around 20 minutes, turning over the vegetables once during cooking.

In a grill pan or fry pan, cook the asparagus with a little olive oil, and some salt at a high heat for a few minutes until they start to char.

Allow the vegetables to cool a little before assembling the salad. Layer the vegetables and crumbled goat cheese on a serving plate. Drizzle over olive oil, balsamic and season with a little salt nad black pepper.

Sprinkle over the fresh parsley and serve.


******

Wednesday, February 13, 2013

Cauliflower and Speck Tart

So the weekend is approaching and you want something home baked that tastes luxurious, can be eaten for brunch, lunch or dinner and isn't too much of a drama to put together. Look no further than today's dish - a delicious creamy cauliflower and speck tart. The tart is richer tasting than a plain old quiche, with gorgeous Gruyere cheese, white cauliflower and the delicious salty/savoury character of the speck making it super flavoursome. It has a creamy, melting texture that will make it hard to stop at just one slice.

A hint about cooking the tart - don't be tempted to overcook it - you want it to be in the oven until the egg/cream mixture has just set. This ensures that it retains a lovely creamy texture. You can eat it warm or cold, but warm is my preference. The flavours seem to really come alive and you get to enjoy that rich, creamy texture at it's best.

I have chosen speck for this recipe as I love having that lovely smokey, salty hit that those small cubes of speck give you - but if you can't get it where you are (most delis should have it) you could substitute plain bacon - although the flavour will be a lot milder.

You could easily make smaller individual tarts if you wanted to - the ingredients below will make 4-6 small tarts or one large one.


Straight out of the oven


Cauliflower and Speck Tart
 
 
You will need: 1 large sheet shortcrust pastry, 1/2 cooked cauliflower cut into florets, 1 teaspoon olive oil, 1 clove finely chopped garlic, 1 large brown onion finely chopped, 250g speck cut into small cubes, 6 free range eggs, 1 cup cream, 1/2 cup grated Gruyere cheese, 1/2 cup grated tasty cheese, salt & pepper, pinch cayenne pepper, 2 pinches freshly grated nutmeg, 1 tablespoon finely chopped fresh chives.
 
Method: Preheat the oven to 200C. Line a large quiche or tart tin with baking paper. Press the pastry into the quiche tin. Lay another sheet of baking paper over the top. Fill with baking beads if you have them – if not, you can use dry beans or rice. Blind bake the pastry for about 10-15 minutes. Remove the baking beads and the paper and allow to cool.
 
Heat a pan and add the olive oil, onion, garlic and speck. Cook on a medium heat for about 10 minutes until the onion is transparent and the speck has browned a little. Season with a little salt and pepper. Spoon the mixture evenly into the pastry case. Arrange the florets of cooked cauliflower evenly on top of the speck mixture.
 
In a bowl, whisk together the eggs, cream, cayenne, nutmeg, salt, pepper and about 2/3 of the cheese. Pour the mixture into the pastry case. Top with the remaining cheese and sprinkle with the fresh chives.
 
Bake at 200C for 35-40 minutes or until the egg mixture is just set. Remove from the oven and allow to cool a little before cutting into slices.
 
******


Saturday, February 2, 2013

Chinese New Year Flavour

Chinese New Year is fast approaching and on 10th February we will be welcoming the arrival of  the 2013 year of the Water Snake. For some reason, I always get inspired by the new energy that the Lunar New Year brings so I thought it was the perfect time to cook something with a Chinese flavour in keeping with this celebration. Peking duck pancakes have always been a big favourite and my lovely husband Andrew has been asking lately if I could have a go at making them at home. Well, this week I got my act together and finally got around to it, creating my own version of this classic and very popular dish.

There is a real art to true, super shellac like, glossy and parchment crisp Peking duck that is pretty tricky to reproduce in a home kitchen. We are lucky enough to live in a neighbourhood where buying Peking duck fresh from the Chinese BBQ store is easy, so realistically just buying the duck and making the pancakes myself would be a viable shortcut. However, I decided that I would aim for a recipe that would give all the delights of Peking duck whilst being easy to put together for the home cook - and for those who don't have the luxury of having a Chinese BBQ outlet around the corner!

For any Peking duck experts reading this, I don't pretend that this is 100% authentic (the duck does not go through the usual drying processes)  but the result is a delicious try-and-stop-at-one pancake, with the gorgeous flavour of the traditional version.

So, why not celebrate Chinese New Year with a batch of these delicious treats? I warn you though that they are very moreish - best make a double batch!


Crispy Glazed Duck Pancakes
with cucumber, onion and hoisin sauce


You will need: 2 duck breasts skin on, 1 small continental cucumber, 4 spring onions, 1 cup Hoisin sauce, 1 tablespoon honey, 1 teaspoon minced garlic, 1 teaspoon minced chilli, 2 teaspoons sesame oil, salt.

For the pancakes: 1/2 cup plain flour, 3 tablespoons cornflour, 1/4 cup water, 1/4 cup milk, 2 eggs, 1 tablespoon melted butter, pinch of salt.

Method:  First, make the pancake batter. Combine the flour, cornflour, water, milk, eggs, salt and butter and blend until super smooth. (I used a stick blender to do this) Pour into a jug, cover and stand for 15 minutes.
 
Now make the duck glaze by combining the honey, garlic, chilli, sesame oil and salt. Set aside.
 
De-seed the cucumber and cut into fairly thin strips. Do the same with the spring onion. Refrigerate until you are ready to serve.
 
Preheat the oven to 200C. Dry the duck breasts with a paper towel. Season the duck breasts with a little salt on both sides. Heat a non stick fry pan to a medium heat and cook the duck skin down for 6-8 minutes, draining off the fat as it renders down. When the duck is a deep golden colour, turn it over and cook it skin side up for about 3 minutes.
 
Transfer the duck to a baking tray and cook in the oven for 8-10 minutes (timing will depend on the size of the duck breasts) Remove the duck from the oven and brush both sides with half the glaze mixture. Return the duck to the oven for another 10 minutes.
 
Remove the duck from the oven, brush with the rest of the glaze mixture and allow to rest for 10 minutes.
 
Now, make the pancakes. Heat a non-stick frying pan over medium heat. Brush with a little extra butter if you wish. Pour a tablespoonful of batter into frying pan. Spread to form a thin pancake, about the size of the palm of your hand. Cook for 2 minutes. Turn and cook for a further 1 minute. Transfer to a plate. Repeat with remaining batter. The pancakes should be pale and not browned. Turn the heat down if they colour up too much.
 
Slice the duck into thin slices and serve with the pancakes, spring onion and cucumber, with the Hoisin sauce on the side. Serve right away.
 
Makes about 15 small pancakes.
 
******


Thursday, January 24, 2013

Zucchini and Haloumi Fritters

Ok, tonight it's something fast, simple and vegetarian with a Greek flavour. These haloumi and zucchini fritters make a lovely light lunch or a nice side dish for grilled or BBQ'd meat or seafood. I served mine with some simply marinated lamb cutlets, drizzled with olive oil, lemon and plenty of pepper. There were plenty left over for a fresh tasting lunch the next day. I was thinking that these would also be really nice finger foods - just make them bite sized instead of the meal sized ones pictured here.

I love salty flavours and gorgeous Cypriot haloumi cheese really gives you that - so much so that you should be really careful not to add any extra salt to your mixture, or the dish will be overwhelmed. The fritters will be salty already because of the very strong haloumi and have a lovely aroma and taste, from the spring onion, garlic, fresh parsley and mint added to the batter.

You can whip a batch of these in no time, so what are you waiting for?


Zucchini and Haloumi Fritters
with Garlic Yoghurt

You will need: 
For the fritters: 2 medium zucchini, 250g (1 small packet) Haloumi cheese, 2 teaspoons finely chopped mint, 2 tablespoons chopped continental parsley, 1/2 cup finely chopped spring onion, 2 eggs, 2 heaped tablespoons plain flour, 1 clove minced or very finely chopped garlic, 2 pinches cayenne pepper, olive oil for frying.

For the sauce: 1 cup continental style thick plain yoghurt, 2 teaspoons finely minced or pureed garlic, pinch of salt, pepper to taste.


Method:
First, make the sauce - simply combine all the sauce ingredients, cover and refrigerate until ready to serve.

Grate the zucchini, place in a bowl and allow to sit for 5 minutes. Squeeze out as much of the moisture as you can. Grate the haloumi.

Combine the haloumi, zucchini, mint, parsley, spring onion,eggs, flour, garlic and cayenne and mix well. Heat a non stick fry pan with a little olive oil and cook the mixture a tablespoon at a time for about 5 minutes each side. Use a spoon to gently shape the patties. The mixture will be quite soft - this is normal, and the fritters will firm up a little as they cook and then again as they cool.

Drain on paper towels. Serve warm or cold with the garlic yoghurt. Makes about a dozen medium sized fritters.

******


Tuesday, December 4, 2012

Summer on a Plate

Today's dish was inspired by some of the delicious green Summer vegetables that have just come in to season and are really fabulous right now - asparagus, green beans, peas and zucchini. This salad would work plated up individually as a light entree or lunch - or on a generous sharing platter as a change from your usual repertoire of Summer salads, to go with grilled meat or seafood. It would also be a beautiful vegetarian option for a BBQ or the Christmas dinner table. It is really easy to put together and tastes as good as it looks.

This salad has a great balance of flavours and textures - the crisp, light texture of the vegetables, the rich creaminess of the goat cheese, the tang of the simple chive vinaigrette dressing and the delightful freshness of the mint. Just perfect for a Summer menu.

I really adore Chevre (soft, creamy style goat cheese) but if you wanted to use the firmer aged goat cheese this would work just as well. I do think though that the younger, creamier style has a freshness that works particularly well with the lightness of the vegetables and the aromatics of the mint leaves. Of course if you detest goat cheese, feta would be a fine substitute.

We are heading to the South Coast for Christmas this year and this salad will definitely be on the menu while we are away. The vegetables will be easy to cook on the BBQ and it will be perfect as a light lunch by itself, or as an accompaniment to some fresh local seafood or a char grilled piece of lamb. It would also be great as a topping on some thickly cut, rustic sourdough toast.

I love the transition of the seasons when all the new produce starts to appear - out with the old and in with the new. It's easy to get in a bit of a rut - cooking the same stuff, but these new season ingredients always inspire me to try something new. To see what else is in season right now, check out the list on the right hand side of this page and get some inspiration too. In the meantime, here is my "Summer on a plate" salad to get you going.


Asparagus, Zucchini and Green Bean Salad
With Mint and Goat's Cheese


You will need:
For the salad - 1 bunch asparagus, 1 finely sliced spring onion, 2 smallish green zucchini, a generous handful or two of green beans, 1 cup fresh or frozen peas, About 60g Chevre (goat cheese), a handful of fresh mint leaves, a splash of olive oil, salt and pepper.

For the dressing - 2 tablespoons good quality olive oil, 1 tablespoon Sherry Vinegar, 2 teaspoons honey,  2 teaspoons finely chopped chives, 1 clove minced or super finely cut garlic (I do mine on a Microplane), salt and pepper. 

Method: First, make the dressing. Simply combine all of the ingredients and whisk together thoroughly until all combined. Put aside while you prepare the salad.

Bring a pot of salted water to the boil and cook the beans for about a minute until they start to soften. Drain them and run them under cold water to stop the cooking process. Set aside.

Cook the peas until tender (I just do these in the microwave - quick and easy) Set aside to cool.

Cut the woody, hard ends off the asparagus and then chop the asparagus in half. Slice the zucchini in diagonal slices.

Heat a grill or fry pan and add a small splash of olive oil and cook the the zucchini and asparagus in batches, seasoning with salt and pepper as you go. They should just colour up a little and not be overcooked. You want them to retain a little firmness. Set aside.

Chop or crumble the goat cheese.

Assemble the asparagus, zucchini, onion, beans, mint and peas on a serving dish, then add the goat cheese. Drizzle over the dressing, top with a few extra mint leaves and serve.

******


Saturday, June 30, 2012

A Winter Salad - and a very food-centric week!

The past 7 days has been quite food focused here at Gourmet Goddess headquarters, and a real mixed bag. We began by doing something completely new - attending a themed "Six Degress of Preparation" dinner early in the week, indulged in some late night Hawker delights in Chinatown - one of our favourites -  and ended the week with the Good Food and Wine Show in Sydney on Friday.

When I came across the Six Degrees of Preparation people whilst checking out some other food related sites on the internet, I thought it sounded like a great idea - smallish 6 course dinners, built around one ingredient each time, showcasing that ingredient. I noticed that the next scheduled dinner was themed around one of my favourite ingredients - pomegranate. I thought it was really worth checking out, so bought our tickets and looked forward to seeing what it was all about.

The venue - Effendy Restaurant in Balmain - was really lovely, but sadly the food was a real letdown. It wasn't bad, just very average. I was expecting a real celebration of all things pomegranate, but the flavours were just not there. The creativity I had hoped for was missing and the presentation let it down badly too. Also, the servings were more "tastes", and we were both starving. Did I mention we were forced to wear name tags, so we could "mingle"? Awkward. Needless to say we made an early exit before dessert was served and headed to our absolute favourite late night food haunt in Chinatown - Mamak. Now those folks really know about flavour.

Mamak specialise in authentic roti and satay that tastes like it just came from a hawker stall in Singapore or Kuala Lumpur - and a real favourite of ours. Not only is it delicious, it is ridiculously cheap and of the best quality and freshness. There is a good reason they often have queues out the door! (alas, they take no reservations) You can find them at 15 Goulburn Street, Haymarket -  and praise the Goddess! On weekends, they stay open for supper until 2am. They also have a restuarant in Chatswood, which I haven't visited. To get more information on the joys of Mamak, head to their website: http://www.mamak.com.au/  Highly recommended, and well worth the hassle of trying to park in the city.

Friday saw us head to the annual Good Food and Wine Show. We always elect to take a day off and go first thing on the Friday to beat the massive crowds, as during the weekend it becomes completely chaotic - teeming with people and shopping carts and prams and squealing tots having tantrums and slow walkers and AAAGGHHH!!!! .....well, you get the picture! Bedlam. The show is worth a visit though and we always come away with a few goodies for our trouble - this time we brought home 4 great cheeses, all from the Hunter Valley (including a gorgeous aged goat's cheese I have used in today's recipe), duck breasts, a stash of beautiful Careme brand pastry, a selction of Beerenburg sauces, a couple of kilos of lovely crunchy "Jazz" apples, some organic muesli and snack bars and lots of samples of this and that.

I noticed that this year, a lot of my favouite stallholders were not there and big supermarket brands and all things Masterchef related seemed to dominate. A real shame, given that in my opinion,  the whole reason to go to these sorts of shows is to be exposed to new ingredients, suppliers, techniques and products. We did have a fun day regardless though - and lived on delicious cheese for the rest of the weekend! I did however keep a little aside.....

Which brings me to today's recipe - a gorgeous winter salad, bursting with colour, texture and layers of great winter flavours. I used a strong rich goat cheese - an aged chevre from Wyandra - and some baby beetroot as the inspiration for today's lunch. The beetroot is cooked twice with onions, creating a rich, sweet, caramelised taste that is a perfect companion for the goat cheese. I chose 2 different lettuces - red oak and spiky green endive, some smoky, crispy bacon, nutty chickpeas - and to top it off, a sweet/tangy dressing made with a base of delicious hazelnut oil and balsamic. This salad is substantial enough to serve as a main meal - toasted rustic bread would be a great addition. If you really aren't keen on goat cheese, feta cheese would be a good substitute.

Apart from the initial prep for the beetroot, it is quick to make and a real delight to eat - the perfect winter salad. Enjoy!


Winter Beetroot, Bacon and Chickpea Salad
with Aged Goat Cheese


You will need: A bunch of smallish sized beetroot, 2 cups cooked well drained chickpeas, 1 large red onion, about 4 cups of lettuce leaves (I used red oak and green endive), 50g goat cheese (I used an aged Chevre), 3 slices bacon, splash of olive oil, 2 teaspoons balsamic vinegar, salt and pepper.

For the dressing: 2 tablespoons hazelnut oil, 1 tablespoon balsamic vinegar, 1 tablespoon maple syrup, 1 or 2 tablespoons warm water, salt and pepper.

Method: First, take the beetroot and remove the stalks and the leaves. Place them in a pot of boiling water and allow them to simmer until tender - about 20 minutes. Rinse them under cold water and remove the skins - they will come away very easily.

 Preheat the oven to 220C. Cut the beetroot into quarters and place in a small overproof dish or baking tray. Peel and quarter the onion and add this to the dish, with a generous seasoning of salt and pepper, the balsamic and a splash of olive oil. Bake the beetroot and onion, stirring occasionally, for 40 minutes. Remove and allow to cool a little.

While the beetroot is cooling, roughly chop the bacon and pan fry until crispy.

Next, make the dressing - whisk all of the dressing ingredients together until well combined. Set aside.

To assemble the salad, arrange layers of lettuce, beetroot mixture, bacon and chickpeas onto the plates. Top with the goat's cheese (you can crumble it over the top if you are using young goat's cheese or slice it like I did if you are using an aged, richer variety) Drizzle over some of the dressing and serve right away.

Serves 2-4 people.

******

Sunday, June 10, 2012

Winter Sunshine

As most of you would be aware, each week the Gourmet Goddess kitchen receives a delivery of local, organic and chemical free produce from the fabulous folks at Food Connect in Sydney. One of the great things about this, apart from the first rate, ethical produce - is that they often include seasonal vegetables or fruit that are not terribly common on most dinner tables. This was one of those weeks. Amongst the cornucopia of seasonal produce was a stash of freshly dug Jerusalem artichokes - dirt still attached. At first glance I thought they were ginger roots, but I was thrilled when I realised that they were in fact the first Jerusalem artichoke crop of the winter.

Native to the eastern part of North America, also called sunroot or earth apple, the Jerusalem artichoke is in fact not an artichoke at all. It is actually a tuber vegetable related to the sunflower and does not resemble the well known green globe artichokes in any way, either in looks or in taste. So if you started reading this post and immediately thought - "Ick. I hate artichokes" - don't despair. These are artichokes in name only. Just to confuse things, they also have absolutely nothing to do with Jerusalem. So the name is not only 100% misleading, it is also geographically incorrect. On top of the identity crisis, they are also - let's be frank here -pretty damned ugly looking. Now that we have that out of the way, let's talk flavour. Nutty, slightly creamy and delicious, these gorgeous winter vegetables taste great roasted', fried into crispy chips or pureed with potatoes for a beautiful tasting mash. Because they are in season at the moment, now really is the time to enjoy them at their best.


Jerusalem Artichokes
- not an artichoke and not from Jerusalem.
Go figure.

Today, I decided to team them with fresh seasonal cauliflower and create a creamy winter soup. These flavours work in perfect harmony and make a change from the usual repertoire of winter soups. This soup is not only great served in a rustic style with a hunk of freshly baked bread, it is also perfect all dressed up, as part of a dinner party or degustation menu.

Cauliflower and Jerusalem Artichoke Soup


So, give these mis-named, not so pretty winter vegetables a try. They are absolutely delicious - however you choose to cook them -  and will become part of many a winter menu once you discover their inner beauty. It's cold outside - let this relative of the sunflower bring some winter sunshine in!

You will need: 2 large brown onions, 2 large peeled potatoes, 1/2 cauliflower, about 400g jerusalem artichokes, 3 cloves garlic, 6 cups chicken or vegetable stock, 1/2 cup milk (if you want something really sumptuous, use cream), 1 apple, 1/2 cup flaked almonds, 1 tablespoon olive oil, salt, pepper, pinch of cayenne pepper, parsley or chives and a drizzle of fruity olive oil to serve.

Method: Scrub the artichokes to clean any dirt off them - you do not need to peel them. Cut the cauliflower into florets. Roughly chop the onion, potato and artichokes into generous chunks. Roughly chop the garlic.

Heat the olive oil in a pot and add the onion. Cook it gently for about 5 minutes until it starts to soften. Add the garlic and the artichokes and cook for another 5 minutes or so. Add the potato and the cauliflower, season generously with salt and pepper, add the pinch of cayenne and allow to cook for another 5 minutes.

Add the chicken stock. Bring the mixture to the boil and allow to simmer for about 30 minutes, until the vegetables are very soft. Remove from the heat and blend the mixture until smooth with a hand blender or food processor. Add the milk (or cream) and taste for seasoning. Add salt and pepper as required.

When you are ready to serve, spoon the soup into bowls and top with a little of the parsley or chives. Drizzle with olive oil and serve with crusty bread.

Serves 4-6 people

******

Saturday, May 26, 2012

A Warm Welcome to Winter

With only a few days to go until the official start to winter, today I thought that I would share a delicious one pot comfort food dish that is packed with wintery flavour. The natural sweetness of pork is given a turbo boost, courtesy of a gorgeous caramelised fennel gravy and the addition of my favourite tipple at the moment, Monteith's Pear Cider. The cider gives sweetness, but also just the right amount acidity to the sauce. The pairing of cider and pork meat is not a new one, but this was my first time putting pear cider into a dish - usually I would use apple. I must admit, I really prefer the pear option and I think it will be my go-to cooking cider from now on.

When selecting cider, make sure that you buy one of a good quality - unfortunately a lot of them sold in bottle shops are made from nasty fruit concentrate, which I find cloying and unpleasant. I choose Monteith's because it is all pure crushed fresh fruit with no concentrate additive. If you can't find Monteith's, ask the bottle shop person to point you in the direction of a good quality alternative.

Although this recipe has a fennel component, don't be put off if you aren't a fan of fennel like I am. (I could happily eat it every day!) The fennel in this dish caramelises with the the onions to create a meltingly sweet gravy that is to die for. Because the dish is cooked for a long time, the aniseed flavour becomes very subtle and all you taste is soft, sweet goodness. To finish the sauce, I have added a little soft cream cheese (I used the low fat kind) I have found this a great, lighter alternative to cream, that still gives that wonderful richness. A touch of mustard and a little sweet honey adds warmth and depth to the dish.

Tonight I chose to serve this dish very simply with some roasted Dutch carrots and super fresh, seasonal green beans. It would also be great with mash or rice - or even a serve of golden polenta. Whatever you serve with it, this lovely pork dish will make you warmer than a leopard print snuggie on a chilly winter night. Snuggle up folks!


Slow cooked pork with pear cider
and braised fennel


You will need: 1 piece pork neck or scotch fillet - 1 to 1.5kg, 2 large chopped brown onions, 1 large chopped stalk celery, 1 large fennel bulb cut into generous pieces, 4 finely chopped cloves garlic, 2 cups rich chicken stock, splash of olive oil, pinch cayenne pepper, 1 tablespoon honey, 2 teaspoons wholegrain mustard, a few finely chopped fresh sage leaves, 1 x 375ml bottle pear cider (I used Monteith's crushed pear cider), 1 tablespoon soft cream cheese, 3 teaspoons cornflour mixed with enough water to make a loose paste, salt and pepper.

Method: Preheat the oven to 160C. Season the meat generously with salt.  In a large heavy dish with a lid that can go from stove top to oven, heat a splash of olive oil and brown the meat on all sides. Set aside.

Add the chopped onion and celery and cook for a few minutes, until it starts to soften. Add the fennel and the garlic and cook for another minute or two, seasoning well with salt and pepper. Add the honey, mustard, cayenne and sage. Mix well.

Add the the cider and then the stock and combine thoroughly. Cover and cook for 1 hour. After an hour, give the dish a stir through and baste the meat with the sauce, turning it over once. Allow the dish to cook for another 45 minutes.

After the second stage of cooking, remove the dish from the oven and add the soft cream cheese and the cornflour mixture. It will begin to thicken a little. Taste for seasoning and adjust if needed. Return it to the oven for another 10 minutes.

Remove the dish from the oven and allow it to rest for a few minutes, before slicing the pork into generous thick slices. Pour over the sauce and serve with seasonal vegetables.

Serves 4-6 people.

******


Sunday, April 22, 2012

Autumnal Inspiration

I just love this time of the year when you feel everything changing, as we  transition into winter. I am a cold weather person and I thrive in Autumn and Winter. The colder weather seems to spark my creativity a lot more and it is always a very productive time for me. This is particularly true of what I choose to cook and eat. With all of the summer produce disappearing and the cold weather ingredients beginning to be available, I am inspired with new possibilities when I visit the greengrocer.

This week I decided to roast some beef for our Saturday night dinner, but thought I would forget about the basic roasted vegetables and look at some seasonal flavours and accompaniments for it. To start with, I flavoured the beef with celery, paprika and juniper, giving the beef a lovely aroma and a delicious flavour and warmth. As always, I cooked the meat on the Weber, over the coals, but you can of course use a conventional oven if you want to.

We received a bunch of beetroot, organic carrots and some gorgeous kipfler potatoes in our fruit and vegetable box this week, so I used those as side dishes, along with some baked seasonal witlof. Witlof is also known as Belgian endive or chicory. Admittedly it is not going to be to everyone's taste, with it's bitter character, but I found that it worked really well with the sweetness of the beetroot that I baked with plenty of red onions, garlic, honey and balsamic.

The result was a delicious succulent roast with a real Autumn flavour. I made a jug of gravy with the resting juices from the beef and served this along with some horseradish on the side.

A note about the beef - as with all meat, you need to give it sufficient resting time to ensure maximum flavour and tenderness. I have found this to be particularly true of topside beef, which was what I used for this recipe. Don't be tempted to rush this step. There are two different schools of thought when it comes to whether or not you cover the meat with foil while it is resting. I have been reading a very funny Twitter exchange online recently between Anthony Bourdain and others about this subject - I strongly stand in Bourdain's camp and believe in not covering the meat. It continues to cook after you remove it from the heat anyway, so covering it with foil will just keep more heat in and therefore extend the cooking process even further. This means that meat that was cooked to perfection when you pulled it out of the oven can end up badly overcooked and as tough as old boots when you come to serve it. Those worried about the meat getting cold as it is resting need not be - as long as you put it somewhere relatively warm, it will be fine.

So everyone, check out your greengrocer or farmer's market, see what is coming in to season and give your cooking a transitional seasonal makeover. Also check out my continuously updated list of what is in season on the right hand side of this web page. Our Saturday night roast certainly took on an Autumnal twist as a result of some seasonal inspiration - what seasonal ingredients will you explore this week?


Juniper Roasted Beef
with Autumn vegetables
and caramelised balsamic beetroot


You will need: 1kg piece roasting beef (I used topside), 10 juniper berries, 2 teaspoons celery salt, 2 teaspoons sweet paprika, 1 tablespoon olive oil, 2 large carrots, 2 whole witlof, 6-8 kipfler potatoes, 4 whole beetroot, 1 large red onion, 3 cloves garlic, salt and pepper, 1 tablespoon grated mozzarella cheese, 1 tablespoon fresh parsley, 1 tablespoon honey, 1 tablespoon balsamic vinegar, a little extra olive oil.

Method: Preheat the oven to 220C. Place the whole beetroot in boiling water and allow to simmer for about 10 minutes. Drain and run them under cold water. Now remove the skins - they should come right off easily with your hands. Cut the beetroot into quarters. Slice the red onion into thick pieces and place in a small ovenproof dish with the beetroot. Roughly chop the garlic and add to the dish, along with the honey, balsamic, 1 tablespoon olive oil and plenty of salt and pepper. Bake the beetroot, turning a few times for around 30 minutes.

While the beetroot is cooking, prepare the meat. Crush the juniper berries and combine with the celery salt, paprika, pepper and a tablespoon of olive oil. Mix well and rub into the meat. Allow to infuse for at least 15 minutes. Bring the meat to room temperature before cooking it. Taking it right out of the fridge and straight into the oven/BBQ will result in tough, dry meat.

Place the meat into the preheated oven (or use the Weber like I did) and bake with the potatoes for 20-25 minutes (rare) 30 mins (medium) 40 minutes (Well done) Allow the meat to rest uncovered for 20 minutes before slicing and serving.

While the meat is cooking, cut the witlof into quarters and the carrots into long thick batons. Place in a shallow baking dish with salt, pepper and a drizzle of olive oil. Place in the oven and bake for 20 minutes. After 20 minutes, sprinkle the cheese over the witlof and return to the oven until the cheese is just melted.

Slice the beef into thick slices, assemble the dish and top with a little fresh parsley to serve.

Serves 2-4


******


Thursday, January 19, 2012

Rocking Mexican Vego

For today's post, I thought I would share a meal that we enjoyed a few days ago as part of our "No Meat Mondays". I was in the mood for something Mexican, so I created these vegetarian quesadillas with lovely caramelised pumpkin. They were really delicious and satisfied my craving for Mexican as well as the no meat brief. Although the pumpkin takes a while to roast, you could also cook it the day before when you have time, or for a shortcut, steam or boil it (although it will not have that wonderful caramelised flavour that baking will give you)

The quesadillas were very filling, especially when served alongside a big bowl of salsa (tomatoes, red peppers, cucumber, garlic, olive oil, fresh parsley and coriander, chilli and a squeeze of lemon) and a simple homemade guacamole. These would make a great vegetarian party dish - just cut the quesadillas into smaller pieces so they are easier to handle as finger food. Quesadillas lend themselves to so many different fillings, and lots of cheese combinations. The name quesadilla is actually derived from the Spanish word queso - meaning cheese.

Give these delicious vegetarian beauties a whirl. They are easy to do and taste fabulous. I will definitely be adding these to my rotation of vegetarian dishes! Grap some tortillas and get your Mexican on!


Pumpkin Quesadillas
served with salsa and guacamole


You will need: 8 pieces of bread “wraps” or tortillas, 1 cup grated mozzarella cheese, 1 cup grated cheddar cheese, ½ cup pitted, chopped black olives, about 500g uncooked pumpkin,1 red onion, 1 bunch fresh coriander, 1 tablespoon sweet paprika, salt and pepper, olive oil, lemon slices to serve.


Method: Peel and chop the pumpkin into pieces about 4cm square. Slice the onion into chunky pieces. Combine the onion and pumpkin with a drizzle of olive oil, paprika and a generous amount of salt and pepper.


Preheat the oven to 220C. Cook the pumpkin for about 40 minutes – or until soft. I actually like to overcook it a bit, as the caramelised edges give the pumpkin extra flavour.


Combine the two cheeses well and then roughly chop the coriander.


Lay four of the wraps/tortillas flat and sprinkle half of the cheese over the bases. Now divide the pumpkin mixture amongst the wraps, squashing and spreading out the pumpkin with a spoon, so it is evenly distributed.


Sprinkle over the coriander and olives, then the rest of the cheese. Season with salt and pepper and then add the remaining wraps/tortillas to the top, to make a sandwich.


Heat a frypan and oil it lightly. Cook your quesadillas on both sides until crisp on the outside and the cheese has melted. Be careful when turning them over so that they do not fall apart. You can keep the completed ones warm in the oven as you cook the rest if you like.


Cut the quesadilla’s into four and serve with lemon slices,salsa, guacamole or just a salad.


Serves 4 people

******

Tuesday, December 13, 2011

Glazed Quince Ham with Cherry Relish

Christmas is fast approaching and although there is usually lots to be done cooking and entertaining wise at this time of the year, this festive season I'm not lifting a finger. Because our household doesn't really celebrate Christmas (Summer Solstice for us!) Andrew and I have decided to pack our bags and spend the Christmas break by ourselves on the beautiful South Coast of NSW. We will be spending 7 glorious days by the sea at Bannister's Resort in Mollymook - which as luck would have it, also houses Rick Stein's famous seafood restaurant.

I have always admired Rick Stein's no nonsense approach to food and his love for seafood in particular. It is going to be a real treat to see what his restaurant has to offer while we are away. I have been keeping my eye on the menu online and it all looks great. We have also made a booking for dinner during our stay, so we get both the lunch and dinner experience. I will be sure to take notes and photos for a review on my return.

In the meantime, I thought that I would prepare a very simple Christmas style dish for those of you who are actually cooking Christmas lunch this year. It is incredibly simple and really delicious - a ham baked with a beautiful fragrant quince glaze and served with a lip smacking cherry relish. I used a very small ham for this, as I was only cooking for two - if you are using a big one, I would make double or triple the amount of glaze to be sure that you have enough. Same goes for the cherry relish. If you aren't a ham fan, you could just make the relish and it will go beautifully with turkey, chicken or roast pork.

The cherry relish uses dried cherries that have a lovely rich flavour. They are sometimes labelled "sour dried cherries". Any store or market that stocks dried fruit should have them. For those in Sydney, I bought mine at Addison Road Organic Market in Marrickville. The quince glaze uses quince jam that I buy from a middle eastern grocer. If you can't find this, a good substitute would be quince paste that has been warmed in the microwave. If you can't locate either, just use apricot jam.

A baked ham is a really fabulous stand by if you need something that is easy, looks great and can feed a lot of people easily. A beautifully glazed ham served with crusty rolls and a generous selection of condiments is a real crowd pleaser. Fabulous party food that frees up the host but is still generous and sustantial.


Ham with Quince Glaze
and Cherry Relish
 

You will need:
(for the ham) 1 small to medium sized ham, 2 tablespoons quince jam, 2 tablespoons brown sugar, 1 Tablespoon Dijon mustard, 1 tablespoon port, pinch of salt, pinch cayenne pepper, black pepper.

(for the cherry relish) 2 cups dried cherries, 2 large red onions, 1 tablespoon salted butter, 1 cup caster sugar, 1 cinnamon stick (or a couple of pieces of cinnamon bark), 1 tablespoon sherry, salt and pepper.

Method: Begin with making the relish - you may prefer to make this a day or two ahead if you want to. Soak the cherries in hot water for about half an hour. Drain them and set aside.

Chop the onions into thin slices. In a pan, melt the butter and cook the onions on a low to medium heat until they soften and are semi transparent. The aim is to cook them gently, so they become soft and sweet. Do not brown them.

Add the drained cherries and the cinnamon. Combine and cook for about 5 minutes. Add the sugar and season with salt and a generous amount of pepper. Allow to simmer, stirring often for about 10 minutes. The mixture will turn to the consistency of jam. Add the sherry and mix well. Keep stirring as it bubbles up and simmer for another few minutes.

Allow the relish to cool before removing the cinnamon and transferring to an airtight container or a small sterilised jar.

Now to the ham - preheat the oven to 200C.

Combine the quince jam, Dijon mustard, brown sugar, port, salt, pepper and cayenne in a small bowl with a teaspoon of warm water. Mix well.

If you are using a ham that has skin on it, gently peel the skin off and discard it. Cut a criss cross pattern into the exposed fat. (You may choose to do the traditional thing here and press a clove into the centre of each diamond shape)

If you are using a smaller, skinless and boneless ham like I did, all you have to do is make sure any string/packaging is removed and pat it dry with a paper towel.

Brush the ham all over with the glaze. Bake in the oven for 15 minutes. Re glaze every 10 minutes or so until it is golden and caramelised on the top and warmed completely through. Remember that ham is already cured, so you do not need to actually "cook" it as such. You just need to heat it. A large ham can take up to an hour to glaze and cook through - mine only took about 25 minutes as it was very small.

Allow the ham to rest for 10- 20 minutes before slicing and serving with cherry relish on the side. After the ham has been glazed, it is also great served cold.

******

Saturday, September 10, 2011

Spring Zing - Rainbow Trout

During the week we visited the fishmonger, with the intention of choosing some nice fillets of something or other to cook on the BBQ that night. Looking at all the different fish they had for sale, the one that really stood out were beautiful, glossy and super fresh rainbow trout. I couldn't go past how great they looked and decided to ditch the fillet idea and bought two of them, one for each of us to have whole. The fish were about 30cm long. They were scaled and cleaned by the fishmonger to make the prep work at home easy. Rainbow Trout has such delicious pink and flavoursome flesh, similar to Salmon and they are ideal for cooking on the BBQ.

Spring is well and truly in the air, so I also bought some new season potatoes and red radishes, and built my accompaniments around them. I wanted a dish that was simple and vibrant, so good fresh ingredients were important. I also added some green herbs, a touch of fennel and plenty of fresh lemon. Very zingy flavours and very spring!


Starting with fresh, in season ingredients


To prepare the fish, I just patted them dry inside and out, and the filled the cavity with sliced red onion, dill, lemon, garlic and fennel. I seasoned the inside with Kampot pepper (fabulous super aromatic black pepper that comes from Cambodia - if you don't have Kampot pepper, normal black pepper is fine) and a little sea salt. To ensure that the flavourings stayed put, I tied each of the fish up with cooking string. The fish were then brushed with olive oil, seasoned with salt and pepper and cooked on the BBQ with the lid on for about 25 minutes. I didn't turn the fish during the cooking process.


Preparing the trout for cooking


While the fish was cooking, I finely sliced cucumber, red onion and radishes and mixed them with a generous handful of parsley and a touch of fresh dill to make a simple, crunch salad. The dressing was simply a drizzle of fruity extra virgin olive oil, a squeeze of lemon and some salt and pepper to season. To finish the accompaniments, I just boiled a few baby Chat potatoes and then tossed them in a little butter and a sprinkling of the fresh dill to finish.


Rainbow Trout with fennel and lemon
served with a crisp radish salad and new potatoes


Once the fish were cooked, they were carefully removed from the BBQ, placed on a bed of the crisp radish salad and served with the potatoes and some extra fresh lemon. Delicious. You could also cook this dish in the oven if you don't have a BBQ with a lid - I would do it in a medium to hot oven for 20-30 minutes, depending on the size of the fish.

This dish was so simple to throw together and would be a great no fuss spring/summer entertaining idea. Keeping the fish whole really ramps up the flavour and it looks great on the plate - it also makes preparation hassle free. If you aren't familiar with Rainbow Trout, give them a go - they are pretty inexpensive and should be available from most fishmongers at the moment.

In Gourmet Goddess gardening news, I have just planted a whole lot of tomatoes and peppers (the long "bullhorn" kind) that I hope will thrive over the coming months so that we can eat them in the summer. There are also new herbs - two kinds of basil (green basil and the vibrant opal basil, with bright purple leaves) thyme, continental parsley, mint. I have spinach and beetroot (the last of the current harvest which I will pick very soon) as well as carrots, lettuce and lemongrass. In the last week, the nasturtiums have gone crazy - I think I will have plenty to use in salads over spring. The garden is also starting to show colour - masses of pansies in purple and crimson and yellow and the jasmine that I planted a year ago is flowering too. I plan to add a few more spring plants and herbs over the next few weeks. I'm looking forward to plenty of time in the garden to enjoy it all as the plants all wake up from winter hiberbnation.

******